The Art and Craft of Coffee (19 page)
Read The Art and Craft of Coffee Online
Authors: Kevin Sinnott

Three-piece vacuum maker, consisting of upper bowl, bottom bowl, and filter
Fresh water, 8 ounces (240 ml) for every 2 tablespoons (10 g) whole bean coffee
Digital scale
Fresh whole bean coffee, 2 tablespoons (10 g) whole bean per 8 ounces (240 ml) water
Grinder set to fine
Stovetop or heating element
Spoon
Kitchen timer or clock
Heat-safe gloves
Expert Notes on Vacuum Brewing
Here are some tips for vacuum brewing
< The glass vacuum brewer has a lot going for it. It is beautiful to watch, does a thorough job extracting oils from the grounds, and delivers just about as hot a cup of coffee as possible. It just might become a favorite brewer, if you’re willing to take the time and attention.
Instructions
1. Fill the lower bowl with carefully measured cold water. For this method, use 8 ounces (240 ml) of water per 2 tablespoons (10 g) of finely ground coffee to make up for water lost during brewing.
2. Measure out whole bean or ground coffee. If using whole bean, grind coarse.
3. Insert the filter into the upper bowl
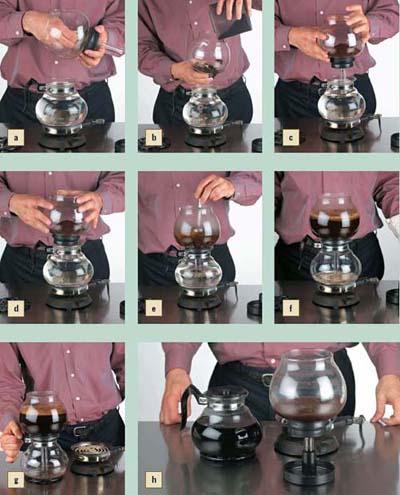
(a)
. Any type of vacuum filters (glass, ceramic, or metal) will produce a high-quality brew.
4. Add approximately 2 tablespoons (10 g) finely ground coffee per 8 ounces (240 ml) of water
(b)
.
5. Place the lower bowl on the heat source on medium heat. Let the water come to a boil and then place the upper bowl snugly inside the lower bowl
(c, d)
. Steam should develop in the lower bowl, which then forces water to rise through the tube and filter into the upper bowl, where it mixes with the coffee. Keep a spoon nearby to gently stir the grounds and facilitate mixing
(e)
.
6. When most of the water has risen into the upper bowl, start a timer. A small amount of boiling water should remain in the lower bowl
(f)
.
7. Lower the heat just enough to keep the lower bowl water boiling.
8. After 1 minute, remove the entire brewer from the heat source, ideally using heat-safe gloves
(g)
. Place the brewer on a trivet or heat-resistant surface. The sudden temperature drop in the lower bowl should start the vacuum process, during which the freshly brewed coffee is drawn down through the filter tube and into the lower bowl.
9. Once most of the coffee has returned to the lower bowl, listen for a gentle bubbling. This indicates that the vacuum has drawn every bit of coffee flavor from the grounds. (Examining the spent grounds should reveal that they are almost dry.)
10. Carefully separate the two bowls. Some vacuum brewers come with a cooling stand
(h)
. If yours does not, lay the upper bowl on its side in the sink until you are ready to clean it.
11. Stir the coffee in the lower bowl and serve.
Vacuum Brewer Tutorial

Percolator
A percolator consists of a water boiling vessel and a tubed, inserted filtering device that holds ground coffee. In this method, boiling water rises up through the tube and sprays over the grounds. The water travels down through the grounds and through a bottom screen where it lands back in the boiling vessel. It is boiled again and travels the same path. This repeats for six to eight minutes or until your desired strength is reached. Many coffee aficionados “accept” only the first boil, because all succeeding contact boils the coffee. However, a manual percolator operated with a gentle boil can produce strong coffee with minimal bitterness. Note, electric models may or may not reduce heat during brewing. Models that do not reduce heat will cause more bitterness.
Materials
Percolator
Fresh water, 6 ounces (180 ml) for every 2 tablespoons (10 g) whole bean coffee
Digital scale
Fresh whole bean coffee, 2 tablespoons (10 g) whole bean per 6 ounces (180 ml) water
Grinder set to course
Stovetop or electric outlet
Timer
< The percolator is accused of violating the number one rule of brewing in that it boils the coffee during brewing. Using a low flame (on a gas range) and a manual percolator, it is possible to achieve a low boil, with deliciously strong results
Expert Notes on Percolator
Here are some tips on using a percolator:
• Use the lowest possible heat setting once the water boils to a simmer to reduce bitterness.
• Stop heating at eight minutes, otherwise you may accentuate bitterness. Remember, the coffee will continue heating after you turn off your heat source. A little goes a long way.
• Try light roasted coffees for percolators. Low-acidity coffees such as Brazilian and Sumatran varieties take advantage of the percolator’s high-extraction temperatures. Higher-acidity coffees brewed in percolators can end up tasting too sharp.
Instructions
1. Disassemble the percolator.
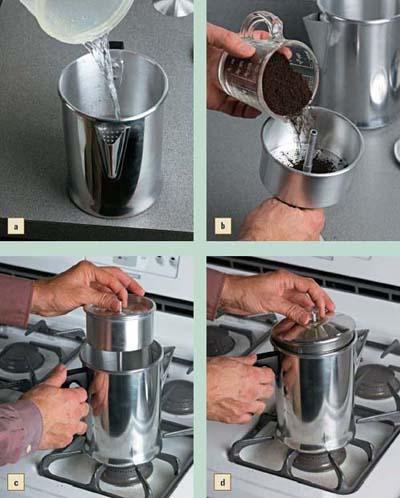
2. Fill the water boiling vessel with the appropriate volume of water
(a). Do not fill above the bottom of the inserted filter.
3. Measure out whole bean or ground coffee. If using whole bean, grind coarse.
4. Remove the top grate of the filter and add to the filter basket approximately 2 tablespoons (10 g) coarse ground coffee per 6 ounces (180 ml) water
(b)
. Replace the top grate
(c)
.
5. Place the percolator on medium heat or plug in electric model. Set a timer for 6 to 8 minutes.
6. When the water starts boiling (perking), lower the heat to just enough to maintain simmer.
7. Start the timer. Now the machine takes over. The boiling water rises up through the tube, sprays the grounds, and drips through the grinds back into the boiling vessel. This process repeats for approximately 8 minutes.
8. After 6 to 8 minutes (depending on your desired taste), remove the percolator from your heat source
(d)
.
9. Keep it warm on very low heat. Serve the coffee immediately.
Percolator Tutorial

Ibrik/Turkish/Greek Method
The ibrik method, also called Turkish or Greek, consists of tossing pulverized coffee grounds into a vessel with water. The water is boiled with the grounds multiple times. There is no filter. The grounds settle, so carefully pouring the coffee is the only way to reduce the amount that ends up in cups. Some in the coffee industry consider the careful pouring part of ibrik coffee making an art form. To some, ibrik represents coffee brewing at its oldest and most basic form.
Traditionally, ibrik coffee is served sugarless at funerals or unhappy occasions and with extra sugar at weddings and other festivities. Also, in some Arabic countries, serving someone the coffee without any foam signifies “losing face” because the foam is considered the coffee’s face. Be careful. If you don’t divide the foam equally, you could send the wrong message.
Materials
Ibrik coffee maker (copper)
Fresh water, 3 ounces (90 ml) for every 2 tablespoons (10 g) whole bean coffee
Digital scale
Fresh dark roasted whole bean coffee, 2 tablespoons (10 g) ground superfine
Mortar and pestle “grinder” or a true ibrik grinder (which looks like a pepper mill)
Sugar
Stovetop or other heat source
1-to 3-ounce (30 to 90 ml) demitasse cups
Spoon
< Ibrik coffee is considered real coffee by much of the world. Properly made, it can be a powerful, aromatic taste sensation. Part of its art is in its creation, and its rituals are as rich as its taste.
Expert Notes on Ibrik
Here are some tips for ibrik brewing
• To minimize the grounds in a cup, don’t constantly stir; a little stirring goes a long way.
• Pour ibrik coffee very slowly, as most of the grounds will have sunk to the bottom. The ibrik coffee pot automatically hangs at a forty-five degree angle. Try pouring at that angle as well.
• Add a pinch of cardamom for flavoring. This is perhaps the earliest known form of flavored coffee. Also try orange-blossom water. Add more or less to your preference.
Instructions
1. Place 3 ounces (90 ml) of water into the ibrik
(a)
.
2. Add 2 tablespoons (10 g) of powder ground coffee
(b)
.
3. Add 1 tablespoon (12 g) of sugar per demitasse
(c)
. Never fill an ibrik more than half full. It will foam up during boiling and could overflow.
4. Put the ibrik on medium heat and bring mixture to a boil
(d)
. Once it boils, lower the heat so it won’t overflow. Also, gentle heat produces a milder cup. Let it sit for 1 or 2 minutes.

