The Cook's Illustrated Cookbook (147 page)
Read The Cook's Illustrated Cookbook Online
Authors: The Editors at America's Test Kitchen
Tags: #Cooking

![]() WHY THIS RECIPE WORKS
WHY THIS RECIPE WORKS
Tandoori chicken is a dish that calls for a 24-hour marinade and a 900-degree oven. We wanted to turn this Indian classic into an easy weeknight dinner we could make indoors. We skipped the long marinade in favor of a two-step approach to flavoring the chicken. First we rubbed a salt-spice mixture into the chicken pieces and left them to sit for half an hour; we then dipped the pieces in a spice-flavored yogurt mixture. After several tests, we realized that attempting to mimic the extreme heat of a tandoor oven simply wouldn’t work in a home kitchen—cranking up the oven temperature only resulted in dry, charred meat. Instead, we started the chicken in a moderate 325-degree oven, then finished it under the broiler to crisp the exterior.
SERVES 4
We prefer this dish with whole-milk yogurt, but low-fat yogurt can be substituted. Serve with basmati rice and a few chutneys or relishes. If using large chicken breasts (about 1 pound each), cut each breast into 3 pieces. If using smaller breasts (10 to 12 ounces each), cut each breast into 2 pieces.
2 | tablespoons vegetable oil |
6 | garlic cloves, minced |
2 | tablespoons grated fresh ginger |
1 | tablespoon garam masala |
2 | teaspoons ground cumin |
2 | teaspoons chili powder |
1 | cup plain whole-milk yogurt |
¹⁄ | cup lime juice (2 limes), plus 1 lime, cut into wedges |
2 | teaspoons salt |
3 | pounds bone-in chicken pieces (split breasts cut in half, drumsticks, and/or thighs), trimmed |
1.
Heat oil in 10-inch skillet over medium heat until shimmering. Add garlic and ginger and cook until fragrant, about 30 seconds. Stir in garam masala, cumin, and chili powder and continue to cook until fragrant, 30 seconds longer. Transfer half of garlic mixture to medium bowl, stir in yogurt and 2 tablespoons lime juice, and set aside. In large bowl, combine remaining garlic mixture, remaining 2 tablespoons lime juice, and salt.
2.
Using sharp knife, make 2 or 3 short slashes into skin of each piece of chicken, taking care not to cut into meat. Transfer chicken to large bowl and gently rub with salt-spice mixture until all pieces are evenly coated. Let sit at room temperature for 30 minutes.
3.
Adjust oven rack to upper-middle position and heat oven to 325 degrees. Set wire rack in aluminum foil–lined rimmed baking sheet. Pour yogurt mixture over chicken and toss until chicken is evenly coated with thick layer. Arrange chicken pieces, scored side down, on prepared wire rack. Discard excess yogurt mixture. Roast chicken until breast pieces register 125 degrees and thighs and/or drumsticks register 130 degrees, 15 to 25 minutes. (Smaller pieces may cook faster than larger pieces. Remove pieces from oven as they reach correct temperature.)
4.
Adjust oven rack 6 inches from broiler element and heat broiler. Return chicken to prepared wire rack, scored side up, and broil until chicken is lightly charred in spots and breast pieces register 160 degrees and thighs and/or drumsticks register 175 degrees, 8 to 15 minutes. Transfer chicken to serving plate, tent loosely with foil, and let rest for 5 minutes. Serve with lime wedges.
MAKES ABOUT 1 CUP
The raita is best made with whole-milk yogurt, although low-fat yogurt can be used. Do not use nonfat yogurt; the sauce will taste hollow and bland.
1 | cup plain whole-milk yogurt |
2 | tablespoons minced fresh cilantro |
1 | garlic clove, minced |
Salt | |
Cayenne pepper |
Mix all ingredients together and season with salt and cayenne to taste. Cover and refrigerate until needed.
![]() WHY THIS RECIPE WORKS
WHY THIS RECIPE WORKS
Americanized adaptations of chicken teriyaki are lackluster at best, with soggy skin shellacked in a corn-syrupy sauce. We found that the deep, meaty flavor of chicken thighs stands up best to the salty profile of teriyaki sauce. We kept the skin on as it created a protective barrier against the heat of the oven, keeping the meat moist; however, we opted to remove the bones, which allowed the meat to cook faster and made it easy to slice the chicken into thin strips. Broiling the chicken on the middle rack allowed for the most consistent level of browning. And instead of marinating the thighs in the sauce (which resulted in soggy skin), we decided to spoon the sauce over the chicken just before serving. A traditional combination of soy sauce, sugar, and mirin was a good start, but the additions of ginger and garlic provided depth, while a little cornstarch gave our sauce the ideal glazy consistency.
See “BONING CHICKEN THIGHS FOR TERIYAKI” illustrations that follow recipe.
SERVES 4
There is a fair amount of soy sauce in this dish, so there is no need to season with salt before serving.
8 | (5-ounce) bone-in chicken thighs, trimmed and boned |
Salt and pepper | |
¹⁄ | cup soy sauce |
¹⁄ | cup sugar |
2 | tablespoons mirin |
1 | garlic clove, minced |
¹⁄ | teaspoon grated fresh ginger |
¹⁄ | teaspoon cornstarch |
1.
Adjust oven rack 8 inches from broiler element and heat broiler. Set wire rack in aluminum foil–lined rimmed baking sheet.
2.
Using sharp knife, make 2 or 3 short slashes into skin of each piece of chicken, taking care not to cut into meat. Season chicken with salt and pepper and arrange skin side up on prepared wire rack, tucking exposed meat under skin and lightly flattening thighs to be of relatively even thickness. Broil until skin is crisp and golden brown and thighs register 175 degrees, 8 to 14 minutes, rotating baking sheet halfway through broiling.
3.
Meanwhile, whisk soy sauce, sugar, mirin, garlic, ginger, and cornstarch together in small saucepan. Bring mixture to simmer over medium-high heat and cook, stirring occasionally, until sauce is syrupy and measures ³⁄
4
cup, about 4 minutes. Remove from heat and cover to keep warm.
4.
Transfer chicken to cutting board and let rest for 5 minutes. Cut meat crosswise into ¹⁄
2
-inch-wide strips and transfer to serving platter. Stir teriyaki sauce to recombine, then drizzle half of sauce over chicken. Serve immediately, passing remaining sauce separately.
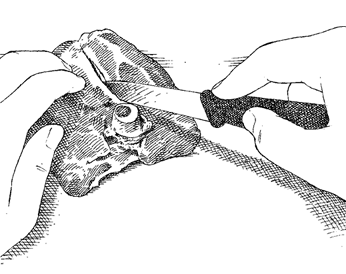
1.
After trimming excess skin and fat (leaving enough skin to cover meat), cut slit along white line of fat from one joint to other joint to expose bone.
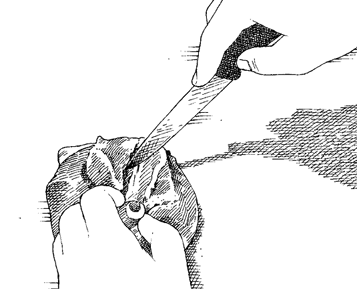
2.
Using tip of sharp knife, cut and scrape meat from bone at both joints.
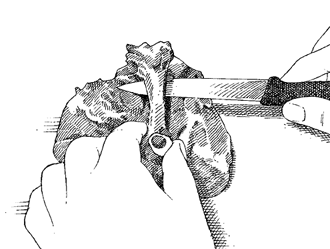
3.
Slip knife under bone to separate meat completely from bone.
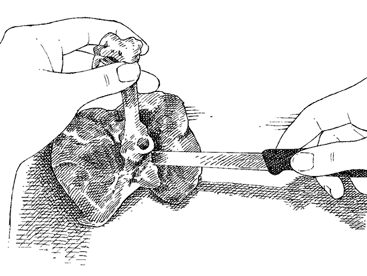
4.
Discard bone. Trim any remaining cartilage from thigh.
![]() WHY THIS RECIPE WORKS
WHY THIS RECIPE WORKS
Orange-flavored chicken continues to be a Chinese restaurant favorite, despite its frequent disappointing performance—the fried chicken is often too heavily breaded and the sauce is overly sticky and unbearably sweet. For a coating that would be moderately crunchy and maintain its texture beneath a blanket of well-balanced sauce, we dipped the chicken first in egg white and then in cornstarch. A little cayenne added some zip and some baking soda helped the coating develop a golden brown hue. Chicken thighs retained moisture better than delicate white meat when deep-fried. For extra flavor and to help the chicken retain its juiciness, we marinated the chicken in a soy sauce–based mixture, reserving some marinade to become the base for the final sauce. A healthy dose of orange juice and zest, ginger, garlic, and cayenne gave us the balanced sauce we sought, with sweet, sour, and spicy background notes.