Yoga for a Healthy Lower Back (32 page)
Read Yoga for a Healthy Lower Back Online
Authors: Liz Owen

FIG. 4.21
Keep your right leg strong, and balance on your right foot for a few breaths. Hold the pose for ten to fifteen seconds if possible. Stretch your left leg back while your spine stretches forward, all the way through the crown of your head and the tips of your fingers. Lift your abdominal wall slightly up toward your spine to engage your abdominal core and balance the pose from your center. To come out of the pose, simply retrace your steps, bringing your left foot to the floor as your trunk and arms lift up, coming back into Upward Hand Pose. Take a couple of breaths, arms still raised, and repeat Balanced Warrior Pose to the opposite side.
Variation: Proud Warrior Flow
Once you feel comfortable moving into and out of Balanced Warrior from Upward Hand Pose, you can challenge yourself to come into it from
Proud Warrior Pose
.
Come into Proud Warrior with your right leg forward and your left leg back. On an exhalation, fold forward, bringing your trunk and arms parallel to the floor. Lengthen your trunk forward any amount possible. On your next inhalation step your left foot toward your right foot and lift your left leg up and back until it is parallel to the floor. Straighten your right leg as you lift your left leg. Hold Balanced Warrior for ten to fifteen seconds, focusing your mind on finding its balance, strength, and inner poise.
To come out of this variation, first come back into Proud Warrior: Bend your right knee, reach your left leg back and place your left foot on the floor while you lift your trunk and arms back up. Inhale as you straighten your right leg. Turn your feet so they are parallel to each other and then repeat the pose to your left.
Cobra Pose Flow
Strengthen | Bhujangasana Variations
Before you practice Cobra Pose, take a moment to review “
Tips for Healthy Backbends
” and make sure your lower back is comfortable practicing
Supported Cobra Pose
. When it is, you're ready to move into full Cobra Pose. The intention of Cobra Pose is to strengthen the musculature of your lower back without causing your spinal muscles to contract
too much, which would put you at risk for muscle spasms and injury. Be sure to mindfully observe your body as you practice each step, and only proceed as far as your body says it's ready to go.
Step 1: Sphinx Pose
Lie down on your front body, resting your head either on your forehead or chin, whichever is most comfortable for your head and neck. Place your hands on the floor forward of your shoulders, and draw your arms next to the sides of your body, with your forearms on the floor and your elbows by your ribs. Spread your fingers and ground your palms. Slowly lift your head and shoulders up while your hips and legs press firmly down into the ground. Engage your buttocks. Roll your shoulders back and draw them away from your ears, so your collarbones are high and your heart is open and broad. Look forward and elongate the back of your head. Draw your chest away from your waist as you lift it up, creating length and traction along your spine (
fig. 4.22
). Hold for ten to fifteen seconds while you listen to the feedback from your lower back. Come down and rest. If your lower back is comfortable, proceed to Cobra-in-the-Grass Pose. Otherwise, repeat Sphinx Pose.
Step 2: Cobra-in-the-Grass Pose
Now you'll begin the transition into Full Cobra. Start in Sphinx Pose, but this time place your hands by your shoulders and lift your forearms and elbows off the floor. Keeping your elbows bent, gently draw the right side of your torso forward, then the left side. Slide from left to right, creating a gentle swaying, slightly twisting action from side to side, elongating your spine forward and lifting it upward little by little (
fig. 4.23
). Visualize a snake in the grass. If you've ever watched a snake move through grass, you know how intuitive and Zen-like its movements areâit smoothly glides around obstacles, lifting its head to see what's ahead, then sinking it back down as it proceeds with determination and stealth. Bring that same strong, focused intention to your practice of this pose.
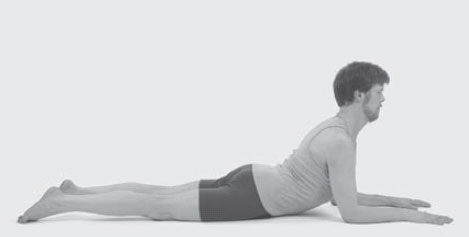
FIG. 4.22
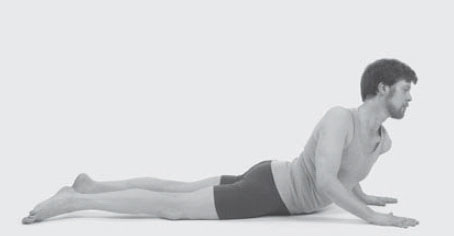
FIG. 4.23
Step 3: Full Cobra Pose
After your curvy grass-traveling Cobra has warmed your lower back muscles, you're ready for the full pose. Start as you did in step 2, and, pressing your hands down, lift your trunk and slowly straighten your arms, using them to lift your spine into more and more of a backbend. Practice all the actions of step 1 and engage your abdominal core muscles, to make sure you are supporting your lower back.
Stretch your arms only as straight as your lower back comfortably allowsâit's absolutely fine to keep your elbows bent so your back can benefit from a healthy, but not overdone, stretch (
fig. 4.24
). Your lower back muscles should feel engaged but not compressed or gripping. Your legs and front groins should remain well grounded on the floor. If it's comfortable in your neck, take your head back, but keep your gaze soft and focused inward. And if your lower back gives you full permission, straighten your arms fully and come into the strongest version of the pose.
Visualize each spinal vertebra, from S1 all the way through your lower, middle, and upper back, lifting up and coming into a gentle, even back arch, a luminous strand of pearls connected and energized by the flow of prana through the Sushumna, the central energy channel of your spine.
To come out of Cobra Pose, slowly bring your spine down to the ground, vertebra by vertebra. Place your forearms parallel to the top of your mat and briefly rest your forehead on your hands. Then place your left hand flat on the floor, roll over onto the right side of your body, and come up to a seated position. After a strong backbend such as Cobra Pose it feels great to release your lower back, first by lengthening it, then by resting it in a completely supported position. I recommend that you practice
Forward-Bending Hero's Pose
, for a few moments to stretch your spine, and then come into
Decompressing Standing Forward Bend
, placing a rolled blanket between your thighs and abdomen. Breathe deeply into your lower back, feeling it rest into the blanket supportâsoftening, releasing, undoing.
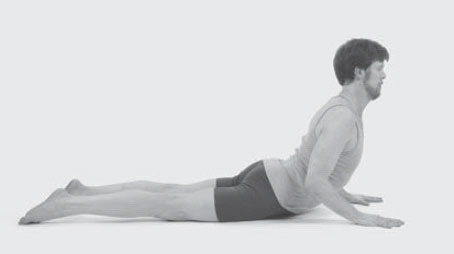
FIG. 4.24
Head-to-Knee Pose
Stretch | Janu Shirshasana
Sit on your mat with your legs straight forward, and have a belt handy. Bend your left knee and bring your left foot to rest along your inner upper right thigh. Be sure you are sitting squarely on your sit bones. Place your hands on your lower back and feel that your hips and lower back are lifting up and you are in neutral hip position. Lift your arms and trunk up, as if coming into Upward Hand Pose, then fold forward at your hips and hold your right foot with your hands. If you can't reach your foot or if your lower back is uncomfortable, hold your foot with a belt (
fig. 4.25
). Keep your trunk upright and breathe deeply for a few moments.
Turn your trunk to align your spine with your right leg. Exhaling, fold more deeply from your hips and reach forward through your trunk (
fig. 4.26
).
Forward
is the important direction of movement, so that your whole trunk elongates, rather than overrounds in your lower or middle back.
A forward bend should be a comfortable stretch for your lower back; it requires length all along the back body, from your calf, into your hamstrings, through your hips, and all along your spine. If there's discomfort anywhere along the back of your body, keep your trunk lifting upward; you can also keep your right knee bent. As your hamstrings, hips, and spinal muscles lengthen over time, you'll be able to stretch your spine forward and straighten your leg, moving more deeply into the wonderful feeling of quiet repose that forward bends offer.
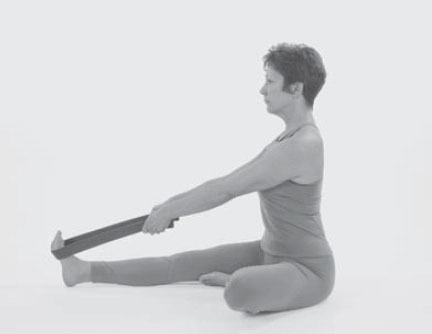
FIG. 4.25
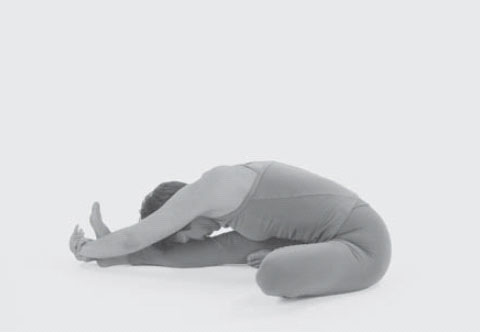
FIG. 4.26
TIPS FOR COMFORTABLE SEATED FORWARD BENDS
Seated forward bends ask you to combine two important aspects of yoga practiceâa balanced seated position and a deep forward bend. Here are some ways to ease these poses and any other seated forward bends you might practice.
â¢Â  Tip for sitting: If your hips round back and cannot stay in neutral position when you sit in Staff Pose, sit up on a folded blanket.
â¢Â  Tip for bending: If your hamstrings and hips are tight, or if your back is overrounding, bend the knee of your straight leg(s)âyou'll feel what it's like to disengage your hamstrings and come into a comfortable forward bend. Or, hold the foot of your straight leg with a belt and keep your trunk lifting upright instead of bending forward.
Stay in the pose for fifteen to twenty seconds, using the ebb and flow of your breath to reach your trunk farther toward your foot as you inhale, and gently releasing it down toward your right thigh as you exhale. Finally, gaze down at your thigh while you maintain a comfortable position for your neck. When you're ready to come out, lift your trunk halfway up, stretch your arms and trunk back up to a seated Upward Hand Pose, and then release your arms down. Change legs and repeat with your right leg bent.
Seated Forward Bend Pose
Stretch | Paschimottanasana
Sit in Staff Pose and check that you are in neutral hip position. If your lower back is rounding or collapsing back, sit on a folded blanket. Have a belt nearby. Inhaling, reach your arms and trunk up and with a deep exhalation, reach forward, just as you did in Head-to-Knee Pose, and hold your feet (
fig. 4.27
). If you can't reach, hold your feet with a belt. Also, as in Head-to-Knee
Pose, you can bend your knees to learn how to fold forward with your trunk long.