Yoga for a Healthy Lower Back (38 page)
Read Yoga for a Healthy Lower Back Online
Authors: Liz Owen

One-Legged Downward-Facing Dog Pose
Strengthen | Eka Pada Adho Mukha Svanasana
Now that you've learned
Three-Legged Table Tuck
, you'll practice the same movements while in Downward-Facing Dog to strengthen both your abdominals and your lumbar spine muscles. Before you do, though, review and practice
Downward-Facing Dog Pose
until you feel strong and stable; then you're ready to proceed into One-Legged Dog.
Begin in Downward-Facing Dog Pose. Tuck your right knee into your chest and with an exhalation, lift it back and up. Bend your right knee, letting your right foot move toward your left buttock (
fig. 5.14
). Lift your right thigh as high as possible, until you feel a good stretch all along the right side of your trunk. Now stretch your right leg straight, forming a single, angled line from your hands to your right foot (
fig. 5.15
). Engaging your abdominal core is the key to coming into a comfortable One-Legged Dog Poseâit will help you lift your weight out of your wrists and shoulders, and you'll find a great feeling of length and expansion through your spine. Hold the pose for five to ten seconds, and then rest in
Child's Pose
when you're done.
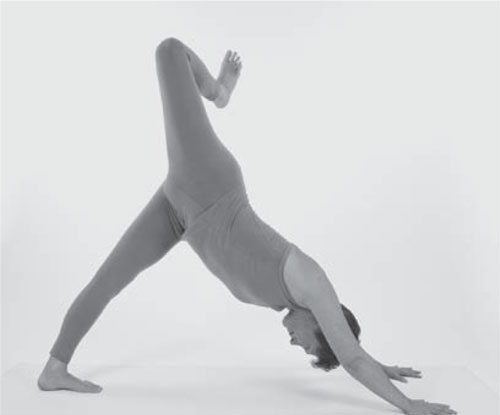
FIG. 5.14
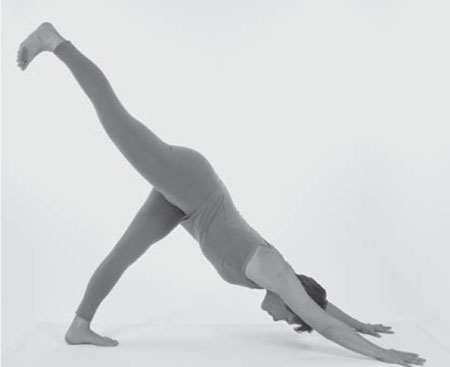
FIG. 5.15
Boat Pose Cycle
Strengthen | Paripurna Navasana Vinyasa
In Boat Pose, your body forms a V-shape with your hips on the floor and your legs and trunk angled upward. This is considered a challenging abdominal pose because all your abdominal core and back muscles are involved in supporting your trunk, and tone and mobility are required in your hamstrings and hip flexors.
Before you attempt Boat Pose, you'll practice a five-step vinyasa of supported movements. Just like in Leg-Lifts Cycle, these are important preparatory steps to ready your body for Full Boat Pose. Be sure to rest between each step and listen to the feedback of your lower back. Practice all the steps only when you feel ready.
Step 1: Grounded Bent-Knee Pose
Sit on your mat with your legs stretched out in front and your hands on the floor at your sides and behind your hips. Lift your trunk upward and broaden your upper chest. Draw your navel in and up and knit your abdominal wall together, taking care not to overarch your lumbar spine. Draw your shoulder blades away from your neck.
From this strong seated position, bend your knees and place your feet flat on the floor. Be sure to keep your lower back lifting rather than letting it collapse. If that's not possible, sit on a folded blanket to help lift your hips. With an exhalation stretch your arms straight forward, palms facing each other (
fig. 5.16
). Hold your position for ten to fifteen seconds; breathe smoothly and deeply. Release your arms back down to your sides, straighten your legs, and return to Staff Pose.
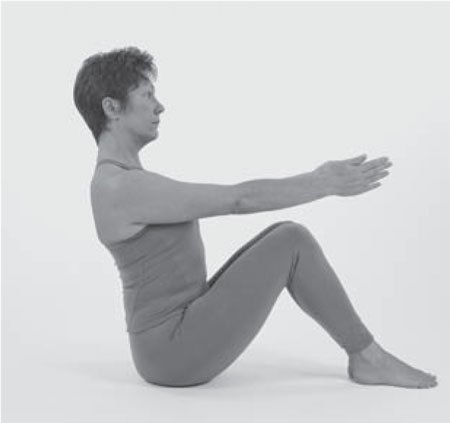
FIG. 5.16
Step 2: One-Legged Grounded Bent-Knee Pose
Start in Grounded Bent-Knee Pose (step 1), but this time keep your hands on the floor. As you exhale, stretch your right leg up toward the ceiling, at about a forty-five-degree angle from your hips (
fig. 5.17
). Hold for one breath, then bring your right foot back down to the floor and stretch your left leg up. Be sure not to let too much weight or pressure come into your hands as you practice this variation. Repeat three times to each side.
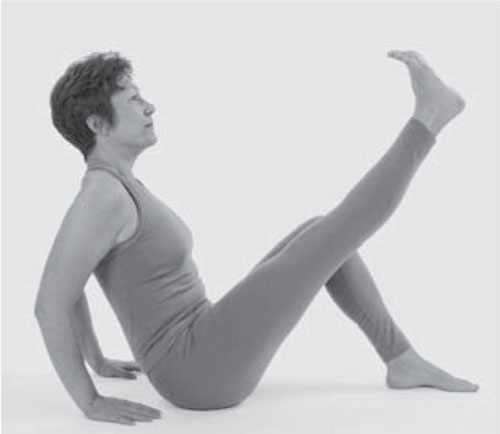
FIG. 5.17
Step 3: Bent-Knee Balance
Start the same way you did in step 2. As you exhale, lean back ever so slightly and lift both feet off the floor, with your knees still bent (
fig. 5.18
). Lift your trunk with each inhalation, and as you exhale, relax your groins down toward the floor. Hold your position for ten to fifteen seconds and remind your body to repeat the actions you've done so far in your chest, shoulder blades, lower back, abdomen, and groins.
When you lift both feet off the floor, you need a little extra grounding through the base of your hips to stabilize your body, so relax your groins, feeling them melt down to the ground, and drop your outer hips to the floor. If you still feel unstable, practice with a folded blanket placed about two inches away from the back of your pelvis so that when you lean back, your sacral joints are supported by the blanket. This blanket support may also be helpful in the remaining steps.
Check in with your lower back. If you're ready for a break, stretch your legs straight onto the floor, or rest in Child's Pose for a few moments before moving on to step 4.
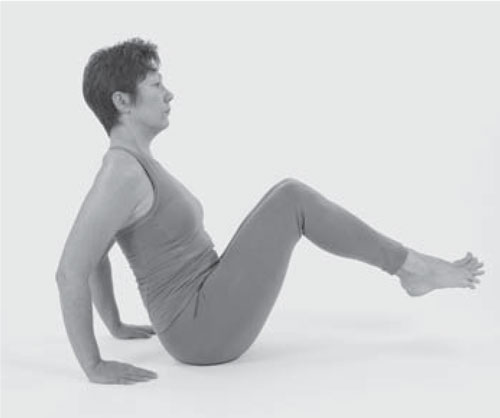
FIG. 5.18
Step 4: One-Legged Supported Boat Pose
Start in Bent-Knee Balance (step 3). Hold your position as you inhale, and as you exhale, lift your right leg up toward the ceiling (
fig. 5.19
). Hold for one breath, bring your right leg back into Bent-Knee Balance on your next exhalation, then lift your left leg up again, repeating three times to each side.
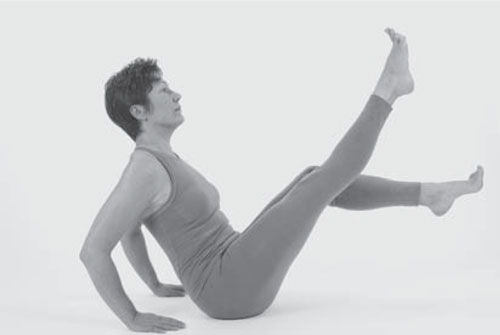
FIG. 5.19
Step 5: Two-Legged Supported Boat Pose
Start in Bent-Knee Balance (step 3) again. Hold your position as you inhale, and as you exhale slowly stretch both legs up toward the ceiling, either one at a time or, if your lower back is agreeable, stretch them up together (
fig. 5.20
). Straighten your legs if you can, but keep them bent if it feels too tenuous in your lower back. It may seem like lifting both legs up more than doubles the work . . . and it does. You no longer have the downward position of one bent leg to balance out the work the abdominal and spinal muscles need to do to keep your trunk lifted. Hold the pose for five to ten seconds, breathing deeply and smoothly. To come out of the pose, bend your knees and place your feet back down on the floor, then slowly lie down on your back and relax before practicing Full Boat Pose.
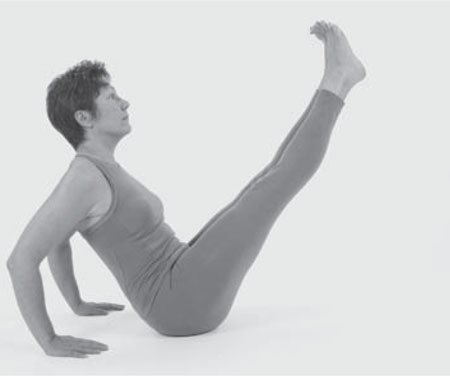
FIG. 5.20
TIPS FOR A COMFORTABLE BOAT-POSE CYCLE
You can practice some modifications in any or all the steps of Boat-Pose Cycle in order to provide different types of support to your lower back. Here are three ideas:
â¢Â  Sit facing a wall and support your heels on the wall
â¢Â  Hold the backs of your thighs
â¢Â  Place a long, looped belt around your body from your thoracic spine (right under your armpits) to the backs of your thighs, close to your knees, or to your feet.
Step 6: Full Boat Pose
Start in Two-Legged Supported Boat Pose (step 5). With an exhalation, take one hand off the ground and stretch your arm straight forward, parallel to the ground. On your next exhalation, stretch your other arm forward and turn your palms toward each other (
fig. 5.21
). Make sure your lower back is still lifting up as much as possible without tipping into an overarch.
You're finally in the deepest stage of Boat Pose. Breathe deeply. Relax your eyes, throat, and tongue. Lift your trunk with every inhalation, and relax your groins with every exhalation. When your hamstrings are long and your hip flexors are toned, your feet will be higher than your head and your eyes will be gazing straight across at your shins.
Hold Boat Pose as long as your body enjoys its intensity and your lower back feels comfortable, anywhere from five to fifteen seconds. When you are ready to come out, bend your knees and place your feet back on the floor.
Lie down on your back and rest your hands on your lower abdomen. Visualize your abdominals, spinal muscles, and psoas muscles relaxing and softening into the support of the earth. Although pride can sometimes be a deleterious emotion, now is a moment to embrace and celebrate what your body is able to do!