Yoga for a Healthy Lower Back (35 page)
Read Yoga for a Healthy Lower Back Online
Authors: Liz Owen

Layer 4: Transversus Abdominis
To find the deepest layer of abdominal muscles, remain lying down with your legs stretched straight on the floor. Ground your buttocks, press out through your heels, and engage your thigh muscles as if you were about to lift your legs up off the floor.
12
Remember to keep your tailbone lifting slightly up. Can you feel how your abdominal wall becomes active from one side to the other? This feeling is the transversus abdominis muscle, the deepest layer of musculature that runs from your lumbar and thoracic spines around each side of your trunk to the front, forming the “belt” that supports your abdominal organs.
Hold these actions for ten seconds and feel the power you've accessed in your abdominal core. Relax for a few breaths. Repeat this exercise a few times so you get used to accessing your core strength. Have you ever journeyed so deeply into your abdominal muscles? As you practice the poses ahead, you'll feel how doing so gives you new access to your core strength in a variety of yoga poses, not to mention in your daily life.
Practice for a Healthy Abdominal Core
The poses in this section are progressive, meaning each one requires slightly more abdominal tone than the last. So you should think of this chapter as a work-in-progress, building strength and ability as you go. Proceed slowly, only moving into the stronger poses when you feel that your abdominals have strengthened enough to support the work of that pose. Come out of any pose if you experience discomfort in your lower back and rest in
Child's Pose
or
Happy Baby Pose
. If you need to let go of a pose that's too challenging for now, do just thatâlet it go. You'll be able to practice it in the future when your abdominals get stronger.
As a bridge between the abdominal connections you made in our “Ask and Listen” meditations and the physical poses we'll now move through, let's practice some pranayama, or yogic breathwork, in order to continue to kindle the fire of your abdominal core.
Shining-Skull Breath
Kapalabhati Pranayama
Shining-Skull Breath is called
Kapalabhati
in Sanskrit (
kapala
means “skull” and
bhati
means “luster”). This breath earns its name because it cleanses the energetic channels of the body from your hips all the way up to the crown of your head. It's considered both a pranayama practice and a
kriya,
or cleansing practice. Both this breath and Bellows Breath, which you'll practice next, activate and invigorate the abdominal muscles and organs and stimulate digestion.
13
Sit comfortably on the floor or on a folded blanket. If your back aches, sit against a wall or in a chair. Place both hands on your abdomen. Take a short, quiet inhalation through your nose and exhale forcefully and audibly through your nose by pressing your abdominal wall inward. After a brief, one-second pause, repeat the sequence. Try it a few times until you get the feel of how your abdomen should feel in the pose, then rest your hands on your thighs with your index fingers and thumbs together in Jnana mudra, “the seal of knowledge.”
Once you get the hang of it, you can practice anywhere between twelve and twenty rounds of Shining-Skull Breath at a time. After your last round,
take a deep, long
Ocean Breath
inhalation through your nose; hold your breath for two to three seconds, and exhale deeply and slowly with Ocean Breath. Practice two more rounds of Shining-Skull Breath. Always finish each set with a full Ocean Breath to rest your lungs and cool your brain. After you've finished, sit quietly and observe your body. Go inside and feel how you've awakened your inner energy and stimulated your body and your mind in a healthy, positive way. You might actually feel tired in your abdominal muscles, as if you had done some of those much-maligned crunches! Enjoy this sensation, and know that you've done something kind and invigorating for your abdominal core.
Bellows Breath
Bhastrika Pranayama
Bellows Breath generates prana and activates the energy of the entire body.
14
It gets its name because the abdominal muscles draw air into the body and then push it back out, like a bellows. The fire imagery continues with this practiceâa bellows stokes a fire by pumping evenly to forcefully pull air in and push it out. Thus, unlike in Shining-Skull Breath, the inhalation and exhalation in Bellows Breath are
both
very powerful.
Because of its intensity, a word of caution is appropriate. A two- or three-minute Bellows Breath practice ignites plenty of heat and activity in your body, and that's all you need for a healthy practice. Overdoing strong breath practices such as Bellows and Shining Skull can endanger your lungs, cause dizziness, and fatigue your body.
Sit comfortably, as you did for Shining-Skull breath. Place your hands on your abdomen. Take one deep, long preparatory breath with a deep inhalation and a long exhalation. To start Bellows Breath, inhale sharply and forcefully through your nose. You should feel your abdominal wall press out into your hands. Then forcefully exhale, pulling your abdominal wall inward to push your breath out. You've just completed one round of Bellows Breath. All the action comes from your abdominal areaâkeep your upper chest and your shoulders relaxed. Practice a few rounds until you are comfortable with the breath.
Practice between twelve and twenty rounds in a row of Bellows Breath. Follow it with a long Ocean Breath inhalation; hold your breath in for two to three seconds, then release a long Ocean Breath exhalation. Sit quietly
afterward. If your body is comfortable, practice two more sets of Bellows Breath, each set followed by a full Ocean Breath to rest your lungs. You should feel very warm afterward, with a feeling that you've completely awakened your abdominal core, your energetic body, and your inner fire.
Earlier in this chapter I talked about the Brahma granthi, the energetic knot that forms at the navel area and inhibits the flow of energy up the Sushumna, the central energy channel of the body. In yogic philosophy, Bellows Breath pierces the Brahma granthi and opens the energy of the Nabhi chakra, the navel wheel. Not only that, Bellows opens two other energetic knots, the Vishnu granthi, located at the Anahata chakra, or heart center, and the Rudra granthi, located at the Ajna chakra, or third eye.
15
By cracking open these granthis, Bellows Breath allows energy to flow freely and completely up through the Sushumna, from the base of the hips to the crown of the head.
If I may get philosophical for a moment, it's significant that these knots are named after the three major manifestations of universal energy in yogic philosophyâBrahma, the creator; Vishnu, the preserver; and Rudra (another name for Shiva), the destroyer. Perhaps the ancient yogis accessed incredible stores of energy with Bellows Breath. This might sound to you like another one of those outlandish claims that the yogis tended to make, but when you practice Bellows Breath . . . well, perhaps you can find a little bit of that power within yourself!
Table-Balance Tuck Pose
Stretch and Strengthen | Vyaghrasana Variation 2
Start in
Cat Pose
. Lift your navel strongly up toward the ceiling and draw your tailbone and your head downward and toward each other. Hold this position for one or two breaths and feel your abdomen knitting together as we practiced earlier. This is a moving pose, so you will need to be mindful of your abdominal knit in order to get its full benefits.
Step 1: Three-Legged Table Tuck
While in Cat Pose, exhale and draw your right knee into your chest (
fig. 5.1
). As you inhale, slowly and mindfully stretch your right leg back and up until it is parallel to the floor; lift your head and shoulders to look forward.
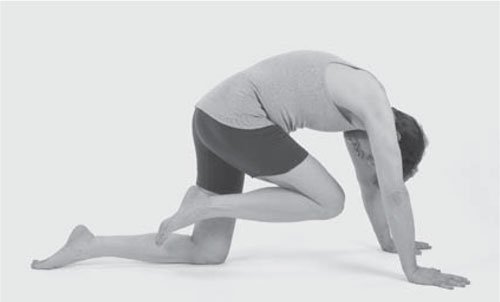
FIG. 5.1

FIG. 5.2
As you exhale, come back into Cat Pose with your right knee tucked in to your chest. Practice this movement three times to each side, using deep breaths to guide your movements. Keep your abdominal wall engaged while you inhale and stretch your leg up and back.
Step 2: Table-Balance Tuck
The final pose requires more core stability than Three-Legged Table Tuck because you will balance on one hand and one leg. If you were comfortable in that pose, you're ready for it.
Start again in Cat Pose. As you exhale, draw your right knee into your chest and reach your left arm under your trunk to touch your right shin with your left hand (
fig. 5.2
). As you inhale, stretch your right leg up and back and reach your left arm forward and up, coming into Table-Balance Pose. Remember to keep your abdomen knitted together! Repeat this step two more times balancing on your left shin and right hand. Rest in Child's Pose for a few breaths before you practice it three times with the opposite arm and leg, and rest again in Child's Pose when you're done.
High Plank Pose
Strengthen | Phalakasana
In High Plank Pose, you'll knit your abdomen together while you support your body on just your hands and feet. You'll need to work strongly through your arms and legs to support the weight of your body.
Start in
Downward-Facing Dog Pose
, stretching up through your arms, shoulders, and hips and stretching your legs down toward the floor. On an exhalation, keeping your legs straight, drop your hips about halfway down to the floor and shift your trunk forward until your shoulders are directly over your wrists (
fig. 5.3
). Draw your navel up toward your spine and knit your abdomen together. Keep your abdomen and chest long, draw your shoulder blades away from your neck, and lengthen your breastbone forward. Feel that your body is an even, upward-sloping plank from your ankles through your hips and shoulders, all the way to your head.
Hold for ten to fifteen seconds, place your knees on the floor, and rest in Child's Pose. Return to Down Dog and repeat High Plank Pose two more times, focusing on using the firmness in your abdomen and the strength of your arms and legs to support your body. High Plank builds arm and leg tone while it strengthens your core.
Note: If you have a shoulder injury or any other condition that prevents you from supporting yourself comfortably in the pose, there are two quick modifications that you can try. You can either place your knees on the floor, or practice the pose with your forearms on the floor rather than bearing weight on your wrists. Any way you practice High Plank Pose will strengthen your abdomen.

FIG. 5.3
Upward-Legs Pose
Strengthen | Urdhva Prasarita Padasana
Step 1: Supported Upward-Legs Pose
Lie on your back with your feet flat on the floor and a belt within reach. Exhaling, draw your knees into your chest and place the belt around your feet. With your next exhalation, stretch your legs straight up toward the ceiling, or bend your knees slightly if you can't comfortably hold your legs
perpendicular to your body. Hold your belt with your arms straight and your shoulders relaxed (
fig. 5.4
).
Keep your hips on the floor, lift your tailbone upward as if you could lift it all the way up to your feet, and knit your abdomen together. These actions will help your lower back stay supported and comfortable.