Building Web Sites All-in-One For Dummies® (106 page)
Read Building Web Sites All-in-One For Dummies® Online
Authors: Claudia Snell

8.
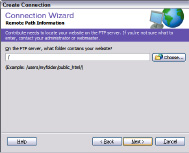
Enter the root folder in which the Web site files are stored. (See Figure 2-8.)
Alternatively, you can click the Choose button to display folders on the remote server.
Figure 2-8:
Your test is successful. Enter your root folder, puleeze.

9.
Click Next.
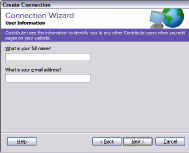
Contribute tests upload speed and performs other diagnostic tests on the remote server. After performing the tests, the Connection Wizard reconfigures, as shown in Figure 2-9. On this page, you enter your user information. The information that Contribute needs is your name and e-mail address. The user name and e-mail address is how Contribute identifies users who are allowed to edit the Web site.
Figure 2-9:
Who are you? Who, who are you?

10.
Enter your user information and then click Next.
The Connection Wizard reconfigures to show the Summary page, which summarizes the information you submitted in the previous steps. If the information is accurate, go to the next step. If not, click the Back button as needed to navigate to the page that contains the information that you need to change.
11.
Click Done.
The connection information is stored on the remote server. The Create Connection button becomes the Edit Page button.
Congratulations! You made a connection to your client's Web site, which can now be edited with Contribute. Your next step is to administer the site and determine whether you'll accept the role of administering the site from this point on, or transfer this role to one of your client's lackeys, um, personnel.
Administering the Web site
After making a connection to a Web site, you
administer
the site. In essence, you set permissions for the people who will edit the site. When you set permissions, you can limit the type of editing each team member can do, as well as set limits on the size of images and so on. To administer a Web site to which you've made a connection, do the following:
1.
Choose Edit
â
Administer Websites and then choose a Web site to which you made a connection.
All sites to which you've been the first to connect to show up on a submenu of the Administer Website menu. After you choose a Web site, a dialog box appears asking you what type of editing you want for the site and whether you accept the role of administrator. (See Figure 2-10.)
Figure 2-10:
Will you be my admin-istrator?

2.
Choose an editing option by selecting the applicable radio button.
We strongly advise you to choose the Standard Word Processing option because it's the easiest for most office personnel to learn.
3.
Click Yes to become administrator of the site.
Alternatively, you can choose No and bestow the honor on someone else.
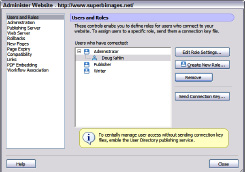
After you make a choice, the Administer Website dialog box appears, as shown in Figure 2-11. The Users and Roles section of the dialog box appears by default. This shows all users who have a connection to the Web site and the roles they play. If you select a user role and click the Edit Role Settings button, you can set permissions for this type of user. The options are largely self-explanatory. You can limit the sizes of images that are added to pages, the type of editing allowed, the type of code Contribute writes when a user from the role group edits a page, and so on. You can also create new roles or remove roles from this section of the Administer Website dialog box.
Figure 2-11:
Administer me, baby!

4.
Click Edit Role Settings.
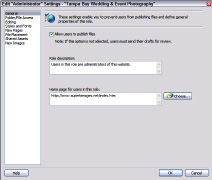
The dialog box reconfigures, as shown in Figure 2-12. By default, Contribute has three roles. The first person who connects to the site assumes the role of administrator. The roles are defined as follows:
â¢
Administrator:
Users who oversee the site. More than one person can have administrator rights. If you're teaching your client how to use Contribute, set yourself up as an administrator. That way, when your client panics â and he will â you can log on to show him where he went wrong.
â¢
Writer:
Users in this role can edit Web pages, but cannot publish them to the site.
â¢
Publisher:
Users in this role can edit Web pages and publish them to the site.
Figure 2-12:
Preparing to edit role settings.

5.
Accept the default settings or edit them.
As administrator, you obviously want the option to publish files. When you edit roles for other users, though, you can prevent them from publishing edited files by restricting them to a specific page from which they can begin editing.
 You modify settings for any role by selecting the role and then clicking Edit Role Settings. If you decide that three aren't enough, click Create New Role and follow the prompts to name the new role and define role permissions.
6.
Modify the other sections of the settings dialog box.
You can edit the following sections:
â¢
Folder/File Access:
The options in this section let users in the role you're editing edit files in any folder, or you can specify the folders from which users can edit files. You can also disable deleting files and enable users to remove rollback versions of pages stored on the site.
â¢
Editing:
Here, you specify how much editing users in this role can do, specify paragraph spacing options, and other editing options.
â¢
Styles and Fonts:
In this section, specify whether users in this role can edit styles, apply styles, apply fonts and sizes, change formatting (use boldface, italics, or underline), and change font color and background color.
â¢
New Pages:
In this section, you specify whether users in this role can create a blank page, use built-in starter pages, and create new pages by copying existing pages. You can also specify which pages can be used as the basis for a new page as well as whether to use Dreamweaver templates that have been uploaded to the server.
â¢
File Placement:
Here, specify the file placement rules for the following: images, style sheets, Microsoft and PDF files, and all other placed files. File placement rules enable you to specify the folder in which files of type are saved. You can also add, edit, or delete file placement rules.
â¢
Shared Assets:
This section enables you to specify which files on the site can be shared by users with this role setting.
â¢
New Images:
This section enables you to specify whether Contribute Image editing can be used when inserting files, and also to specify the maximum dimensions for files that are uploaded to the site (Contribute resizes them when they exceed the dimensions you specify) as well as the maximum quality of JPEG images. You can also enable an option to reject images that exceed the maximum file size you specify.
7.
Click OK to apply the settings.
When you change settings, they are uploaded to the server. You need to repeat this option to specify role settings for site Publishers and Writers. After changing settings, you're back to the Administer Website dialog box.
8.
Click Administration and then click Set Administrator Password.
The Change Administrator Password dialog box appears, as shown in Figure 2-13.
Figure 2-13:
Password, please.
