Chinese Brush Painting (20 page)
Read Chinese Brush Painting Online
Authors: Caroline Self,Susan Self

3.
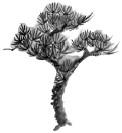
Host tree: trunk and branches 2, 3, 4.
To make the host tree in the middle, reload the brush and make a zigzag stroke wider than the first trunk, moving slightly to the left and then to the right, for a taller trunk than the left one, and stop.
4.
Right guest tree: trunk and branch 5.
To make the right guest, reload the brush, press and drag left, then right, and then left near the center trunk. Stop here to allow space for the clusters of needles attached to the trunks.
Painting Wheels for a Tree Group
1.
Branch 1.
As usual, start at the left, with the left guest, and plan a large cluster of needles that will slope to the left.
2.
Use the small brush with very dark paint and mark where the center dots will be for the top row of wheels.
3.
Paint the strokes to the dots, overlapping diagonally as they go left and downward.
4.
Branch 5.
Move to the right guest and paint a cluster moving to the right and downward, but make it higher than the cluster on the left. Keep it asymmetrical.
5.
Branch 4.
The open area in the center of the page is for the host tree. Paint in the wheels for the top row sloping downward to the right.
6.
Branch 3.
T
he left end of the trunk can have a large cluster. Mark the dots and paint about nine wheels.
7.
Branch 2.
Directly above this cluster and slightly to the right, mark dots for a rounded-up top cluster moving to the right and up. Paint in these clusters.
8.
Notice where you have open spaces for the branches.
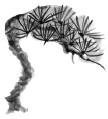
Painting Branches for a Tree Group
Because trees grow in all four directions, some of the branches are not seen.
1.
To complete this grouping of trees, load the small brush with dark paint.
2.
Start with a small line under the left cluster and make a press-and-lift stroke going right. Attach this to the trunk of the left tree.
3.
Above the cluster on the host tree, make a mark suggesting that the needles hide the rest of the branch.
4.
Make another stroke to the right, connecting to the middle group of clusters.
5.
Further toward the top of the host tree, mark a small branch to meet the top group of wheels.
6.
Move to the right, make a thin line, press, and then continue under the cluster of wheels on the far right.
Painting over Wheels for a Needle Group
1.
When all of the clusters seem to be attached, move to the small brush and medium light mix.
2.
Swing your arm and make gray circles around each of the wheels starting at the far left, working up and down the middle and up the right side. Work from left to right across the page so your hand does not get into the wet paint.
3.
Check every wheel to make sure it looks more solid than just some radiating lines.
Keep this exercise and use it to do a large one on rice paper.

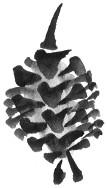
Painting Pine Cones
Many artists paint pine trees with cones hanging down from the branches. Pine cones usually hang from strong branches, and many times there are two cones near each other.

The cones are painted with the basic stroke made from the dragged dot.
1.
Use the small brush loaded with dark paint and your hand slightly in position #2, so the brush can be dragged.
2.
Start with the brush tip toward the left, press, drag a bit to the right, and lift. This should make a triangular-shaped stroke. Under this stroke, make four others, one under the other, down the page. This will be the spine of the cone.

3.
Now reload the brush, start at the top row to the right of the spine, and make a dragged stroke from the right toward the spine. Under this row, make three more dragged dots toward the spine. The cone is usually fatter in the middle and gets smaller and more pointed at the bottom.

4.
Go to the left side of the center row, start at the top, and make the dragged dot from left to right so the point is toward the spine. Move the dots closer to the spine as they get to the bottom.
5.
To end the cone, paint two dragged dots moving up from the bottom to meet the spine.
6.
Go back and look at the spacing of the dots. If you see open spaces between the outer row and the spine, add a dragged dot to fill in the space.
7.
Load a small brush with light mix.
8.
Add a light color in the center of the cone to make it look solid.

Take one of the pine tree examples and use it as a branch. From a twig connected to the main branch, paint a pine cone, leave a little space, and paint another pine cone a little lower than the first. Around the top of the twig, add a few wheels of needles.
Designs
with
Insects
and Birds