Chinese Brush Painting (23 page)
Read Chinese Brush Painting Online
Authors: Caroline Self,Susan Self

3.
Immediately dip the brush in water and run it along the inner edge of the line forming the mountain, both up and down. The water should blend the color toward the center.
4.
Reload the brush, paint the outline of the second mountain, and quickly add a water line to blend the color toward the center.
5.
Even after you have added the water, there should still be a plain paper area in the center of each mountain. Fill the large brush with water and make a wet line of water inside the first mountain line, but closer to the center.

6.
Now load the brush with medium paint, and make a paint line in the middle of the water line so the color oozes out in both directions, making a new, small mountain line in front of the large outlined mountain already painted.
7.
Move to the second mountain and wet the inner mountain area. Load the brush with color and make a soft oozing line suggesting the mountain in front. There should be a small space between the two mountains to allow space for the waterfall.

Painting the Sun
The sun and the moon are often included in landscape paintings to add interest. They are a part of nature that landscape painters want to record. The sun and the moon are usually painted when they are at full size and shown as circles.
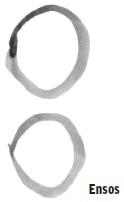
Enso
is a Japanese word that means “circle.” To make a sun for your painting, you need to be able to make ensos.
1.
Touch your finger lightly to the paper at the left.
2.
Swing your arm upward, then to the right, down, and back to the beginning spot, completing the circle. Feel the swing of your arm, and try to make it an even swing.
3.
Focus on the beginning spot and, as you swing your arm around, keep your eye on it to aim the brush toward the end of the stroke. Practice this swing several times. This exercise tests your ability to concentrate on the task at hand.
To paint the sun rising over the mountain in your landscape picture, you need to make a perfect circle.
1.
Load the small brush with medium paint, hold your hand in position #1 and the brush in a vertical position, and focus on what you plan to do.
2.
Place the tip of the brush on the paper and start the swing right away, going up and to the right, down the other side, and back to the beginning spot, using your whole body and arm.
3.
With practice, you can make perfect circles. Practice making smaller and smaller ensos, as they are usually small in paintings.
4.
When you think you can do a good circle most of the time, try adding the sun to your mountain picture.

Painting the Waterfall
A waterfall adds an interesting element to a landscape. In this scene, a waterfall flows between the two mountains. To paint it correctly, you need a fine point on the brush.
1.
Load the brush with medium dark paint and roll it forward and back to make a point.
2.
T
o make it easier to make fine lines, you can use your left hand as a support. This works only for short fine lines where you do not need to move your arm or hand across the paper. You move the brush only slightly with your fingers. Lay your left hand flat on the table under your right hand as it holds the pointed brush vertically. Practice making fine lines in this way before continuing.
3.
Lower the tip of the brush until it barely touches the paper. Using only the tip, move your fingers slightly to make the top three downward lines of the waterfall.
4.
Then move your fingers slightly a short distance to the right for the shelf.
5.
Still holding your right hand over your left, make several longer strokes downward. Be careful not to let them run together.
6.
Add another set of strokes at the bottom.
7.
If you have difficulty making thin lines, use a toothpick dipped in medium paint.
Painting Trees in the Distance
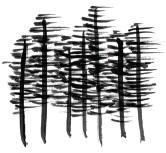
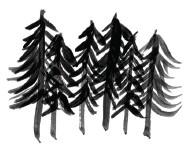
Distant trees in a landscape are painted with simple strokes. Often, several types of trees with different textures are painted to add interest.
Start with the trunks of the trees, and then add different strokes for branches to show different types of trees.
1.
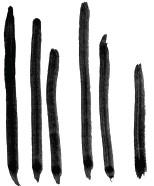
Load a small brush with dark paint and hold it in position #1.
2.
Begin a stroke at the top of the tree trunk and pull downward a few inches. Repeat this seven times, making each trunk longer or shorter than the last one and leaving different spaces between the trunks.
Try making different varieties of trees by painting different types of branches. These are examples of trees one might see off in the distance in your landscape.
Horizontal branches.
Paint in horizontal lines by swinging your arm from left to right a short distance. Make the lines at the top shorter and have them get wider toward the bottom of the trunk.
Curved branches.
Make more vertical trunks, varying the height and the space between them as you did before. This time, add short strokes at an angle and slightly downward connecting to the trunks.
Diagonal branches.
Roll the brush to a nice point and hold it vertically. Make more trunk strokes, and this time add longer strokes sloping out to the left and then out to the right of the trunks.
