Chinese Brush Painting (21 page)
Read Chinese Brush Painting Online
Authors: Caroline Self,Susan Self

C
hinese painters like to add insects and birds to their paintings. Moving creatures add interest to flower and tree paintings in the same way that people add interest to landscapes.
Painting a Butterfly near an Orchid
It’s fun to paint butterflies. Butterflies are attracted to the fragrance of wild orchid flowers and are often seen flying around or landing on the blossoms.
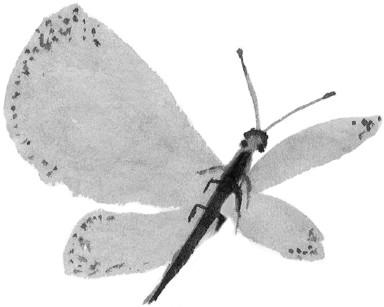
Painting Butterfly Wings
Butterfly wings are painted by using the basic dragged dot stroke in different positions. The butterfly is shown in flight at an angle, so its wings are not symmetrical. Asymmetry rules once again!
1.
Load the large brush with medium light paint.
2.
To make the large upper left wing, think about the dragged dot that you have learned. Place the side of the brush at an angle over the paper where the top left of the wing will be. Press, drag, and lift quickly to make the narrow area where the wing attaches to the body.
3.
For the upper right wing, use the tip of the brush. Roll the brush sideways on the plate to make the hairs roll into a point. Start the stroke at the upper right tip of the wing. Press and lift quickly to make the point meet at the point of the left wing.
4.
To make the lower right wing, put the tip of the brush at the center where the other lines meet. Press lightly and lay the heel of the brush down to make a dot for the wing.
5.
Once again, roll the brush to make a point. On the left lower side, start the stroke at the center and lay down a short, dragged dot. You should have two large upper wings and two smaller ones at the bottom.
Painting the Butterfly Body
The body of the butterfly is shown at an angle because of the position of the right wings. The body is a long oval with two eye dots at the top. Between the eyes are two small antennae. Along the sides of the body are three sets of legs.
1.
Load the small brush with medium light paint. Roll the brush to make a point.
2.
Start painting at the head and make a single stroke similar to the nail stroke for the body.
3.
Load the small brush with dark paint. Roll the brush to make a point.
4.
Make a single stroke to darken the body below the head.
5.
Instead of using the small brush to paint the details of the body, you can use a toothpick dipped into dark paint.
6.
Start at the end of one antenna and make a dot. Reload and make a curved line to the head. Reload and make a second antenna in the same way.
7.
The legs of the butterfly are close to the body and are very small. Again, use a toothpick to make three sets of legs that bend on each side of the body.
8.
Add the tiny dots on the edges of the wings. It is easier to paint them in carefully with the toothpick held vertically.
9.
Practice this butterfly several times.
Now you are ready to try to add it to a design.
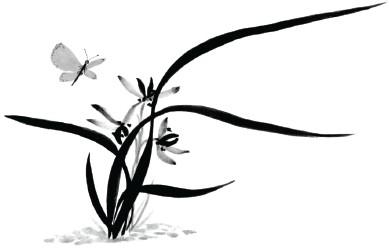
Adding a Butterfly to an Orchid Design
Plan a new design with orchid leaves and flowers. Leave a space among the flowers to place a butterfly in flight.
Notice that the butterfly is about the same size as an orchid blossom, which is not very big. The butterfly helps to define the scale of the orchid plant.
1.
Paint the orchid design on practice paper.
2.
Add the butterfly to the design.
3.
Keep practicing the combination until you like the results.
Now you can go to the rice paper. Paint the orchid design and butterfly. Remember to paint on the smooth side of the rice paper. You’ve made another masterpiece!
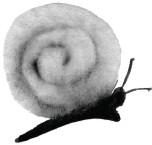
Painting an Orchid with a Snail
It’s fun to see a snail balancing on an orchid leaf. You can imagine that it was on the ground and crawled up the leaf. Its weight causes the leaf to bend down even more.
Painting a Snail
The shell of the snail is represented by a light spiral. The body of the snail is a long oval at the bottom that curves up on the right to make a wider area for the head. As with the butterfly, there is a dot for the eye and two antennae.
1.
Load the large brush with light paint.
2.
Using your arm, make a large filled circle to represent the shell of the snail.
3.
While the circle is still wet, load the small brush with dark paint and make a curving line from the center of the shell outward. Let the dark paint ooze out into the lighter paint to make soft edges. Practice this many times.
4.
Using the small brush loaded with dark paint, make the long oval for the body of the snail. Press at the right to make a wider area for the head, drag to the left, and lift to make a point at the tail. Add a small curve at the lower front of the body to show the muscle the snail uses to move forward.
5.
As with the butterfly, use a toothpick loaded with dark paint to make the dots and lines for the two antennae.
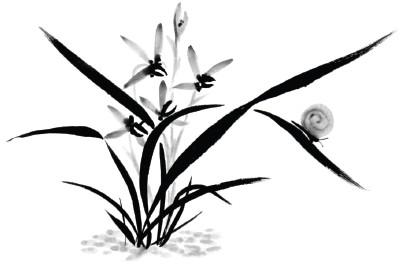
Adding a Snail to an Orchid Design
Plan a new orchid design with one leaf on the right curving up and then down where the snail is crawling. This design should be easy to do because you have done it before.
1.
Paint the orchid design.
2.
Add the snail to the leaf on the design.
3.
Keep practicing the combination until you like the results.
Paint the design on rice paper to become one of the rice paper masterpieces in your folder. Remember to use the smooth side of the rice paper.
Painting a Bird on a Pine Branch
Chinese people are fond of birds. They keep pet birds in cages and take the cages for walks in the park to meet other people with birds in cages. Birds are also painted in the wild flying in the air or sitting on a branch.
Painting a Bird
The Chinese paint many kinds of birds. You will learn to paint a simple kind of singing bird. Does he look like he’s singing? How can you tell?
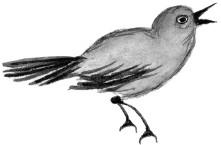
1.
Load the small brush with dark paint.
2.
Painting a bird usually begins with the beak. Make a small press-and-lift stroke from left to right for the upper part of the beak. Make another stroke touching the first one beneath it and about the same size.
3.
Notice that the head of the bird is an oval, and its body is shaped like an egg. Judge how large the body and head should be to match the beak. You cannot draw on rice paper or erase on it, but you can sketch your plan by making a mark with your fingernail on the paper. Make a slight indentation on the paper the size you think the head and body should be.
4.
Load the large brush with medium light paint. Test it on the plate to see that it is not too dark.
5.
Paint the outline of the body and head by following the fingernail line. Leave a white circle for the eye area and fill in the whole body of the bird.
6.
When the head and body area has dried a little, load the small brush with dark paint and make a dark dot for the eye. Leave a white area around the dot. Using a toothpick, make a thin dark line around the white eye area.
7.
Load the large brush with dark paint.
8.
To make the tail feathers, stroke from the bottom of the body downward and to the left with a long stroke. Make each feather a different length.
9.
On the left side of the bird, about one third of the way up, make several feather strokes with the large brush to represent wing feathers.