Examination Medicine: A Guide to Physician Training (80 page)
Read Examination Medicine: A Guide to Physician Training Online
Authors: Nicholas J. Talley,Simon O’connor
Tags: #Medical, #Internal Medicine, #Diagnosis

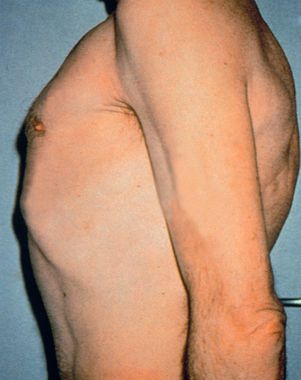
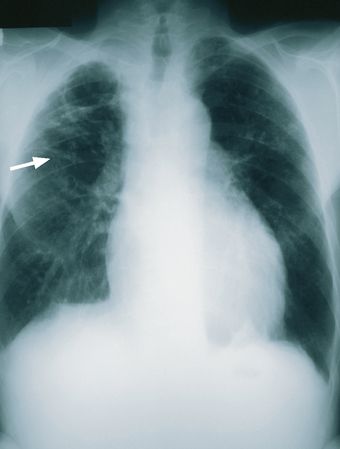
If COPD seems likely, test for Hoover’s sign: place your hands along the costal margins with your thumbs close to the xiphisternum. Normally inspiration causes your thumbs to separate, but the overinflated chest of the COPD patient (
Fig 16.22
) cannot expand any further and so the diaphragm pulls the ribs and your thumbs closer together.
FIGURE 16.22
Barrel chest. N Talley, S O’Connor,
Clinical examination
, 7th edn.
Fig 10.5
. Elsevier, 2013, with permission. From F S McDonald (ed.)
Mayo Clinic images in internal medicine
, with permission. Copyright Mayo Clinic Scientific Press and CRC Press.
14.
Ask the patient to lie down at 45° and then visually measure the JVP.
15.
Examine the praecordium for signs of pulmonary hypertension and cor pulmonale. Finally, examine the liver and look for peripheral oedema. Check for Pemberton’s sign (p. 371).
16.
Before leaving the patient, ask whether you may see the temperature chart.
HINT
Try to avoid finishing the examination by saying to the examiners, ‘I now want to know the results of spirometry and pulse oximetry’, as this may cause irritation.
HINT
Try to put the signs together. Common respiratory short cases include:
1. ILD (dry cough, crackles and clubbing)
2. bronchiectasis (loose cough, full sputum mug, coarse crackles and wheezes, clubbing)
3. COPD (overinflated chest, possible cyanosis, pursed lips breathing, reduced breath sounds and wheezes, Hoover’s sign)
4. pleural effusion (stony dullness, bronchial breathing on top, needle marks from previous aspirations)
5. thoracoplasty (gross unilateral chest deformity, big scar)
6. cystic fibrosis (often young patient with signs of bronchiectasis and cachexia)
7. treated carcinoma (sometimes clubbing, scar, radiotherapy marks, signs of effusion or collapse, lymph nodes).
Chest X-ray films
Hints on how to read a chest X-ray film (see
Fig 16.23
)
This is a valuable investigation and some even consider a chest X-ray as an extension of the physical examination. It is essential to be familiar with the various radiographic appearances. As a physician, you should feel personally responsible for viewing all the patient’s radiographs.
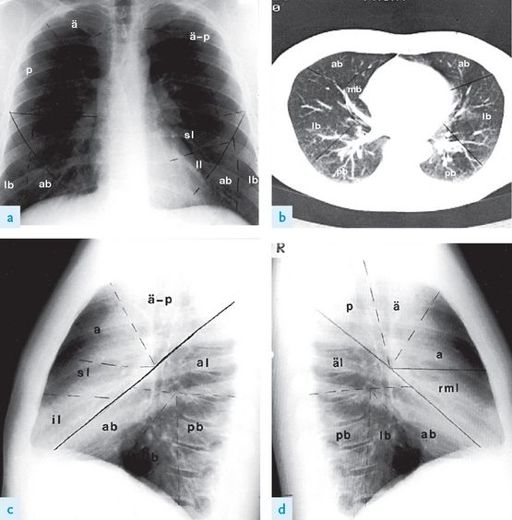
FIGURE 16.23
The lung segments. (a) PA view. (b) CT scan through lung bases. (c) Left lateral view. (d) Right lateral view.
Right upper lobe: ä = apical segment; a = anterior segment; p = posterior segment. Left upper lobe: ä-p = apico-posterior segment; a = anterior segment; sl = superior lingular segment; il = inferior lingular segment. Right lower lobe: äl = apical segment; mb = medial basal segment; lb = lateral basal segment; ab = anterior basal segment; pb = posterior basal segment. Left lower lobe: äl = apical segment; lb = lateral basal segment; ab = anterior basal segment; pb = posterior basal segment. The Canberra Hospital X-Ray Library, reproduced with permission.
1.
When first viewing the chest radiograph, check:
a.
film date, to ensure that it is current
b.
type of film – posteroanterior (PA) or anteroposterior (AP) film; the latter (which may be labelled ‘portable’) magnifies heart size, making assessment of cardiac diameter difficult
c.
correct orientation – the left side is most reliably determined by the position of stomach gas
d.
film ‘centring’ – the medial ends of each clavicle should be equidistant from the spines of the vertebrae; rotation affects mediastinal and hilar shadows, causing undue prominence on the side opposite that to which the patient was turned.
2.
Next, systematically examine the PA film, comparing right and left sides carefully for abnormalities of:
a.
soft tissues (e.g. mastectomy, subcutaneous emphysema) and bony skeleton (e.g. rib fractures, malignant deposits)
b.
tracheal displacement, paratracheal masses
c.
heart size, borders and retrocardiac density
d.
aorta and upper mediastinum (count the ribs, look for mediastinal shift, mediastinal masses – see
Figs 16.23
and
16.24
)
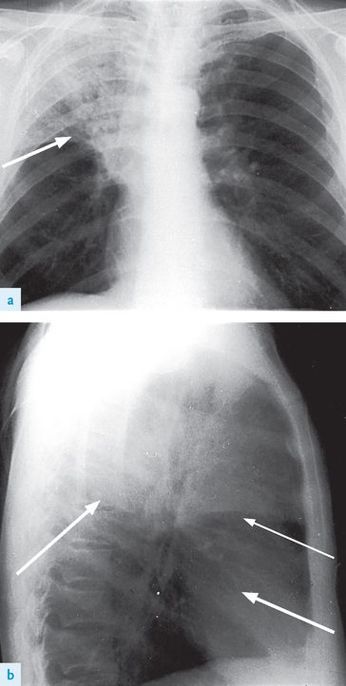
FIGURE 16.24
(a) and (b) Right upper lobe consolidation. The right upper lobe is opacified and is limited inferiorly by the horizontal fissure (arrows). There must be some collapse as well, as the fissure shows some elevation. Figures reproduced courtesy of The Canberra Hospital.
e.
diaphragm (right higher than left by 1–3 cm normally), cardiophrenic and costophrenic angles
f.
lung hila (left normally above right by up to 3 cm, usually no larger than an average thumb)
g.
lung fields – upper zone (to lower border of second rib), midzone (from upper zone to lower border of fourth rib) and lower zone (from midzone to diaphragm)
h.
pleura
i.
gastric bubble (normally there should be no opacity >0.5 cm above the air bubble)
j.
the presence of monitoring leads, a permanent or temporary pacemaker, central lines or other ‘hardware’.
Learn to do all this rapidly and accurately.
3.
Finally, always ask to look at a lateral film. Examine it just as carefully. The lateral film is used to help decide the exact anatomical site of an abnormality.
Candidates must learn the normal position of the fissures (the horizontal fissure, seen sometimes on the PA and lateral film, is a fine horizontal line at the level of the fourth costal cartilage, whereas the oblique fissure is only seen sometimes on the lateral, beginning at the level of the fifth thoracic vertebra and running downwards to the diaphragm at the junction of its anterior and middle thirds).
The lung segments must also be memorised (see
Fig 16.23
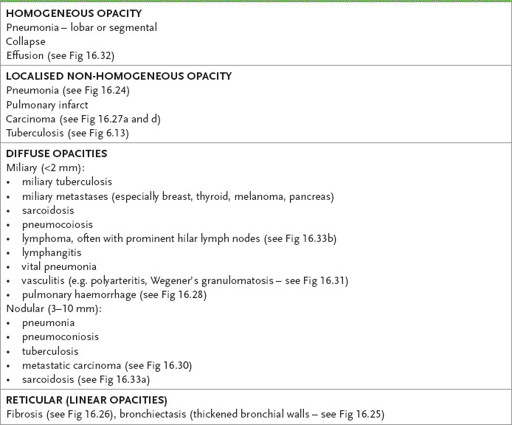
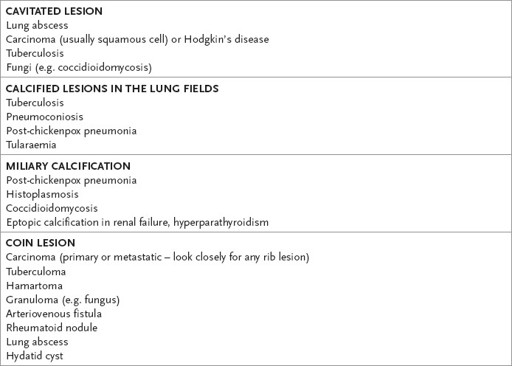
). Remember, abnormalities in the lung fields are described by terms such as ‘mottling’, ‘opacity’ or ‘shadow’ – it is usually unwise to attempt to make a precise diagnosis of the underlying pathology in your initial assessment of the chest X-ray (see
Table 16.15
).
Table 16.15
Differential diagnosis of radiological appearances in chest X-ray film
Some common radiological abnormalities
The following X-rays and scans (
Figs 16.24
–
16.33
) show some important changes associated with pulmonary disease.
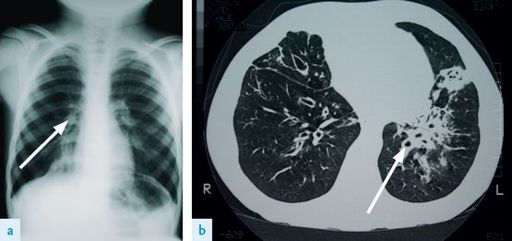
FIGURE 16.25
(a) Right middle lobe bronchiectasis. Note the increased lung markings and the thickened bronchial walls (arrow). (b) CT scan of the chest of a patient with bronchiectasis. Note the thickened bronchial walls (arrow). Figures reproduced courtesy of The Canberra Hospital.
