Make: Electronics (9 page)
Authors: Charles Platt

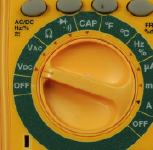
Figure 1-54.
Each meter has a different way to measure volts DC. The manually adjusted meter (top) requires you to move a slider switch to “DC” and then choose the highest voltage you want to measure: In this case, the selected voltage is 20 (because 2 would be too low). Using the autoranging RadioShack meter, you set it to “V” and the meter will figure out which range to use.
If you were using a miniature old-fashioned lightbulb instead of an LED, you’d see the potential difference varying much more, because a lightbulb behaves like a “pure” resistor, whereas an LED self-adjusts to some extent, modifying its resistance as the voltage pressure changes.
Now touch the probes to the two terminals of the potentiometer that we’re using, so that you can measure the potential difference between them. The potentiometer and the LED share the total available voltage, so when the potential difference (the voltage drop) around the potentiometer goes up, the potential difference around the LED goes down, and vice versa. See Figures 1-55 through 1-57. A few things to keep in mind:
- If you add the voltage drops across the devices in the circuit, the total is the same as the voltage supplied by the batteries.
- You measure voltage relatively, between two points in a circuit.
- Apply your meter like a stethoscope, without disturbing or breaking the connections in the circuit.
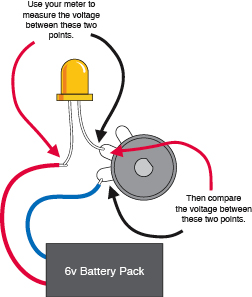
Figure 1-55.
How to measure voltage in a simple circuit.

Figure 1-56.
The meter shows how much voltage the LED takes.

Figure 1-57.
The meter shows how much voltage the potentiometer takes.
Checking the Flow
Now I want you to make a different measurement. I want you to measure the flow, or current, in the circuit, using your meter set to mA (milliamps). Remember, to measure current:
- You can only measure current when it passes
through
the meter. - You have to insert your meter into the circuit.
- Too much current will blow the fuse inside your meter.
Make sure you set your meter to measure mA, not volts, before you try this. Some meters require you to move one of your leads to a different socket on the meter, to measure mA. See Figures 1-58 through 1-61.

Figure 1-58.
Any meter will blow its internal fuse if you try to make it measure too high an amperage. In our circuit, this is not a risk as long as you keep the potentiometer in the middle of its range. Choose “mA” for milliamps and remember that the meter displays numbers that mean thousandths of an amp.

Figure 1-59
.

Figure 1-60
.
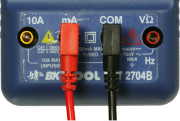
Figure 1-61.
A manual meter such as the one here may require you to shift the red lead to a different socket, to measure milliamps. Most modern meters don’t require this until you are measuring higher currents.
Insert your meter into the circuit, as shown in Figure 1-62. Don’t turn the potentiometer more than halfway up. The resistance in the potentiometer will protect your meter, as well as the LED. If the meter gets too much current, you’ll find yourself replacing its internal fuse.
As you adjust the potentiometer up and down a little, you should find that the varying resistance in the circuit changes the flow of current—the amperage. This is why the LED burned out in the previous experiment: too much current made it hot, and the heat melts it inside, just like the fuse in the previous experiment.
A higher resistance limits the flow of current, or amperage
.
Now insert the meter in another part of the circuit, as shown in Figure 1-63. As you turn the potentiometer up and down, you should get exactly the same results as with the configuration in Figure 1-62. This is because the current is the same at all points in a similar circuit.
It has to be, because the flow of electrons has no place else to go
.
It’s time now to nail this down with some numbers. Here’s one last thing to try. Set aside the LED and substitute a 1KΩ resistor, as shown in Figure 1-64. The total resistance in the circuit is now 1KΩ plus whatever the resistance the potentiometer provides, depending how you set it. (The meter also has some resistance, but it’s so low, we can ignore it.)
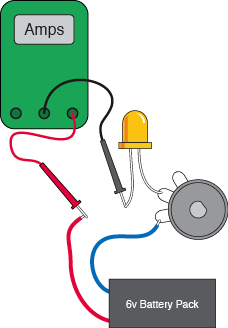
Figure 1-62.
To measure amps, as illustrated here and in Figure 1-63, the current has to pass through the meter. When you increase the resistance, you restrict the current flow, and the lower flow makes the LED glow less brightly.
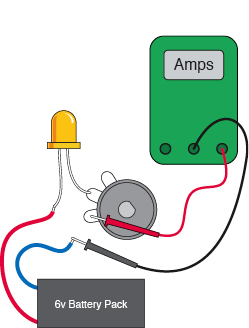
Figure 1-63
.