OS X Mountain Lion Pocket Guide (17 page)
Read OS X Mountain Lion Pocket Guide Online
Authors: Chris Seibold
Tags: #COMPUTERS / Operating Systems / Macintosh

This preference pane is, unsurprisingly, where you add and
remove printers and scanners. To add a device, click the tiny + button
on the left side of the pane, and Mountain Lion will look for nearby
printers and scanners and set them up for you. To remove a printer or
scanner, select it in the list and then click the − button beneath the
list. The rest of the options you see in this pane depend on the exact
model of printer or scanner you have installed.
The Sound preference pane is divided into three tabs:
Sound Effects, Output, and Input. The “Output volume” slider is always
visible at the bottom of the pane, regardless of which tab you’re on.
There’s a checkbox below that slider that lets you get rid of the Volume
menu extra. If you’re wondering how you’ll control the volume with the
menu extra gone, remember that you can use the keyboard for that trick:
use the F10–F12 keys on Apple keyboards.
The Sound Effects tab allows you to choose an alert
sound. To preview a sound, click it in the list or use the arrows to
move up and down. Mountain Lion gives you plenty of options for audio
alerts, so hopefully you can find something to your liking.
The next question is where you want the alert sounds to come
from. If you have speakers plugged into your Mac, you can opt to send
the sound either through them or through the computer’s built-in
speaker(s).
Below that is a slider for adjusting the alert volume if, for
example, you want alert sounds to be softer than the rest of the
sounds coming out of your Mac (you don’t want Basso walking all over
iTunes, right?). Note that the maximum alert volume is the same as the
master volume for your system, so if you want alerts to be the loudest
noise coming out of your Mac, you’re out of luck unless you can turn
down the volume of other sound-generating programs.
Finally, you get two or three checkboxes so you hear the sounds
you want and skip the ones you don’t. By checking the box next to each
entry, you can do the following:
Play or silence user interface sounds (such as the noise the
Trash makes when being emptied).Play feedback when volume is changed (with this turned on,
if you hit a volume key or move the volume slider, the alert sound
will play at the new volume).
The Sound Effects tab lets you decide which speakers
play alert sounds; the Output tab lets you decide where everything
else
is played. For example, you can choose
between your Mac Pro’s internal speaker (not great for an immersive
media experience) or the
top-of-the-line speakers you plugged into the optical out port.
Headphones are a special case, as plugging in headphones mutes the
internal speakers.
You also might see some extra options depending on your
hardware. For example, if you’re using the built-in speakers on an
iMac or MacBook, you get to adjust the left-right balance with a
slider.
This tab is where you control your Mac’s “ears.” If
you’re using anything other than a Mac Mini or a Mac Pro, your
computer has a built-in internal microphone, which is the default
selection for sound input. This means that any audio chats, video
chats, or podcasts you record will get recorded via that internal mic.
If you want to use a USB microphone instead, plug it in and select it
from the list on this tab.
Another option on this tab is “Input volume,” which controls how
“hot” (as they say in the radio business) the sound coming into your
Mac will be. Turn it all the way up and anyone you’re chatting with
will reach for his or her volume controls a millisecond into the
conversation.
Turning on “Use ambient noise reduction” tells your Mac
to ignore the sounds going on around you—screaming kids, howling
wolves, or what have you. It isn’t perfect, but it helps when you’re
chatting or, more importantly, using voice commands with your
Mac.
iCloud is the system OS X uses to keep your Mac synced
with your iPhone, your iPad, and any other Macs you own. The iCloud
preference pane is where you control what stuff you want synced up and
how much iCloud storage space you’re using.
This preference pane is, in true Apple fashion, extremely simple.
There’s a list of apps with checkboxes beside them. Checking a box means data for that app
will be shared with any other devices logged in to your iCloud account.
(The sections below explain how iCloud relates to each app in the
list.)
If you click the Sign Out button in the iCloud preference pane,
you’ll be hit with fifty questions. The rub is that signing out of
iCloud will delete your iCloud contacts from your Mac, turn off your
Photo Stream, delete iCloud calendars from your Mac, and so forth. You
can choose to keep local copies on your Mac, but it’s easiest to just
remain logged in.
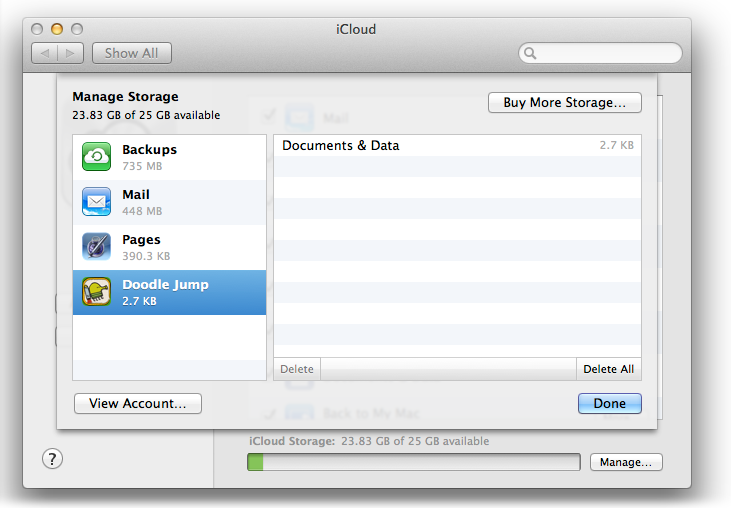
At the bottom of the pane is a green bar that indicates
how much of the iCloud disk space allotted to you is being used (
Figure 5-5
). If you’re
bumping up against your limit, you might want to spend some time
managing your data. To do so, click Manage to bring up a list that shows
just what is using your space and how much space it’s using.

Figure 5-5. Preparing to delete some Doodle Jump data.
For most of the items in the list, you can simply select the app,
backup, or document, single-click the data you want to delete, and then
hit the Delete key to erase the memory-hogging data. The exception is
Mail: if your email is using up too much space, you have to take a trip
to the Mail app and delete any extraneous messages and folders
there.
When you’re using iCloud, any changes you make to your
contacts (adding, deleting, or modifying them) on one device are
automatically reflected on all your other devices. It’s a convenient
feature (and one that you’re likely already used to).
The Calendar app on your Mac takes care of all your
calendaring chores, but you’re not always in front of your Mac when
you want to make an appointment or change a meeting time. With iCloud,
changes you make on one device are pushed to (automatically shared
with) all your devices. And as you likely expect, you can also create
calendars that others can subscribe to and update. If you’re running a
Cub Scout den, for example, all the members can update the calendar as
needed, and the changes will be pushed to everyone subscribed to that
calendar.
Reminders work the same way: create a reminder on your iPhone,
and it will show up on your Mac, and vice versa.
Check this box and any entry you make in the Notes app
will show up on all your iCloud-enabled devices.
In Lion, this option was labeled Bookmarks, but it has
been improved in Mountain Lion. If you check this box, then not only
will your bookmarks be synchronized across your devices, but the pages
and tabs you currently have open will be, too. So if you’re browsing
your favorite site on your Mac and then decide to pick up your iPad,
then the same site will be open on the tablet when you launch Safari
there.
One of the niftier and, with the advent of iOS 5, most
necessary features of iCloud is Photo Stream. When you upload pictures
to your Mac, or snap a photo (or record a video) with your iPhone, the
photo (or video) gets published to your Photo Stream for you to see on
all your devices. Apple stores a copy of your last 1,000 photos for
the last 30 days so you’ll have plenty of time to drag the photo into
a library to save it on your Mac forever.
To enable Photo Stream, make sure you’re signed in to iCloud and
then open iPhoto ’11; you’ll be greeted by a splash page asking you if
you want to enable Photo Stream. To turn Photo Stream off on your Mac
while leaving it on for other devices, head to iPhoto
→
File
→
Preferences, and then click on the Photo
Stream icon. To turn it off for all your devices, uncheck the Photo
Stream checkbox in this preference pane.
Happily, any photos and videos in your Photo Stream don’t
count against your free 5 GB of iCloud storage.
You’ve probably been in a position where you have a
document on your PC at work and would like to tweak that document on
your Mac or iOS device. If you have iWork iOS apps (Keynote, Pages, or
Numbers) on your iOS devices, you’re in luck. To make documents from
your Mac or PC available anywhere, head to
www.icloud.com/iwork
,
log in with your Apple ID and password, and then simply drag and drop
any documents you’d like to share. To edit those documents on your Mac
(or PC), log into that same site and you’ll be able to modify the
documents in your browser.
While iCloud will happily work with Microsoft Office
documents, you won’t be able to do anything with them until you have
one of the iWork iOS apps installed on at least one of your iOS
devices.
Unlike photos, documents (the ones you add to iCloud) and data
(your contacts and so forth)
do
count against
your 5 GB storage limit.
This feature allows you to access your Mac from any
other computer—useful if you’ve left that really important file at
home and you’re giving a presentation in Toledo. Just hop on the
hotel’s computer and you’ll be able to get that Keynote presentation
everyone is dying to see.
How well Back to My Mac works depends on how your router is
configured. If your Mac doesn’t like your router’s configuration, it
will tell you what you need to do to get maximum
performance.
Do you suffer from the horrors of a misplaced Mac? It
can be unnerving when you wonder whether you left your MacBook Air on
a park bench or in your room. Fortunately, you can find that lost
Mac.
Find My Mac offers a bit more than just the ability to
find your Mac. You can also remotely make your Mac play a sound (in
case you left it under a couch cushion) or you can send a message to it (like “OMG reward for
return!!!!”). If those measures aren’t enough, you can also lock your
Mac remotely, preventing anyone from accessing your Mac unless they
enter the correct four-digit code. You also have a nuclear option,
Remote Wipe, which deletes all the data on your Mac. This is great for
keeping your info safe but, should you later locate your Mac, you’ll
have to restore all your data (though that’s not a big deal if you’ve
been using Time Machine regularly).
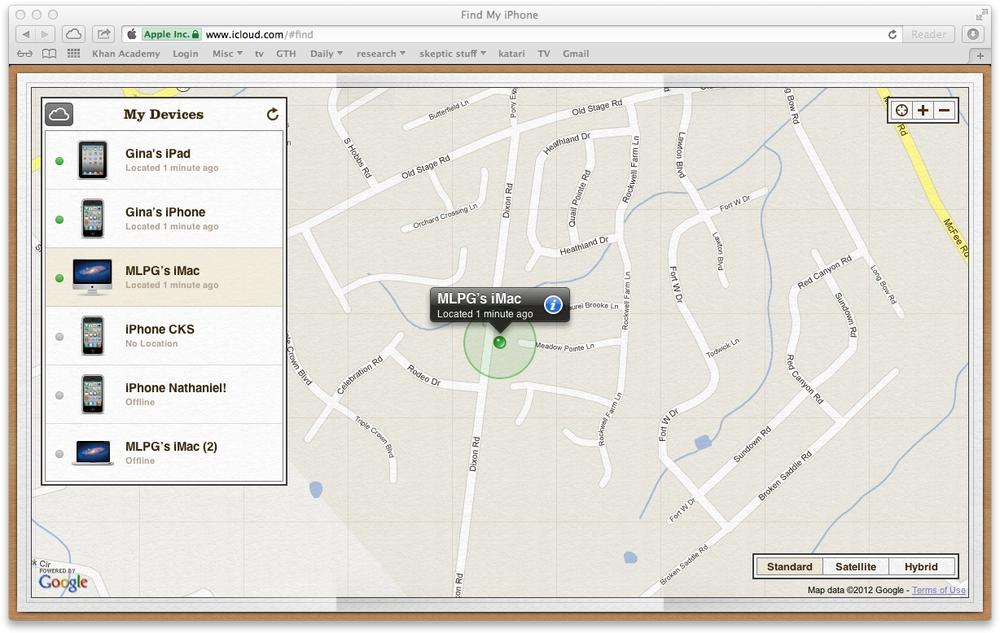
You can find your stray Mac by heading to
www.iCloud.com
, logging
in, and clicking Find My iPhone. When you do, all the devices you have
registered with iCloud will show up. Click the device you’re
interested in and you’ll get a good idea of where it is (
Figure 5-6
). If you want your Mac to
do something, click the blue “i” and then tell your Mac what to do.
(If you have only one device registered, you’ll be able to skip the
blue “i” step and just tell your Mac to play a sound or send a message.)

Figure 5-6. Looks like my iMac is at home