OS X Mountain Lion Pocket Guide (7 page)
Read OS X Mountain Lion Pocket Guide Online
Authors: Chris Seibold
Tags: #COMPUTERS / Operating Systems / Macintosh

Next to the menu is the Application menu. The name and
contents of this menu depend on what application you’re currently
using.
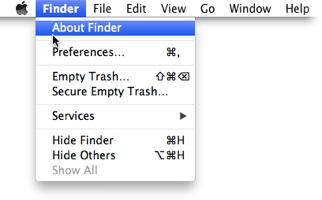
Figure 3-4
shows the
Finder’s Application menu, which you see whenever you have a Finder
window or click an empty spot on your desktop.

Figure 3-4. The Finder’s Application menu
There really isn’t a standard
Application menu, but most have some commonalities. In a typical
Application menu, you’ll find:
- About [Application Name]
Opens a window with the application’s version number,
copyright info, and whatever else the program’s developer thinks
should be there.- Preferences
Opens the application’s preferences window. What you can
control from this window varies from application to
application—it could be very little or a lot. For info on the
Finder’s preferences, see the section
Mastering the Finder
.- Services
All the services that the current app can use appear in a
list when you highlight this option. Check out
The Services Menu
for details.- Hide [Application Name]
Hides all of the current application’s windows. If you
have 50 Safari windows open and don’t want to manually minimize
each one to see what lies beneath, then choose this option. To
get the windows back, just click the application’s Dock
icon.- Hide Others
Hides every application except the one you’re
using.- Show All
This is the antidote to the
Hide command. Whether you’ve hidden a single
application or every application, Show All will return all the
hidden application windows to full visibility.- Quit [Application Name]
Quits the current application. (You can also invoke this
command by pressing ⌘-Q.) Most people’s inclination is to quit
any application they aren’t using, but that often isn’t
necessary. OS X is very good at allocating resources, so leaving
an application idling will generally have very little impact on
the system.
The Services Menu
The Services menu is the most complex option in the
Application menu. It offers you quick access to functions provided
by other programs, which are called
services
. The services available
to you depend on the applications installed on your Mac and the
program you’re using. In some applications, the Services menu won’t
have anything to offer (the menu will read “No Services
Apply”).
TextEdit (which you can find in the Applications
folder) provides a nice example of what the Services menu can do.
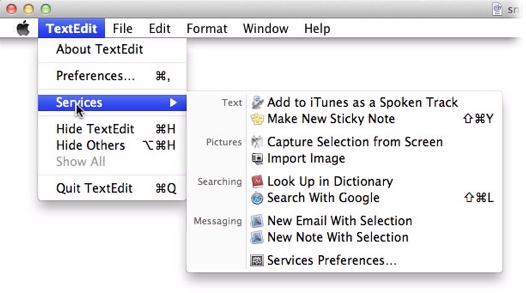
Figure 3-5
shows the options available
when you’ve selected some text in TextEdit. If you want to send the
selected text as a Mail message, for example, all you need to do is
choose New Email With Selection, and Mail will pop open a new
message with the text already inserted. Clicking the Services
Preferences option opens the Keyboard preference pane to its
Services section, where you can customize the Services menu. You can
also create your own services with Automator (see
Automator
).

Figure 3-5. Services for TextEdit
After the Application menu come more menus. How many?
That depends on the application. For example, Mail has eight and
Safari has seven. You’ll find at least four menus in the menu bar
besides the Application menu. What’s in these four menus
also
depends on the application, but there are
some standard options to expect:
- File
This menu typically contains options for saving, opening,
creating, and printing files. For apps that use iCloud, when you
select Save in this menu, you’ll get a choice to save the
document locally or to iCloud.- Edit
Here you’ll find the old Mac standbys: Cut (⌘-X), Copy
(⌘-C), Paste (⌘-V), and Undo (⌘-Z).- Window
This menu lists all the open windows for the current
application, as well as some commands for working with
them.- Help
Depending on the application and its developer, this menu
can either be very useful or a waste of space. When you open the
Help menu (either by clicking it or by pressing Shift-⌘-?),
you’ll see a search box and a few other options. One of the
really nice things about the Help menu in OS X is that it won’t
just regurgitate an entry in a database—instead, if possible, it
shows
you how to do what you want to do.
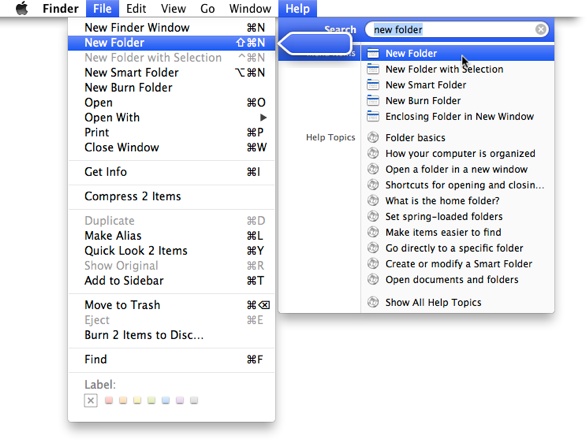
For example, suppose you want to create a new folder while using
the Finder. Open the Finder’s Help menu, typenew folderin the search box, and
then put your cursor over the New Folder entry in the list that
appears. The Help system will then show you which menu contains
the New Folder option and highlight it with a floating blue
arrow, as shown in
Figure 3-6
.

Figure 3-6. Help pointing out an answer
The right side of the menu bar is where you’ll find the
menu extras, a.k.a. menulets. (Spotlight and the Notification Center
are on the bar’s
far
right and aren’t technically
menu extras; you’ll learn about them in a moment.) Menu extras give
you easy access to functions you use often. The menu extra’s icon
usually reflects what it does. A useful example is the Keychain menu
extra (
Figure 3-7
), which you can add
by launching the Keychain Access utility in
/Applications/Utilities
and then choosing “Show
keychain status in menu bar” from its preferences. The lock icon that
appears in your menu bar gives you quick access to your passwords and
secure notes without having to make a trip to the Utilities
folder.

Figure 3-7. The Keychain menu extra
Not every menu extra is a shortcut to a program; some control
settings (such as the Volume menu extra), and some are there to show
the status of certain aspects of your Mac (such as the Battery menu
extra). What menu extras you find useful depends on how you use your
Mac.
Unlike menus, whose options change depending on the application
you’re using, menu extras remain constant: each one always does the
same thing, no matter which program is running.
The menu extras you see by default depend on how your Mac is
configured. You can banish unwanted menu extras by ⌘-dragging them off
the menu bar; they’ll disappear with a satisfying poof sound and an
accompanying animation. To rearrange your menu extras, ⌘-drag them
into any order you want.
If you’ve left fast user switching enabled (see
Users and Groups
), you’ll see the name or icon of the
current user here. Click it to select another user to log in
as.
Clicking this magnifying glass icon brings up the
Spotlight search box. For more information, see
Searching with Spotlight
.
The Notification Center is new to Mountain Lion, and
it’s a big improvement. Click its icon at the right end of the menu
bar to reveal all your current notifications. To customize which apps
can use Notification Center and how the notifications are displayed,
see
Notifications
. If you want to open Notification
Center quickly and your Mac has a trackpad, you can open it by placing
two fingers on the far right side of your trackpad and then dragging
them to the right.
If you really want to be productive, it’s much quicker
to use keyboard shortcuts for most commands than to go hunting for
them in the menu bar. Here’s a list of some of the most commonly used
keyboard shortcuts for items in the menu bar.
Key | Action |
|---|---|
⌘-C | Copies selected |
⌘-V | Pastes the contents of |
⌘-X | Cuts the current selection and copies it to the |
⌘-A | Selects everything (the |
⌘-S | Saves the current file |
⌘-O | Opens a new |
⌘-W | Closes the current |
⌘-Z | Undoes your most recent |
⌘-H | Hides the current |
⌘-, | Opens the current |
⌘-Q | Quits the current |
There are many more key commands at your disposal (see
Chapter 8
), but these are
the ones you’ll likely use most often. Also, each application has its
own keyboard shortcuts that can streamline your workflow, so learning
the key commands for the programs you use frequently is worth your
time.