Building Web Sites All-in-One For Dummies® (74 page)
Read Building Web Sites All-in-One For Dummies® Online
Authors: Claudia Snell

Creating and Encoding Flash Video
If you read the early parts of this chapter and start reading this section with tears in your eyes, swearing you'll never do video, take a deep breath. Flash has its own video encoder. Yup, it's part of Flash CS4 Professional. The upcoming sections show you how to encode digital video into the FLV format within Flash. Now that you've caught your breath, read on.
If you have a client who wants to add video to his Web site, you can do so easily with Flash. Full motion video in Flash is a beautiful thing. You tailor the video for your client and the type of equipment used by the client's audience. You can also add a controller to the video, which enables visitors to control playback of the video.
When you need to quickly add a video to a Flash movie, you can do so by encoding the video within Flash. When you encode a video in Flash, you can launch the Adobe Media Encoder, which enables you to encode the file. You then come back to Flash to add the encoded video to your project. These handy steps show you how to encode a video in Flash:
1.
Create a new document the same size as the video you're incorporating on your Web page.
Make sure you match the frame rate of the main movie.
2.
Choose File
â
Import
â
Import Video.
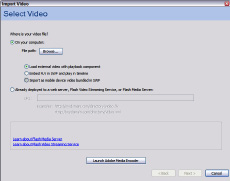
The Import Video dialog box (see Figure 3-3) appears.
Figure 3-3:
Start by importing a video into Flash.
3.
Click the Browse button.
The Open dialog box appears.
4.
Select the video you want to import and then click Open.
The path to the video and filename appears in the File Path field. If Adobe Flash Player doesn't support the video format, a message to this effect appears telling you it's necessary to use Adobe Media Encoder to convert the file to a supported format.
5.
Accept the default Load External Video with Playback Component option unless you have a client who owns several Ferraris and is rich enough to afford Flash Video Streaming Service or Flash Media Server.
6.
Click Launch Adobe Media Encoder.
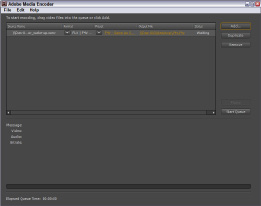
The Adobe Media Encoder dialog box appears (see Figure 3-4).
Figure 3-4:
Encode video into Flash format with Adobe Media Encoder.
7.
Accept the default setting or choose a different setting from the Preset drop-down menu.
This menu has lots of choices. In most instances, the default preset is right on the mark. However, if you're familiar with video encoding, feel free to choose the setting you deem best for your intended audience.
 If you're familiar with encoding digital video, choose Custom and tweak the settings to suit the Web page in which the video will appear. When you modify the settings, Custom, rather than one of the defaults, appears in the encoding window.
8.
Click the Start Queue button.
Adobe Media Encoder does its thing. If you have a long video, this would be a good time to grab your favorite snack. After the video is encoded, you can close Adobe Media Encoder.
9.
In Flash, click Browse.
Navigate to the video file you just encoded and open it.
10.
Click Next.
The Skinning page of the Import Video Wizard appears (see Figure 3-5).
11.
Select a skin from the Skin drop-down menu.
After you select a
skin
(or interface for the video), a preview appears in the preview pane. Unless you're going to use the video as part of a Flash Web site, choose None. All you need is the encoded Flash video. You can add a skin when you add the video to your Web page in Dreamweaver.
_fmt.jpeg) The minimum width of the skin is listed after you choose it. If the minimum width is larger than the width of your video, choose a skin that doesn't have as many controls.
The minimum width of the skin is listed after you choose it. If the minimum width is larger than the width of your video, choose a skin that doesn't have as many controls.
12.
Accept the default skin color, or click the Swatch and choose a different color from the Swatches panel.
13.
Click Next.
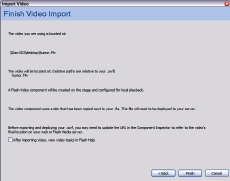
The Finish Video Import page of the Import Video Wizard appears (see Figure 3-6).
Figure 3-5:
Will your video have a thick or thin skin?
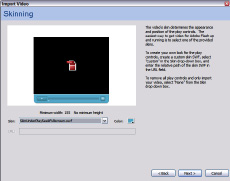
Figure 3-6:
That's a wrap.
14.
Review the information and click Finish if you're satisfied.
Alternatively, you can click Back and navigate to the page on which you need to make changes.
15.
Choose Control
â
Test Movie to preview your video.
16.
Save the document.
This step is optional, as all you really need is the FLV file.
Encoding video with Adobe Media Encoder
If you're encoding multiple videos, use Adobe Media Encoder, which ships with Flash CS4 Professional. This gem gives you the capability of encoding multiple video files. The settings options are identical to those you find when you import video into Flash and use the progressive download method of deployment.
After you apply settings to a file, you can duplicate the file and modify the settings. This option is useful if you need to deploy different versions of the video for visitors who access the Web with dialup, DSL, or cable modems. You can add as many videos as you want to the queue. The application encodes one video at a time. The following illustration shows Adobe Media Encoder with two video files that will be encoded with three settings. In this example, the application will encode six videos.
Here's a good tip: When encoding multiple videos, set up the application prior to finishing work for the day. Then before you leave, just click the Start Queue button. The encoded files will be ready to use in a Web page when you start work the next day.
_fmt.jpeg) When you encode video via Adobe Media Encoder from within Flash, the video encoder creates an FLV (Flash Video) file with the same name as the source file with the
When you encode video via Adobe Media Encoder from within Flash, the video encoder creates an FLV (Flash Video) file with the same name as the source file with the
.flv
extension. You need to upload this file to your Web server along with your Web page.
Adding Flash Video to a Web Page
Adding Flash video to a Web page in Dreamweaver is easy. As an added bonus in Dreamweaver, you can add controls to the video to enable Web site visitors to start and stop the video as they please. This is much better than having the video loop endlessly while the visitors are trying to pay attention to the other content on the page. To add Flash video to a Web page, follow these steps:
1.
Position your cursor at the point in the Web page where you want to insert the video.
2.
Choose Insert
â
Media
â
FLV.
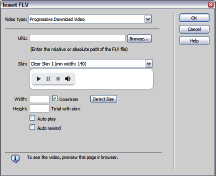
The Insert FLV dialog box appears. (See Figure 3-7.)
Figure 3-7:
Inserting Flash video in a Web page.
