Building Web Sites All-in-One For Dummies® (78 page)
Read Building Web Sites All-in-One For Dummies® Online
Authors: Claudia Snell

Adding text and sound to a slide
You can display text on a slide and also have a sound play when a slide appears. The sound is in addition to any background music you select in the General tab. Logic dictates that you shouldn't display watermark text and text on an individual slide. In fact, we rarely use text overlays in slide shows. Let the images do the talking. Adding tasteful background music is, however, a nice touch. To add text and sound to a slide, follow these steps:
1.
Select the slide to which you want to add text.
2.
Click the Add Text button, which looks like a pencil.
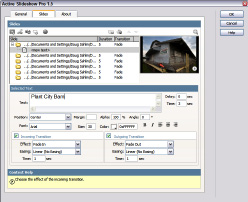
The Slides tab reconfigures to show options for adding text. (See Figure 4-5.)
Figure 4-5:
Adding text to a slide.
3.
Accept the default Delay value of 0 (seconds).
The default value displays the text as soon as the image fully transitions into the slide window. If you specify a value larger than 0 (zero), the text doesn't appear until the duration expires.
4.
Accept the default Time value of 3 (seconds) or enter a different value.
This option determines the length of time for which the text displays over the image.
5.
Enter the desired text in the Text field.
6.
Specify parameters for the text. Your options are as follows:
â¢
Position:
Choose an option from the drop-down menu to determine how the text is positioned over each slide. The options are self-explanatory.
â¢
Margin:
Determines how much the text is indented. Specify a large value if you're using an overlay with your slide show; otherwise, the overlay might hide some of the text.
â¢
Alpha:
The default option of 100% displays the text at full opacity. Specify a lower value if you want the text to be partially transparent and let some of the underlying slide show through.
â¢
Angle:
Enter a value to tilt the text.
â¢
Font:
Choose an option from the drop-down menu.
â¢
Size:
Accept the default value of 30 pixels or enter a different value.
â¢
Color:
Click the Color swatch and choose the text color from the Color Picker. Choose a color that you can see over the images.
â¢
Style:
Choose one or more options to style the text. Your choices are Bold and/or Italic.
â¢
Align:
Choose an option to align the text. Your options are Left, Center, or Right.
7.
Select the Incoming Transition check box.
This option is selected by default. This option adds a transition effect to the text as the image appears. If you accept this option, choose an option from the Effect drop-down menu. Your choices are
â¢
Fade In:
The text gradually fades in from transparent to full opacity.
â¢
Zoom In:
The text zooms into view.
â¢
Blur In:
The text is blurry when it first appears and is clear when the transition period ends.
8.
Choose an option from the Easing drop-down menu.
This determines the type of motion that occurs when the text comes into view. The best way to understand what each choice does is to experiment and remember which effects you like best.
9.
Accept the default Time value of 1 second, or enter a different value.
This determines the duration of the incoming transitions.
10.
Select the Outgoing Transition check box.
This option is selected by default. If you accept this option, choose an option from the Effect drop-down menu. Your choices are
â¢
Fade Out:
The text gradually fades out from full opacity to transparent.
â¢
Zoom Out:
The text zooms out of view.
â¢
Blur Out:
The text is clear when it is displayed and is blurred during the transition out.
11.
Choose an option from the Easing drop-down menu.
This determines the type of motion that occurs when the text goes out of view.
12.
Accept the default Time value of 1 second, or enter a different value.
This determines the duration of the outgoing transitions.
13.
To have a sound play when the slide is displayed, click the icon that looks like a speaker.
This reconfigures the dialog box for sound options.
14.
Click the Browse button, and then navigate to and select the sound.
Select a sound with a duration of a second or two. If you specify a sound with a longer duration, it continues playing while the next slide loads. A perfect example of that is a shutter click for a photographer's slide show.
15.
Accept the default Volume value of 100 or enter a different value.
The default value plays the sound at 100 percent volume. Enter a lower value to lower the volume of the sound.
16.
Accept the default delay of 0 (seconds) or enter a different value.
This option determines whether the sound is delayed; and, if so, by what amount of time.
17.
Accept the default Repeat value of 1 or enter another value.
The default value repeats the sound once. For a slide with a display time of 3 to 5 seconds, the default is the ticket. Besides, too much noise is going to detract from the beauty of the images.
18.
To add a comment to a slide, click the Comment icon.
This displays the Comment field. Type the desired comment. Comments aren't displayed with the published slide show. You can use a comment as a note to yourself about a particular slide.
19.
Click OK to add the slide show to your Web page.
Active Slideshow Pro does its work quickly and adds a Flash file to your Web page.
20.
Press F12.
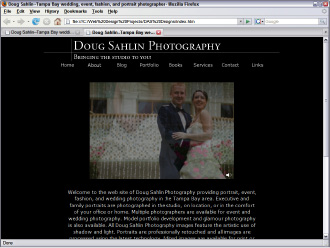
Dreamweaver prompts you to save the file. After saving the file, it's displayed in your default browser. (See Figure 4-6.)
Figure 4-6:
Previewing the slide show in a browser.
Editing a slide show
After you create a slide show and preview it, you might find that you need to tweak it. You can make minor tweaks in Dreamweaver and, if need be, edit the show in the Active Slideshow Pro extension. To edit a slide show, follow these steps:
1.
Select the slide show.
It's the big rectangle with the capital F for Flash.
2.
Choose Window
â
Properties.
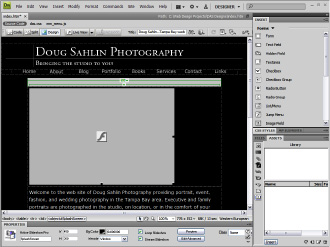
The Property inspector opens. From within the Property inspector (see Figure 4-7), you can edit many of the same parameters found in the General tab of the Active Slideshow Pro dialog box.
Figure 4-7:
Editing slide show properties in the Property inspector.
3.
Click Preview.
The slide show previews from within Dreamweaver.
4.
Click Edit Advanced.
The slide show appears in the Active Slideshow Pro dialog box.
5.
Make your edits and then click OK.
Book VI
Audience Interaction
Creating a user form.
Chapter 1: Adding Basic Interactivity with HTML Forms and JavaScript
In This Chapter
Engaging Web site visitors with interactive content
Considering coding
Creating HTML forms
Adding buttons and boxes to Web forms
Working with password fields, hidden fields, and text areas
Giving Web site visitors multiple choices
Using JavaScript event handlers
Thinking about server side technology
Interactivity is a wonderful thing. You can employ it to make a Web site dance and sing. As Web designers, though, we are devout cowards when the need arises to write code. However, you can create many forms of interactivity without needing to write the first word of code. The Web form is a perfect example, comprising items such as text fields, check boxes, radio buttons, submit buttons, and so on. You can create one in an application like Dreamweaver by merely choosing the proper menu commands. In this chapter, we show you how to create forms as well as how to master JavaScript event handlers.
Understanding Interactivity
An
interactive Web site
does more than appear on your monitor: It has bells and whistles that the user can interact with. Any Web site that requires input from a visitor and delivers different content based on user input can be considered interactive. Interactivity can be as simple as greeting a visitor based on the name she inputs in a Web form, or as complex as delivering information from a database. You can add a lot of interactivity to your designs by adding a bit of JavaScript code to a page, by creating a DHTML (dynamic HTML) page, or by using VBScript (Visual Basic Script).
The most complex types of interactivity take place on the server side and involve adding code to a page that's interpreted by server software. ASP, PHP, and CGI/Perl are examples of programming languages that are interpreted on the server side. (Read all about these in Book III, Chapter 8.)
Now, just because we mention a lot of scary acronyms that are related to code, don't think this chapter has a lot of geek-speak. We mention code only where we need to. In most instances, you won't have to write any code â and when you do, we explain it in terms that you're sure to understand. Now that you have an idea of what interactivity is, it's time to get interactive.
Getting Ready to Code
Yes, at times, you do need to manually write code for the pages you design â and that means learning a language, like JavaScript, VBScript, or one of the other Script Sisters. That's also, like, a lot of work. In most cases, though, you don't have to learn an entire programming language, just like you don't have to know the entire English language to communicate.
Working with code is kind of like working for the government on a need-to-know basis. You learn only as much code as you need to know to get the job done. In many instances, a good HMTL editor (say, Dreamweaver) can create the difficult code for you. All you need to know is which menu command to choose. Fireworks (Dreamweaver's partner in interactivity) can also create code for you. For example, in Fireworks, you can create a functional navigation menu, with a drop-down menu thrown in for grins and giggles.
And you can exercise your creativity in graphic design when creating the menu. Then, export the menu as images and HTML. Figure 1-1 shows a menu as created in Fireworks. After exporting the file as HTML and images, the images are all neatly stored in a folder, and the code that most designers couldn't even think of creating is stored in an HTML file. To get the menu into one of your designs, you use the Fireworks HTML command in Dreamweaver to plop the menu (all neatly sliced and diced inside a table), as well as all the code needed to make the menu work, in your document.
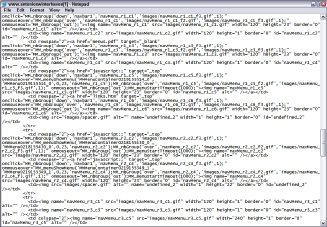
Figure 1-2 shows just some of the code created by Fireworks. In all, Fireworks generated more than 100 lines of code for the menu. Can you imagine writing all that by hand? No wonder hardcore Web developers have carpal tunnel syndrome and an addiction to Naproxen.
Figure 1-1:
A drop-dead gorgeous menu with a drop-down menu.
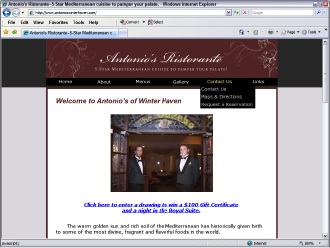
Figure 1-2:
A whole lotta scary code.
But what happens when the dynamic duo of Dreamweaver and Fireworks can't create the effect you're after? You can find lots of code on the Internet. All you need to do is type the desired programming language and examples into your favorite search engine. You'll have lots of results from which to choose. Granted, you'll have to change some of the code to suit your design, but that's a lot easier than thumbing through a manual on the programming language that's heavy enough to be a doorstop.
Another alternative is to grab someone else's code, provided that it's not on a page generated by server side technology. If you see a way-cool effect on a Web site that you want to mimic on your Web site, you can view the code by choosing the proper View Source command from your Web browser. You must remember, though, that there are only about 27 original ideas. Every-thing else is a mutation, permutation, or combination of the original ideas.
Building an HTML Form
One of the most basic and useful forms of interactivity is the lowly Web form. You see them on just about every Web site.
Forms
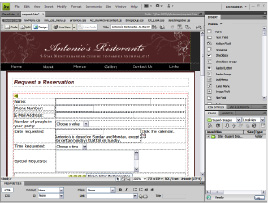
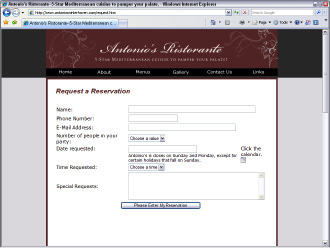
are used to gather information for mailing lists, add entries to blogs, subscribe to RSS (really simple syndication) feeds, and more. Figure 1-3 shows a form used by a restaurant. In the following sections, we show you how to create a Plain Jane form that gets 'er done.
Figure 1-3:
An HTML form in all its glory.
Form tags:
Everything has a beginning. In the case of a form, the
tag designates where the form starts in a document. And a form's got to end somewhere; it's a law. The
tag neatly bookends the form. If you're a geek, you type the beginning and ending
tags, and for that matter, all the code in between. If you're a smart Web designer, though, you let your HTML editor do the heavy work for you. If you use Dreamweaver, you're in luck. Dreamweaver has a Forms toolbar and a menu devoted to creating form elements.
Your HTML editor can take care of another task for you: It lets you specify both the action that occurs when the form is submitted and the method used. The action can be another Web page, or it can be a script on the server, such as a mail-forwarding script. If the form is appending information on a Web page,
GET
is the method. If the form is being used to send information to a user, or to post information to a database, the method used is
POST
.
Text fields:
You can add all manner of elements to a form. One of the most useful form elements enables visitors to add text. When you add a text field to a form, you give the field a unique name. When the information is submitted, the name of the field is used in the ensuing code. For example, the information in the text field can be inserted into a variable, which has the same name as a field in a database. The name of the text field is what the programmer uses when creating the code to make the leap from the text field to the variable to the database.
When you create a text field, you specify the width of the text field. You also determine whether the text is a single line, multiple lines, or password text. Another very helpful option is the ability to limit how many characters an end user can type into the field. If you don't limit the number of characters for a text field, you end up having a character (um, the smart-aleck type that likes to wreak havoc) enter 50 pounds of gibberish in your svelte, 25-character field.
Submit buttons:
The
tag might be the end of your form in HTML, but it isn't the end of the form as far as the user is concerned. The last interactivity (you might remember that this is a chapter on interactivity) the user sees is a button that enables him to submit the form â a button that might be accompanied by its faithful companion, Reset. The Submit button executes the action specified by the beginning
tag. When you add a button to a form, you also have the option to change the default text, change the style of the dull and drab default text with a style from your style sheet, or choose Submit Form, Reset Form, or None as the action. You choose None as the action if you want the button to function as something else â for instance, a hyperlink that loads another Web page. Reset does just as you would expect, it clears all of the fields in the form in case the user changes her mind and wants to start from scratch.
Creating a simple form in Dreamweaver
The past few sections of this chapter cover the basic elements of a form. If you fast-forwarded to this section to create a form, you should probably at least skim the previous sections. It can make the process of creating a form a little easier. Now, you could
hard-code
â developer-speak for typing the code by hand â the form, but that's a lot of work. And if you don't know all the parameters, your form will be as useless as clothes in a nudist colony. The easy way to create a form is to choose menu commands from your HTML editor. This section shows you how to create a form in Dreamweaver CS4, which comes with a handy-dandy Forms toolbar, which is available when you work in the Classic workspace. (See Figure 1-4.) If you work with the Designer workspace, you access everything from the Form menu, found under the Insert menu.
Figure 1-4:
The Forms toolbar.

You can create a form within a new Dreamweaver document or add the form to an existing document. Follow these steps to create a simple form with a text box (or
text field,
as Dreamweaver calls it) and a Submit button to submit user information using a Web site's mail redirect script:
1.
Launch Dreamweaver and open an existing document into which you want to insert a form. Or, open a new document.