Make: Electronics (2 page)
Authors: Charles Platt

O’Reilly Media has uploaded this book to the Safari Books Online service. To have full digital access to this book and others on similar topics from O’Reilly and other publishers, sign up for free at
http://my.safaribooksonline.com
.
1.
Experiencing Electricity
I want you to get a taste for electricity—literally!—in the first experiment. This first chapter of the book will show you:
- How to understand and measure electricity and resistance
- How to handle and connect components without overloading, damaging, or destroying them
Even if you have some prior knowledge of electronics, you should try these experiments before you venture on to the rest of the book.
Shopping List: Experiments 1 Through 5
If you want to limit your number of shopping trips or online purchases, look ahead in the book for additional shopping lists, and combine them to make one bulk purchase.
In this first chapter, I will give you part numbers and sources for every tool and component that we’ll be using. Subsequently, I won’t expect you to need such specific information, because you will have gained experience searching for items on your own.
Maker Shed (
www.makershed.com
) has put together a series of
Make: Electronics
companion kits. These include all of the tools and components used in book’s experiments. This is a quick, simple, and cost-effective way of getting everything you need to complete the projects in this book.
Tools
Small pliers
RadioShack Kronus 4.5-inch, part number 64-2953 or Xcelite 4-inch mini long-nose pliers, model L4G.
Or similar. See Figures 1-1 through 1-3. Look for these tools in hardware stores and the sources listed in the preface. The brand is unimportant. After you use them for a while, you’ll develop your own preferences. In particular, you have to decide whether you like spring-loaded handles. If you decide you don’t, you’ll need a second pair of pliers to pull the springs out of the first.
Wire cutters
RadioShack Kronus 4.5-inch, part number 64-2951, or Stanley 7-inch model 84-108.
Or similar. Use them for cutting copper wire, not harder metals (Figure 1-4).

Figure 1-1.
Generic long-nosed pliers are your most fundamental tool for gripping, bending, and picking things up after you drop them.
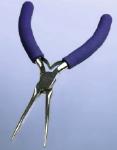
Figure 1-2.
Longer-nosed pliers: these are useful for reaching into tiny spaces.
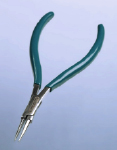
Figure 1-3.
Sharp-pointed pliers are designed for making jewelry, but are also useful for grabbing tiny components.

Figure 1-4.
Wire cutters, sometimes known as side cutters, are essential.
Multimeter
Extech model EX410 or BK Precision model 2704-B or Amprobe model 5XP-A.
Or similar. Because electricity is invisible, we need a tool to visualize the pressure and flow, and a meter is the only way. A cheap meter will be sufficient for your initial experiments. If you buy online, try to check customer reviews, because reliability may be a problem for cheap meters. You can shop around for retailers offering the best price. Don’t forget to search on eBay.
The meter must be digital—don’t get the old-fashioned analog kind with a needle that moves across a set of printed scales. This book assumes that you are looking at a digital display.
I suggest that you do not buy an autoranging meter. “Autoranging” sounds useful—for example, when you want to check a 9-volt battery, the meter figures out for itself that you are not trying to measure hundreds of volts, nor fractions of a volt. The trouble is that this can trick you into making errors. What if the battery is almost dead? Then you may be measuring a fraction of a volt without realizing it. The only indication will be an easily overlooked “m” for “millivolts” beside the large numerals of the meter display.
On a manual-ranging meter, you select the range, and if the source that you are measuring is outside of that range, the meter tells you that you made an error. I prefer this. I also get impatient with the time it takes for the autoranging feature to figure out the appropriate range each time I make a measurement. But it’s a matter of personal preference. See Figures 1-5 through 1-7 for some examples of multimeters.

Figure 1-5.
You can see by the wear and tear that this is my own favorite meter. It has all the necessary basic features and can also measure capacitance (the F section, for Farads). It can also check transistors. You have to choose the ranges manually.

Figure 1-6.
Mid-priced RadioShack meter, which has the basic features; however, the dual purpose for each dial position, selected with the SELECT button, may be confusing. This is an autoranging meter.

Figure 1-7.
An autoranging meter from Extech offers basic functions, plus a temperature probe, which may be useful to check whether components such as power supplies are running unduly hot.
Supplies
Batteries
9-volt battery. Quantity: 1.
AA batteries, 1.5 volts each. Quantity: 6.
The batteries should be disposable alkaline, the cheapest available, because we may destroy some of them. You should
absolutely not
use rechargeable batteries in Experiments 1 and 2.
Battery holders and connectors
Snap connector for 9-volt battery, with wires attached (Figure 1-8). Quantity: 1. RadioShack part number 270-325 or similar. Any snap connector that has wires attached will do.

Figure 1-8.
Snap connector for a 9-volt battery.
Battery holder for single AA cell, with wires attached (Figure 1-9). Quantity: 1. RadioShack part number 270-401 or Mouser.com catalog number 12BH311A-GR,
or similar; any single-battery holder that has thin wires attached will do.
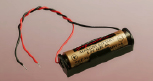
Figure 1-9.
Single AA-sized battery carrier with wires.