Make: Electronics (3 page)
Authors: Charles Platt

Battery holder for four AA cells, with wires attached (Figure 1-10). Quantity: 1. All Electronics catalog number BH-342 or RadioShack part 270-391 or similar.
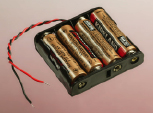
Figure 1-10.
Battery carrier for four AA cells, to be installed in series, delivering 6 volts.
Alligator clips
Vinyl-insulated. Quantity: at least 6. All Electronics catalog number ALG-28 or RadioShack part number 270-1545 or similar (Figure 1-11).
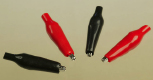
Figure 1-11.
Alligator clips inside vinyl sheaths, which reduce the chance of accidental short circuits.
Components
You may not know what some of these items are, or what they do. Just look for the part numbers and descriptions, and match them with the photographs shown here. Very quickly, in the learning by discovery process, all will be revealed.
Fuses
Automotive-style, mini-blade type, 3 amps. Quantity: 3. RadioShack part number 270-1089, or Bussmann part ATM-3, available from automotive parts suppliers such as AutoZone (Figure 1-12).
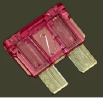
Figure 1-12.
A 3-amp fuse intended primarily for automotive use, shown here larger than actual size.
Or similar. A blade-type fuse is easier to grip with alligator clips than a round cartridge fuse.
Potentiometers
Panel-mount, single-turn, 2K linear, 0.1 watt minimum. Quantity: 2. Alpha part RV170F-10-15R1-B23 or BI Technologies part P160KNPD-2QC25B2K, from Mouser.com or other component suppliers (Figure 1-13).
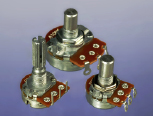
Figure 1-13.
Potentiometers come in many shapes and sizes, with different lengths of shafts intended for different types of knobs. For our purposes, any style will do, but the larger-sized ones are easier to play with.
Or similar. The “watt” rating tells you how much power this component can handle. You don’t need more than 0.5 watts.
Resistors
Assortment 1/4-watt minimum, various values but must include 470 ohms, 1K, and 2K or 2.2K. Quantity: at least 100. RadioShack part number 271-312.
Or search eBay for “resistor assorted.”
Light-emitting diodes (LEDs)
Any size or color (Figures 1-14 and 1-15). Quantity: 10. RadioShack part number 276-1622 or All Spectrum Electronics part K/LED1 from Mouser.com.
Or similar. Just about any LEDs will do for these first experiments.

Figure 1-14.
Typical 5-mm diameter light-emitting diode (LED).
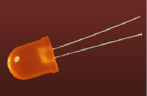
Figure 1-15.
Jumbo-sized LED (1 cm diameter) is not necessarily brighter or more expensive. For most of the experiments in this book, buy whatever LEDs you like the look of.
Experiment 1: Taste the Power!
Can you taste electricity? Maybe not, but it feels as if you can.
You will need:
- 9-volt battery
- Snap connector for battery terminals
- Multimeter
 No More Than 9 Volts
A 9-volt battery won’t hurt you. But
do not
try this experiment with a higher-voltage battery or a larger battery that can deliver more current. Also, if you have metal braces on your teeth, be very careful not to touch them with the battery.
Procedure
Moisten your tongue and touch the tip of it to the metal terminals of a 9-volt battery. The sudden sharp tingle that you feel is caused by electricity flowing from one terminal of the battery (Figure 1-16), through the moisture on and in your tongue, to the other terminal. Because the skin of your tongue is very thin (it’s actually a mucus membrane) and the nerves are close to the surface, you can feel the electricity very easily.
Now stick out your tongue, dry the tip of it very thoroughly with a tissue, and repeat the experiment without allowing your tongue to become moist again. You should feel less of a tingle.

Figure 1-16.
Step 1 in the process of learning by discovery: the 9-volt tongue test.
What’s happening here? We’re going to need a meter to find out.
Tools
Setting up your meter
Check the instructions that came with the meter to find out whether you have to install a battery in it, or whether a battery is preinstalled.
Most meters have removable wires, known as
leads
(pronounced “leeds”). Most meters also have three sockets on the front, the leftmost one usually being reserved to measure high electrical currents (flows of electricity). We can ignore that one for now.
The leads will probably be black and red. The black wire plugs into a socket labeled “COM” or “Common.” Plug the red one into the socket labeled “V” or “volts.” See Figures 1-17 through 1-20.
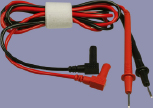
Figure 1-17.
The black lead plugs into the Common (COM) socket, and the red lead plugs into the red socket that’s almost always on the righthand side of a multimeter.