125 Physics Projects for the Evil Genius (44 page)
Read 125 Physics Projects for the Evil Genius Online
Authors: Jerry Silver

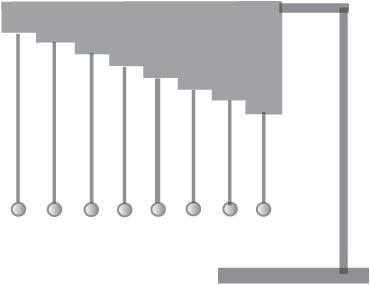
Figure 76-1
Inverted staircase frame for pendulum wave
.
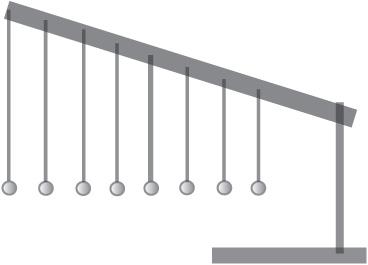
Figure 76-2
Simple frame for pendulum wave
.
Table 76-1

Table 76-1
gives the length of a set of strings for a pendulum wave to repeat every 30 seconds with 25 oscillations for the longest string during that time.
Notice that the optimal string length is not linear. Some pendulum wave frames are actually curved to accommodate the shape given by the previous equation.
- Attach the strings to the masses.
- Adjust the string lengths between the masses and the frame, so all the masses are the same length.
- Attach the other end of each string to the frame, so each of the masses is at the same height from the ground. The masses should be low enough so they can be observed from above.
- Secure the frame to a table or other supports, so each of the masses is free-swinging above the floor.
- Hold all the masses and push off to one side using a meterstick or flat board. The masses are not pushed toward each other.
- Release the masses and observe from above. Placing a board underneath the masses may help in viewing the pattern they form as they move.
The masses define a continuously changing pattern. With the first swing, the masses all swing pretty much together, resulting in the patterns shown in
Figures 76-3
,
76-4
, and
76-5
.

Figure 76-3
Linear alignment
.
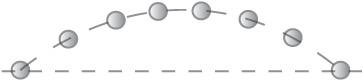
Figure 76-4
Quarter wave
.

Figure 76-5
Full wave
.
The period of a pendulum, or the time,
T
(in seconds), it takes to swing back and forth one time increases with the length of the pendulum, according to the formula:
T = 2π(L/g)
½
where
L
is the string length (in meters) and
g
is the gravitational acceleration constant (in m/s
2
).
Because each successive mass has a slightly longer string, its period is longer than the mass before it. The more cycles the masses go through, the more difficult it is for the masses on the longer strings to keep up. The delay that occurs in the slower masses begins to develop into the patterns depicted in the previous figures.
A follow-up to this exercise is to predict the period during which a sequence of patterns repeats. This can be verified by measuring how often a particular pattern takes to recur compared with the step size for each successive pendulum.
This project illustrates the variability of the period of a pendulum with string length. It also shows how changes in the frequency of a wave can have an effect on whether it is in phase or out of phase with other masses in the system.
Using waves to measure the speed of sound
.
In this experiment you will determine the speed of sound by measuring how long it takes sound to get from one microphone to another separated by a known distance. This is almost the same thing you did in
Project 72
. The only difference is that here we use an oscilloscope to measure the difference in time instead of a stopwatch.
You can take advantage of the wave properties of sound to find the distance between the positions where the sound is loudest. This occurs where the sound constructively interferes. This lets you find the wavelength of the sound. Knowing the wavelength and frequency of sound lets you determine its velocity.
This experiment provides an opportunity to explore basic properties of waves in general. The overall techniques used here can, with significant refinements, also be used to measure the speed of light.
- 2 speakers
- 2 approximately 6-foot lengths of hookup wire
- tone generator or a single tone
wav
file played through a computer or digital audio player - 2 microphones connected to an oscilloscope (or a sensitive sound meter)
- tape measure, meterstick
- quiet room
- Connect the tone generator to the two speakers using the hookup wire. Connect the positive terminal of the tone generator to the positive terminal of
each
of the speakers. The negative terminal of the tone generator is connected to the negative terminals of
each
of the speakers. - Position both speakers side-by-side directed toward the microphone. At this point and throughout this measurement, each speaker should have an unobstructed line-of-sight view to the microphone, as shown in
Figure 77-1
. - Turn on the tone generator. Verify that both speakers are functional and at roughly the same volume. You should hear a steady, continuous tone. Any midrange range frequency should work, such as 440 Hz, although this method works well for all audible frequencies.
- Connect the microphone to your oscilloscope. (Alternatively, you can use a sound meter or just listen carefully to determine the positions of maximum and minimum sound intensity.)
- Display the waveform picked up by the microphones on the oscilloscope. Adjust the amplitude, time scale, and, if needed, the trigger setting.
- Slowly move one of the speakers (either forward or back) along the line between it and the microphone. Each speaker should, at all times, continue to face the microphone.
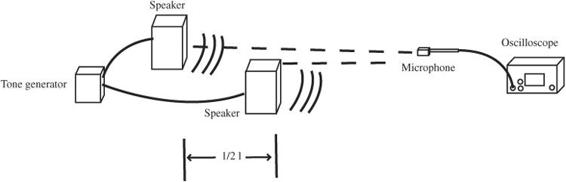
Figure 77-1
Finding the distance between positions of maximum intensity to determine the speed of sound
.
- Monitor the amplitude of the signal displayed on the oscilloscope (or the intensity on the sound sensor; you can also hear the relative intensity of the sound with reasonable accuracy). Be careful to avoid any objects that could block or reflect the sound waves striking the microphone.
- Note the frequency of the sound waves (from the setting on the tone generator or the
wav
file you used). However, if you don’t know the frequency, or just want to confirm it, determine how many seconds it takes on the time scale for one full oscillation to occur. The time it takes for one wavelength to occur is called the
period
of the sound wave. The
reciprocal
of the period is the
frequency
,
f
(in Hz or cycles per second). - As you adjust the distance between the speakers, you should see the amplitude of the combined sound waves decrease, reach a minimum, and then return back to its maximum level as the speakers are moved.
- The
distance between the speakers
when the sound is at a
maximum
is a
full wavelength
. This is the result of constructive reinforcement of the signals. The distance between the speakers when the sound is at a
minimum
is a half wavelength, resulting in destructive interference. (The components for this experiment are shown in
Figure 77-2
.)