125 Physics Projects for the Evil Genius (47 page)
Read 125 Physics Projects for the Evil Genius Online
Authors: Jerry Silver

- Secure the glass perpendicular to the table.
- Place one candle on the table in the upright position on one side of the glass.
- Place the other candle upright on the table on the other side of the glass along the same line and the same distance as the first candle.
- Pick one side of the glass to view.
- Light the candle on the viewing side.

Figure 79-1
Photo by S. Grabowski
.
- All observers should be on the side of the pane with the lit candle.
- Observe the appearance of both candles.
You can see the image of the flame from behind the glass, superimposed on the wick of the (unlit) candle in front of the glass.

Figure 79-2
Photo by S. Grabowski
.
When light strikes a transparent surface, such as a piece of glass, some of the light is reflected, while some of the light is refracted and transmitted through the glass. The image of the burning candle in front of the glass is reflected. The image of the candle without a flame from behind the glass is transmitted. Both the reflected and transmitted light rays form images that fall on top of each other. This creates the illusion that a single image exists and the candle behind the glass is burning.
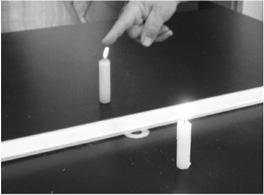
Figure 79-3
Photo by S. Grabowski
.
Another way to do this is to replace the unlit candle with a beaker of water. The water level should be above the level of the candle. The reflected image of the lit candle combined with the transmitted image of the beaker of water creates the illusion the candle is burning under water.
A similar illusion can be created by multiple reflections creating a virtual image floating in the air. In
Figure 79-4
, the image of the space shuttle appears to be hovering over the dome.
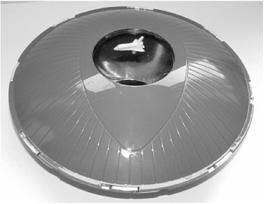
Figure 79-4
Illusion of the shuttle appears to be floating in the air
.
However, when viewed from a slightly different angle, the real toy shuttle can be seen at the bottom of the dome, producing the virtual image also pictured in
Figure 79-5
.
This looks so real, it is common for observers to reach in and try to touch the virtual image to convince themselves it is not real.
A transparent object, such as glass, can both transmit and reflect light that is incident on it. Reflected light follows the law of reflection, where the angle of incidence equals the angle of reflection.

Figure 79-5
The real toy shuttle seen at the bottom of the dome is the sources of the illusion
.
Laser obstacle course
.
This is a simple and fun way of exploring the law of reflection that provides an initial insight into what is needed to achieve optical alignment. This project (which I first heard from Tom Misniak) makes a good team-building activity and can be used as the basis for a friendly competition.
- low-power laser (a laser pointer is fine)
- apparatus (such as a tripod) to mount the laser point and hold it illuminated and stationary for a sustained period (you may need to tape the laser point to keep it on without holding it)
- several plane mirrors
- small white boards
- way to mount the mirrors, such as ring stands and clamps or modeling clay
- dark room
- timer
1. Caution: Be careful not to shine the laser beam at anyone’s eyes. Although the power of the laser should be low, it is a good idea to take care not to expose anyone’s eyes.
2. Distribute a mirror and associated mounting hardware to each participant.
3. Draw a target and mount it in a location where everyone has a clear line-of-sight to it.
4. Set up the laser pointer in a central location.
5. Place the participants at different locations around the room.
6. Define a sequence for the beam to reflect from one person to the next and, finally, to the target.
7. Optional: darken the room.
8. Direct the beam to the first mirror. Use the white board, if necessary, to “capture” the beam.
9. Optional: start the timer.
10. Next, align the pointer and the first mirror to make the beam reflect to the second mirror.
11. Continue from one mirror to the next until the last mirror directs the beam to the target, as shown in
Figure 80-1
.

Figure 80-1
Laser obstacle course
.
12. Optional: in case this gets too easy, require the final beam to pass through a cardboard tube mounted in front of the target.
Competition 2: Back to the target13. Compasses (for Competition 2).
- Take similar precautions, distribute mirrors, and establish a target, as in Competition 1.
- Place the participants at different locations around the room.
- This time, however, have each participant work out their angles and alignment based on applying the law of reflection and measuring angles.
- Give each participant a set time.
- When the time is up, all participants must no longer touch the mirrors. In fact, you can have them leave the area altogether.
- Then comes the moment of truth, where you see how close each of the participants is able to direct the laser to the target.
It is not unreasonable to have six reflections in about ten minutes. This requires interaction and coordination between groups. One lesson people doing this learn is that small changes at the beginning of the course result in large errors at the end. Even vibrations in the first mirror in the sequence can throw off the alignment downstream. Adjustments may need to be made at each step. Another valuable lesson is there comes a time when it is best to leave the mirror alone and stop making changes.
One other thing that may not immediately be obvious is this is a three-dimensional alignment problem. You not only need to adjust left and right, but also up and down.
This is an application of the law of reflection. Because the reflection angle from one mirror becomes the incident angle of the next mirror, errors in incidence double with each reflection.
For the truly dedicated: work out the angles for multiple reflections and back to the target on paper first.
The angle of incidence equals the angle of reflection. Small alignment errors can be quickly compounded when multiple reflections occur.
Light intensity. Putting distance between yourself and a source of light
.
We all know that stars are intense sources of light, but they appear as faint objects in the sky because they are so far away. How does that work? If you increase the distance between yourself and a light source, does the light become one-half of its original brightness or does it drop off some other way? Check it out and see for yourself.
- A light-sensing circuit assembled from