OS X Mountain Lion Pocket Guide (22 page)
Read OS X Mountain Lion Pocket Guide Online
Authors: Chris Seibold
Tags: #COMPUTERS / Operating Systems / Macintosh

Mail is the standard email client for OS X. (If you’re new
to OS X, skip to the
Adding new accounts
to learn how
to get started.) The app, as you can guess, lets you read and compose
emails. But it does a lot more than just that.
One of the new features of Mail is the ability to control
what shows up in Notification Center. By default, any email message you
get shows up in Notification Center. That may seem nifty at first, but
if you get a lot of mail and it’s not all high priority, you likely
don’t want to be bothered by every single message. Happily, you can
decide exactly which messages show up in Notification Center. Head to
Mail
→
Preferences and, on the General
tab, you’ll discover a drop-down menu labeled “New message
notifications.” Clicking this will let you decide which messages make it
through to Notification Center. Your options are Inbox Only, VIPs,
Contacts, All Mailboxes, and any smart mailboxes you’ve set up.
Most of those options will be familiar if you’ve used
previous versions of Mail, but VIPs and Smart Mailboxes are new
categories. VIPs are senders you deem important: your spouse, that
cranky uncle who sends you emails with “fwd:fwd:fwd:fwd:” in the subject
line, or your parole officer. To designate someone a VIP, just open a
message from that person and then point your cursor at her name; you’ll
see a star magically appear. Click the star and that person becomes a
VIP.
Filtering for VIPs is a nice way to keep Notification
Center free of unwanted notifications, but maybe you want
some
—but not all—of the mail from certain senders,
or want mail about certain
subjects to show up in Notification Center. Smart Mailboxes let you do
that. To create one, click the tiny + button at the bottom left of the
Mail window (if you’re using three-column mode) or go Mailbox
→
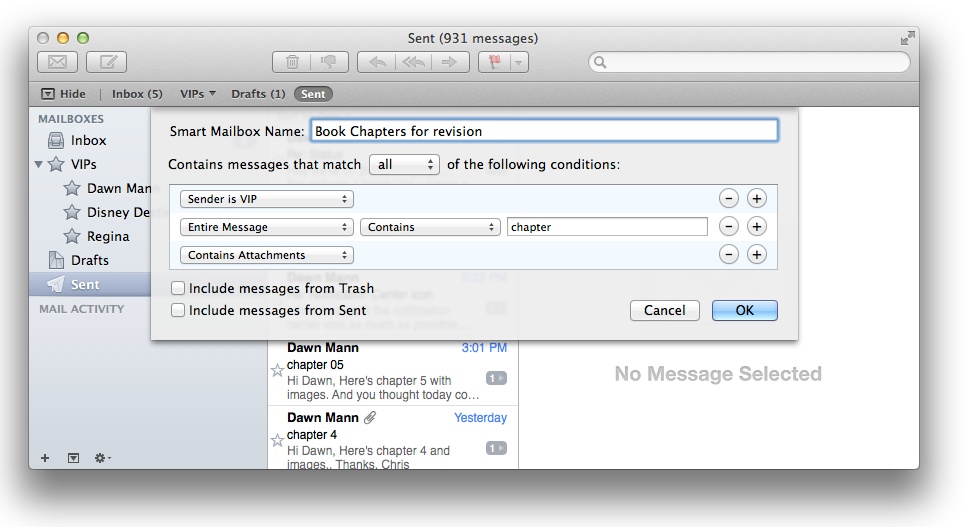
New Smart Mailbox A window appears where you
can set up all kinds of hoops for a piece of mail to jump through before
it makes it to Notification Center (
Figure 6-8
). Click the +
button in this window to add a new criteria.

Figure 6-8. Creating a Smart Mailbox that will contain only chapters
returned for further editing
You don’t have to rely on Smart Mailboxes for your Mail filtering
needs, however. Mail still lets you set up rules to handle incoming
messages, sending them directly to a destination folder depending on the
criteria you select (go to Mail
→
Preferences
→
Rules).
For good or ill, you can also create fancy email with Mail
by using stationery templates. To access them, click the Stationery
button at the top right of any New Message window. Choose one and your
mail will be full of color (and probably annoyance) for all the
recipients of your missive. If you’re looking for an easy way to attach
photos to an email (or use them with stationery), Mail includes a
browser for all your images stored in iPhoto. In the New Message window,
just click the Photo Browser button (it’s to the left of the Stationery
button) and then choose the picture you want to attach. The following
sections contain more info on using Mail.
When you first run Mail, it will ask for your name, an
existing email address, and the password for that account. (To add
another account later, select File
→
Add
Account.) Type in those three bits of information and Mail will try to
figure out how to configure your email server. If it can’t, it’ll ask
you to provide detailed settings, such as the incoming server name,
account type, and more. You can get that info from your administrator
or Internet service provider.
If you’re just adding an email-only account, Mail is the way
to go. But adding accounts with Mail isn’t your best option if
you’re
also
using other services (like chat,
calendaring, etc.) offered by your email provider. In that case,
head to the Mail, Contacts & Calendars preference pane to take
care of everything at once.
Some email services, such as Gmail, allow you to access
your mail using either
POP (Post Office Protocol) or
IMAP (Internet Mail Access Protocol). If you like to
access the same email account from multiple devices (such as an iPhone
and a computer), IMAP is your best choice, because that way all your
mail is stored on the server; when you read a message, it’s marked as
read across all the devices you access it from. (Some services may
require
you to enable IMAP before you can access
them.) To enable IMAP for a service such as Gmail, log into your
account using a web browser, and then visit the service’s settings
page. You may also need to look on the mail service’s settings screen
or in its help system for instructions on configuring Mail to access
it via IMAP.
You can use a signature to automatically append text or
add a picture to the end of your messages. If you end all your emails
with the same thing (even if it’s only “Thanks, Chris”), a signature
can save you some time.
To add a signature, go to Mail
→
Preferences
→
Signatures, and then, in the list on the
left, choose the account you want to add a signature to (or choose All
Signatures to create one for
all
your accounts).
Click the + button and then type the signature text into the
right-hand box (Mail automatically suggests your name and email
address, but you can just type over that). If you want to use an image
(such as a picture of your
actual
signature),
scan it in, whittle it down to a small size (you can use Preview to do
that), save the image as a file, then drag the image file into the
right-hand box. If you add more than one signature, you can click the
Choose Signature drop-down menu in this window and then specify a
signature or tell Mail to rotate through your signatures sequentially
or randomly.
Head to Mail
→
Preferences
→
Junk Mail, and then make sure the box next to
“Enable junk mail filtering” is checked. You can have Mail leave the
suspected junk in your inbox or move it to the Junk mailbox. Note that
every time you mark a message as junk, Mail learns from your action
and improves its junk filtering. But Mail’s junk filter isn’t 100
percent accurate, so if all your email providers offer their own junk
filtering, you might not want to bother with Mountain Lion’s junk
filtering, too.
To add a new, standard mailbox, go to Mailbox
→
New Mailbox. To add a Smart Mailbox—which
lets you set criteria for messages that should go straight into it
(without you having to lift a finger)—choose New Smart Mailbox
instead, and you’ll be presented with a window where you can set your
criteria.
If you’ve become confident in Mail’s ability to figure
out which mail is junk, you can get rid of those messages by pressing
Option-⌘-J or going to Mailbox
→
Erase
Junk Mail.
You can use Spotlight to search for that elusive memo
you want to reread, but if you use the search box in Mail’s menu bar,
you won’t have to wade through search results from other sources.
You’ll get the same lightning-fast results, but you’ll see only
matches from your email, notes, and to-dos.
You won’t find iChat anywhere in Mountain Lion because
it’s been replaced by the more ambitious Messages, which retains all the
functionality of iChat and adds more options for communicating with
others.
After you launch Messages, you can set up an account using any of
the standard chat protocols found on the Mac by clicking the + button in
the lower-left side of the window; your options are AIM, Jabber, Google
Talk, and Yahoo. (If you use iCloud, this info is already available once
you sign into your account, so you won’t see this button.) Once you set
up your accounts, you can use Messages just as you used iChat.
As you’d expect, you can do more with Messages than just
instant-message people. You can send a text to a buddy, start a video
chat with FaceTime, or have a three-way meeting. Messages rolls all your
communication into one simple-to-use app.
In a nutshell, Mission Control is a window-management
application that was introduced in Lion. But that description, while
accurate, is far too terse. Mission Control is composed of Spaces
(virtual desktops for your different workflow needs; “Spaces” has
details), Dashboard for the information that you want quick access to
(see “Dashboard”), full-screen applications, and the regular windowed
applications you know and love. That’s four distinctly different ways of
interacting with your Mac.
Switching between a full-screen application and the
desktop used to be cumbersome, but Mission Control fixes that. Instead
of forcing you to click and hunt for minimized windows, Mission Control
puts everything that’s running on your Mac into one easy-to-navigate
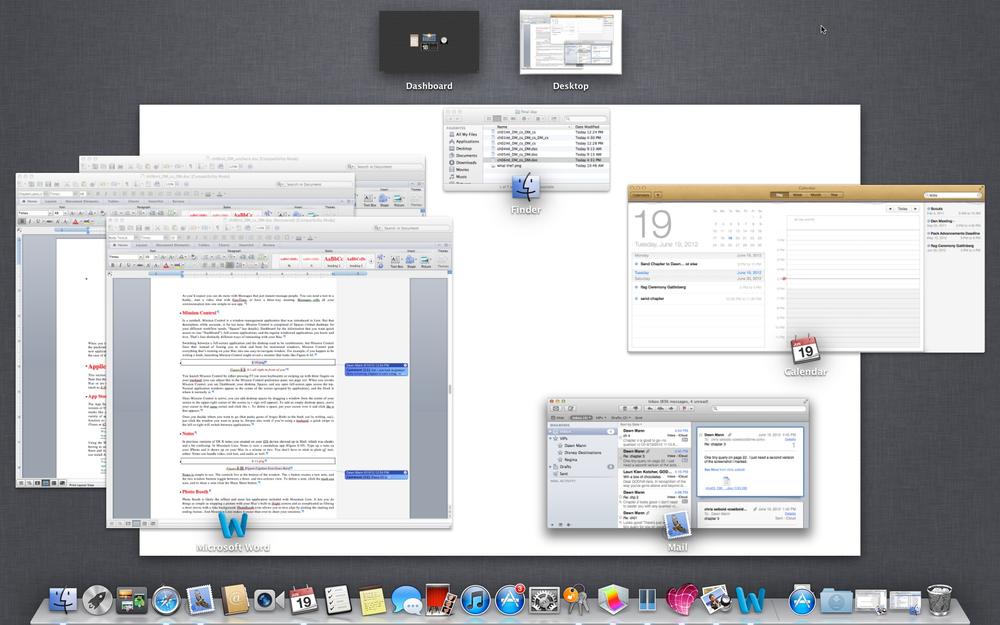
window. For example, if you happen to be writing a book, launching
Mission Control might reveal a monitor that looks like
Figure 6-9
.

Figure 6-9. It’s all right in front of you!
You launch Mission Control by either pressing F3 (on most
keyboards) or swiping up with three fingers on your trackpad (you can
adjust this in the Mission Control preference pane; see
Mission Control
). When you invoke Mission Control, you see
Dashboard, your desktop, Spaces, and any open full-screen apps across
the top. Normal application windows appear in the center of the screen
(grouped by application), and the Dock is where it normally is.
Once Mission Control is active, you can add desktop spaces by
dragging a window from the center of your screen to the upper-right
corner of the screen (a + sign will appear). To add an empty desktop
space, move your cursor to that same corner and click the +. To delete a
space, put your cursor over it and click the × that appears.
Once you decide where you want to go (that pesky game of Angry
Birds or the book you’re writing, say), just click the window you want
to jump to. Swipes also work if you’re using a trackpad: a quick swipe
to the left or right will switch between applications.
In previous versions of OS X, notes you created on your
iOS device showed up in Mail, which was clunky and a bit confusing. In
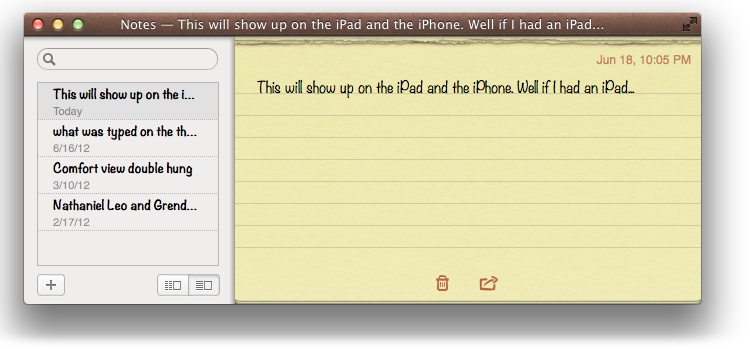
Mountain Lion, Notes is now a standalone app (
Figure 6-10
). Type up a note
on your iPhone and it shows up on your Mac in a minute or two. You don’t
have to stick to plain ol’ text, either: Notes can handle video, rich
text, and audio as well.

Figure 6-10. Making one note that will show up everywhere
Notes is simple to use. The controls live at the bottom of the
window. The + button creates a new note, and the two window buttons
toggle between a three- and two-column view. To delete a note, click the
trash can icon, and to share a note click the Share Sheet
button.