OS X Mountain Lion Pocket Guide (4 page)
Read OS X Mountain Lion Pocket Guide Online
Authors: Chris Seibold
Tags: #COMPUTERS / Operating Systems / Macintosh

Before Migration Assistant came along, getting your data onto your
new Mac could be a real pain. While Migration Assistant is a fantastic
tool, it has one drawback: it doesn’t differentiate between different
types of networks.
As you know, not every network connection is equal. If you’re
transferring small bits of information (like email or text messages), a
cellphone protocol is plenty of bandwidth. But when you’re transferring
larger chunks of data, the connection type is more important. If you’re
using Migration Assistant, there’s a good chance that you’re planning to
send a bunch of data from your old computer to your new Mac, so the
speed of the transfer really matters—especially since you’ll be locked
out of both machines for the duration of the transfer.
Here are your data-transfer options from fastest to
slowest:
- Thunderbolt
You couldn’t use Thunderbolt when Lion was released,
not because some Macs didn’t have the port for it, but because
there wasn’t a cable available from Apple. Now you can get the
required cable from Apple for $49. It’s an investment you might
want to make if you have a lot of data to transfer, because
Thunderbolt can transfer data at up to 20 gigabits per
second.- Ethernet
Ethernet is your second-fastest option. If your Mac
has an Ethernet port (all Macs except the MacBook Air do), you can
string an Ethernet cable between your old computer and your new
Mac and transfer data at up to a gigabit per second.- FireWire 800
FireWire 800 is your next-fastest option. Not every
Mac that can run Mountain Lion has a FireWire 800 port, so if
you’re unsure, check your System Information (see
System Information
) and select FireWire. If both your
computers are FireWire 800 equipped, you’ll be swapping data at a
peppy 800 Mbps. A lot of Mac owners have FireWire
400
on their old machines and FireWire
800
on their new ones (no new Macs have
FireWire 400). If you’re in that camp, you can get a FireWire 400
to 800 cable (try Amazon) and then transfer your files using a 400
Mbps connection.- WiFi
WiFi is the slowest option. Its speed varies
depending on the network, but if you’re using the 802.11n, your
network could be running up to 300 MBps.
The speeds listed above are best-case scenarios, so your real-life
experience may not match those numbers. But even with that caveat,
you’ll save a significant amount of time if you use one of the wired
options instead of WiFi.
Your Mac is kind of lazy. It doesn’t care which transfer method
is the fastest; it’ll automatically opt for the network connection
you’re currently using. So if you don’t want to sling files over your
WiFi connection (which could take forever), you can string a
Thunderbolt cable between your Macs and then switch to
that
connection
in the Network preference pane to get your data moving at breakneck
speed.
If you’re migrating data, chances are you have a new Mac.
If you’re like most people, you’ve accumulated a lot of cruft over time,
and you might not want to transfer
everything
from
your old Mac. Of course you’ll want to save that folder of lolcat
pictures, but that folder with your master’s thesis is just taking up
space.
Migration Assistant lets you decide what to take and what to leave
behind in terms of users and settings. (Don’t worry: this is a
nondestructive process, so the data you shun on your new Mac will still
be on the old machine.) Simply follow the data-migration process
described earlier in this chapter, but when you get to the “Select Items
to Migrate” screen (
Figure 2-6
),
uncheck the items you want to leave behind. Click the disclosure
triangle to display all your options.
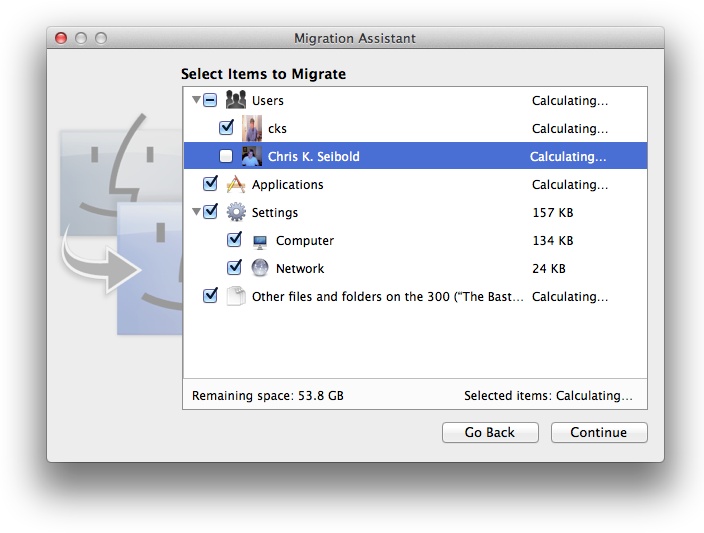
Figure 2-6. Choosing what data to grab
Don’t get confused by the folder names listed on the “Select
Items to Migrate” screen. For example, Movies doesn’t mean that
Migration Assistant will import all your movie files, just that it
will import the Movies
folder
. If you have movies
stored elsewhere and you want them to come along during the transfer,
make sure the “All other files and folders” option is checked.
After you make your selections, click Continue and your data will
be transferred. Give it some time and the data will magically appear on
your new Mac.
Once Migration Assistant finishes transferring your data, Setup
Assistant will pop up and offer to upgrade your email (if you’re
migrating from an older version of Mac OS X). This takes a few moments,
but once it’s finished, you’re free to use your new Mac and pick up
where you left off with your old machine!
Finding your way around Mountain Lion for the first time is
exciting, but it’s also easy to miss many of the cool new features,
especially if you’re new to OS X or you’ve been using an older version of
it. This chapter will get you up to speed on the basics of OS X, with a
special focus on what’s new in Mountain Lion. It’ll familiarize you with
the key aspects of OS X so you can get the most out of Apple’s best
operating system to date.
The logical place to start is with the first thing you
created when you installed or ran OS X for the first time: your account.
Mountain Lion’s roots go all the way to Unix, a multiuser workstation
and server operating system. Because OS X is based on Unix, it’s also
multiuser to its core. Even if no one but you ever touches your Mac,
it’s still helpful to understand user accounts, because you may need to
deal with them someday.
Consider these situations:
As you’ll learn shortly, you may want to set up an
unprivileged account for day-to-day use to limit your vulnerability
to mistakes and malicious software.If you ever need to run a demonstration on your Mac, you’ll
probably want to create a separate account to run the demo to
prevent interruptions from chat buddies, calendar reminders, and the
like.Even the most solitary Mac user eventually needs to let
someone else use her Mac (a houseguest, a family member, or a TSA
agent), and it’s so easy to set up a new user account that you may
as well do it. Then even your most reckless friend can use your Mac
without much threat of major chaos.
There are six types of user accounts in OS X, and you can
also create groups of users:
- Administrator
When you create your first account in OS X, it’ll
automatically be an Administrator account. This is the most
powerful type, because an administrator can make
global
changes that affect the computer and
all other user accounts, like adding and removing programs.
Because of this ability to change things (sometimes
inadvertently), most savvy Mac users argue that you shouldn’t use
Administrator accounts for day-to-day computing; instead, they
recommend using a Standard account most of the time.NoteYou might detest the idea of jettisoning the power of the
Administrator account for day-to-day use. But even if you’re
using a Standard account, you can still make global changes by
typing in your Administrator account name and
password.- Standard
Standard accounts are the sweet spot: you can’t mess
up your Mac or anyone else’s account while using a Standard
account, but you still have plenty of control over how your Mac
works. You can add and delete programs for just your account, but
not to the entire system, and you can delete files you own
(meaning ones you’ve created or installed), but not files owned by
others.- Managed with Parental Controls
Accounts managed with Parental Controls are limited
in what they can do. These users can’t make changes to the system
at all. If you tried to use a managed account, you’d likely find
it frustrating and unacceptable; but to a five-year-old, a managed
account is nirvana. You can adjust the settings using the Parental
Controls preference pane (see
Parental Controls
).- Sharing Only
Sharing Only accounts are designed to let people
connect to your machine from another computer to share files.
People assigned this type of account can’t log into your Mac via
the login screen; only remote connections are accepted.- Group
You can use Group accounts to create a collection of
multiple users. These types of accounts let you exercise
fine-grained control over privileges for shared documents.- Guest
If you want to let others use your Mac without the
ability to accidently delete precious files or install malicious
software, you can enable the Guest User. This creates an option on
the login screen to log in as, unsurprisingly, Guest. There’s no
password required, and you’re free to lock the account down using
Parental Controls. Guests can use your Mac as they wish while
they’re logged in, but the moment they log out, everything they’ve
done (documents they created, emails they’ve sent, etc.) gets
deleted. (Note that the Guest Account
isn’t
an option if you have FileVault activated; see
FileVault tab
.)
Now that you know the different types of accounts in
Mountain Lion, you’ll likely want to set up a few. Click →
→
System
Preferences
→
Users & Groups
(located in the System section). Before you can make any changes, you
have to click the lock icon at the bottom left of the preference pane
and then enter an administrator username and password. The extra level
of security is there because this preference pane lets you adjust the
level of access for other accounts, so you wouldn’t want an
unauthorized person making changes.
To add a new account, click the + button above the lock icon.
This opens a drop-down window where you can select the type of account
to create, enter the identifying info (full name, account name), and
set up a password. Mountain Lion assigns a default image as the new
user’s picture. To pick a different image, just click the default
image in the middle of the preference pane. You’ll be able to choose
from the icons included with Mountain Lion or snap a pic with your
Mac’s built-in iSight camera and then apply Photo Booth’s effects to
the image (click the “Apply an effect” button in the snapshot’s lower
right). Setting up an account is significantly more fun in Mountain
Lion than in previous versions of OS X.
To enable the Guest account, click Guest User in the
list of accounts, and then check the box marked “Allow guests to log
in to this computer.” To disable this account, simply uncheck that
same box; this will prevent guests from using your computer without a
password.
The Home folder is what makes your Mac seem like
your
Mac. For example, if you create a document and
save it in Documents, the document doesn’t show up in some centralized
documents folder for the entire system; it shows up in only the
Documents folder that lives inside your Home folder.
This pattern extends to other folders, too (Music, Movies,
Pictures, and so on). Each account you create gets its own Home folder
with a subset of folders inside it. This is where all your files and
personal preferences (like your selected desktop background) are stored.
All the home folders are stored in a folder called Users that’s found in
the top level of your drive.
There’s one folder inside the Users folder that doesn’t
correspond to any user: the Shared folder. You can use it to store
files and folders you need to share among users on the same
Mac.
You can access your Home folder by opening a Finder window and
then either clicking the house icon in the sidebar or choosing Go
→
Home (Shift-⌘-H). In every Home folder, you’ll
find the following subfolders:
- Desktop
This is where all the files sitting on your desktop are
stored. (There are a few other types of items that can appear on
the desktop—hard disks, CDs, DVDs, iPods, and servers—but you
won’t see them in this folder.) If you drag a document from this
folder to the Trash, it’ll disappear from your desktop.- Documents
This is where your Mac saves documents by default.
Using this folder isn’t mandatory, but it does offer a level of
convenience to have a central repository for all your documents.
You can add subfolders for even more organization: just open the
Documents folder and then choose File
→
New Folder (Shift-⌘-N).- Downloads
The Downloads folder serves double duty: it lives in your
Home folder and has a spot in your Dock. Anything you download
from the Web via a browser shows up here (unless you change the
default download location in your browser’s preferences, that is)
and
in your Dock in the
Downloads stack (the stack bounces when a new item finishes
downloading). If you click the Save button next to an attachment
in Mail, it’s also saved here. You can get your downloaded items
either by opening this folder or by going to the Downloads stack
in the Dock.- Movies
This folder is much like the Documents folder, only
it stores all the movies you make with iMovie and screencasts you
make with QuickTime Player. Just as with the Documents folder,
there’s no reason to store your movies here other than
convenience.- Music
The Music folder, not surprisingly, is where you can
store music files. It’s also where iTunes stores its music library
and any iTunes purchases you make, including iPhone/iPod apps and
videos.- Pictures
Toss all your
.jpg
,
.png
, and
.gif
files right in here. iPhoto also
uses this folder to store images you add to iPhoto.- Public
The Public folder is a repository for files you want
to share with other users who can log into your Mac. You can get
to another user’s Public folder by switching to the Finder and
choosing Go
→
Computer. You’ll see a
window showing all the drives and networks coupled to the Mac
you’re using. Selecting the startup drive will reveal a folder
called Users. Open that folder, and you’ll see all the other
users’ Home folders (they’re labeled with the respective users’
names, as shown in
Figure 3-1
). Open the
appropriate person’s folder, and you’ll see her Public folder. You
can grab any files stored in another user’s Public folder and use
them as you wish. Likewise, any files you toss into your Public
folder can be grabbed by anyone using the same Mac. (Note that,
while you can copy and modify any files you find in the Public
folder, you can’t actually change the contents of someone else’s
Public folder.) If you want to share files in this folder with
people on
other
computers, you’ll have to go
to the Sharing preference pane (see
Sharing
).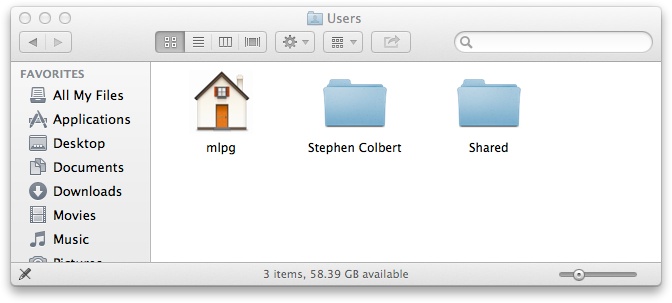
Figure 3-1. This Mac has a meager number of accounts, but even if you
have 100 accounts, they’ll all be stored in the Users
folderTo receive files from others who use the same Mac,
have them put the files in your Drop Box, a folder inside your
Public folder. Drop Box is a shared folder, but the sharing goes
only one way: people can put things into your Drop Box, but they
can’t take anything out. In fact, they can’t even see what’s in
this folder. To use Drop Box, enable File Sharing (see
Sharing
).- Sites
You’ll see this folder only if you’re using an Administrator
account. If you want your Mac to host a website (it’s certainly
capable), then this is where you put the files for the site.
You’ll need to do more than add an HTML file to this folder to get
your site working, though. See
Sharing
to start
sharing sites stored in this folder over your local
network.
Where’s My Library Folder?
Before Mac OS X Lion, there was one additional folder inside the
Home folder: Library. This is where your preferences and settings
(among other things) are stored. If you’re used to manually
controlling various aspects of your Library folder, you’ll likely miss
having easy access to it.
It turns out the Library folder isn’t really gone; it’s just
invisible. The easiest way to make it appear is to head to the Finder
and click the Go menu. With that menu open, press the Option key, and
the Library folder will magically appear as a menu item. Click it and
you can get back to manually messing about with your Library folder if
you’re so inclined (but be warned that tweaking items in the Library
folder can have unintended consequences).