OS X Mountain Lion Pocket Guide (10 page)
Read OS X Mountain Lion Pocket Guide Online
Authors: Chris Seibold
Tags: #COMPUTERS / Operating Systems / Macintosh

It doesn’t matter whether you’ve got a relatively tiny
SSD drive in a MacBook Air or 4 terabytes of hard disk space in a
fully tricked-out Mac Pro. Sooner or later, you’re going to want to
get rid of some files, either because your drive(s) are feeling
cramped or you just don’t want the data around anymore. That’s where
the Trash comes in.
The Trash is located on the right end of the Dock (or, if you’ve
moved the Dock to the left or right of your screen, it’s on the
bottom; see
Dock
to learn how to relocate the
Dock). To banish files from your Mac, select them and then drag them
from the Finder to the Trash (or press ⌘-Delete).
When the Trash has something in it (whether it’s one item or a
million), its icon changes from an empty mesh trash can to one stuffed
with paper. This lets you know that the files you’ve moved to the
Trash are still there, and that you can retrieve them (until you empty
the Trash).
To open the Trash and view its contents in a Finder window,
click its Dock icon. (You can view the items in the Trash with the
Finder, but you can’t actually open a file that’s in the Trash;
attempting to do so will result in an error message.) If you find
something in the Trash that shouldn’t be there, you can either drag it
out of the Trash or select it and then click File
→
Put Back to send it back to where it was
originally.
To
permanently
delete items in the Trash,
right-click or Control-click the Trash’s Dock icon and choose Empty
Trash, or open the Finder and either choose Finder
→
Empty Trash or press Shift-⌘-Delete.
Note that emptying the Trash doesn’t completely remove
all traces of the files you deleted. Those files can be recovered with
third-party drive-recovery utilities, at least until the disk space
they previously occupied has been written over with new data. To make
it harder for people to recover deleted data, in the Finder, choose
Finder
→
Secure Empty Trash.
This command overwrites the deleted files multiple
times.
If you work with a lot of sensitive files, you can tell the
Trash to
always
write over files you delete by
going to the Finder’s preferences (Finder
→
Preferences or ⌘-, while in the Finder) and,
on the Advanced tab, checking the box next to “Empty Trash securely.”
You probably want to leave the “Show warning before emptying the
Trash” option checked because, once you securely empty the Trash,
you’re not getting that data back.
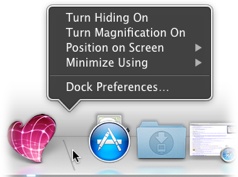
Here are a few quick and easy changes you can make
without invoking the Dock’s preference pane. If you right-click or
Control-click the divider between the two parts of the Dock (it’s a
subtle, dark-gray line), you’ll get the pop-up menu shown in
Figure 3-22
. This menu lets you
choose whether to automatically hide the Dock when you’re not using
it, change the magnification of icons in the Dock, change the Dock’s
location, change the animation OS X uses when you minimize windows,
and open the Dock’s preferences.

Figure 3-22. A quick way to make Dock adjustments
You can change the size of the Dock by dragging up or down over
the dashed divider to increase or decrease the Dock’s size,
respectively.
The Dock is the most obvious way to switch among
applications while they’re running, and Mission Control is probably the
niftiest way, but Mountain Lion gives you a third way to flip among open
apps. The aptly named Application Switcher (
Figure 3-23
) lets you switch
applications without taking your hands off the keyboard, a huge
timesaver if you change programs often. To use it, just hit
⌘-Tab.

Figure 3-23. Change apps and keep your fingers on the keyboard
Holding the ⌘ key while repeatedly hitting the Tab key cycles
through the open applications from left to right, and then wraps around
to the first application on the left again (use Shift-Tab instead to go
the opposite direction). Alternatively, you can press ⌘-Tab and then,
while still holding down ⌘, use the
←
and
→
keys to move between applications.
When the application you want to
switch to has a white border around it, release the keys and that
program will come to the front.
Most windows in OS X share some characteristics, shown in
Figure 3-24
. Knowing what
they do will help you be much more productive when using Mountain
Lion.

Figure 3-24. Mountain Lion’s standard window controls, which live on the title
bar
Here’s what these controls do:
The red button closes the window; if you point your
cursor at it, you’ll see an × or—if there are unsaved changes to the
current document—a dark-red dot inside it. The yellow button minimizes
a window; put your cursor over this dot, and you see a −. The green
button maximizes the window and displays a + when you point to
it.This is called the proxy icon. Drag it to create an
alias of the current file, or Option-drag it to copy the current
file.The name of the current file.
If the application you’re using can go full screen, you’ll see
these arrows. See the section
Full-Screen Applications
for details.
The following table lists some keyboard
shortcuts that are useful for working with windows.
Action | Key |
|---|---|
Open a new window | ⌘-N |
Close the active | ⌘-W |
Minimize the active | ⌘-M |
Minimize all windows for | Option-⌘-M |
Not every key combination is universal. For example, some
applications use ⌘-M for something other than minimizing the active
window.
If the green maximize button isn’t convenient for you, you
can manually resize windows in Mountain Lion. To pull this trick off,
put your cursor over the edge of a window and, when the cursor changes
to a double-headed arrow, simply drag to resize the window.
You’ll still see the occasional triple-slash resizing handle in
the lower-right corner of programs such as Microsoft Word. Don’t
worry, you can still resize such program windows by dragging any edge,
though the resize handle works, too.
Ever longed for a more immersive Web-browsing experience, or
wished that iCal would take over every pixel of screen space? Having
Safari fill your screen when you’re reading a longish Wikipedia entry is
great, and working in Preview using the full screen lets you see more of
the image you’re tweaking.
Not every application has a Full Screen mode, but it’s easy to
figure out which ones can suck up all your screen real estate: look for
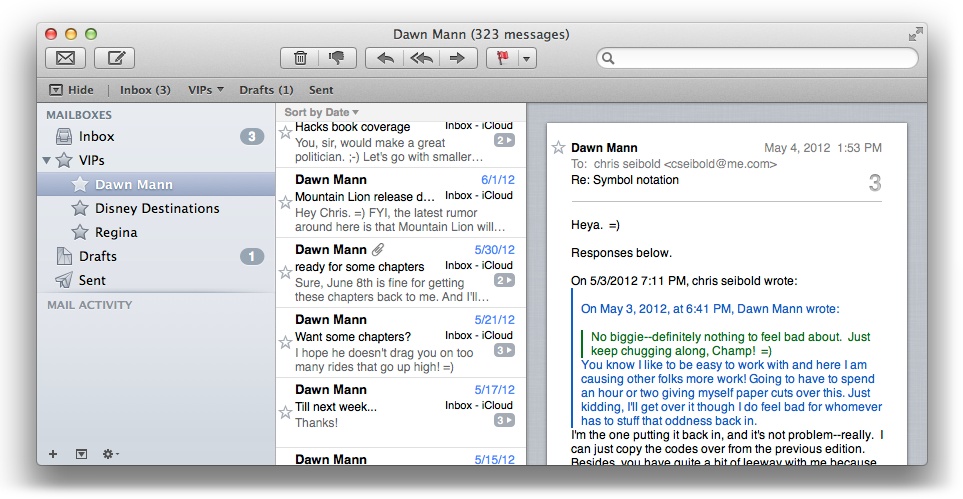
the double arrows in the upper-right corner of the program’s window (
Figure 3-25
).

Figure 3-25. Mail is one of many Full Screen–capable apps in Mountain
Lion
Once the application is in Full Screen mode, you can do whatever you
wish, free from the distractions of your desktop and other programs. When
you’re using that application, move your cursor to the top of the screen
and the menu bar will reappear. Click the blue arrows on the right end of
the menu bar to return the program to a regular window.
You may be thinking that full-screen applications
seem
like a great idea but that they might be a
little too much work when you need to use another program or get back to
the desktop. Don’t worry, there are plenty of easy ways to get out of a
full-screen application. You can switch programs with the ⌘-Tab key combo,
hit the Esc key to exit Full Screen mode, or invoke
Mission Control
.
If you use multiple monitors, you might be hoping for a world
where you can run one application in Full Screen mode while doing
something else on the other monitor. Sadly, you’re out of luck:
launching a full-screen application in Mountain Lion renders the second
monitor useless—unless your goal is to look at a static, gray-linen
screen.
As you already know, folders are where you keep files. But
OS X also includes two special kinds
of folders: Burn folders and Smart folders. This section explains ’em
all.
Your Mac comes preloaded with some folders that are appropriate
for commonly saved files (documents, pictures, music, and so on), but
you’ll also want to make your own folders. For example, you might make a
subfolder for spreadsheets within the Documents folder, or put a folder
on your desktop where you can toss files that end up scattered around
the desktop. To create a regular folder in the Finder, either choose
File
→
New Folder (Shift-⌘-N), or
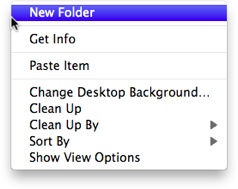
right-click or Control-click a blank spot in a folder and then choose
New Folder from the Context menu shown in
Figure 3-26
. You can also
right-click or Control-click the desktop and then choose New Folder to
add a folder there.

Figure 3-26. Creating a new folder via the Context menu
OS X names new folders “untitled folder,” and it iterates
this name if you create a series of folders without renaming them after
you create each one, so you end up with “untitled folder,” “untitled
folder 2,” “untitled folder 3,” and so on. To change a folder’s name,
click the folder once and then press Return or click the folder’s
current name. The area surrounding the name gets highlighted so you can
type a new one. When you’re done, hit Return to make the new name
stick.
Creating a Burn folder is the easiest way to get files or
folders from your Mac onto an optical disk (a CD or DVD). To do so, go
to the Finder and select File
→
New Burn
Folder; a new folder with a radiation symbol on it will appear in the
current folder. (If you’ve made filename extensions visible—see
Finder preferences
—you’ll notice that folder’s suffix is
.fpbf
.) Be sure to give this folder
a descriptive name like
discoinferno
. Then you can
start tossing any files you want burned onto a disk into that
folder.
The files aren’t actually being moved to the Burn folder;
Mountain Lion is just creating aliases that point to them; when the time
comes to burn the data, OS X will burn the original file(s). Since the
files are aliased, if you decide to get rid of the Burn folder without
burning the data, you can simply toss the folder into the Trash. The
original items will remain untouched.
Once you’re ready to burn the data, open the Burn folder and click
the Burn button in its upper-right corner. Insert a disk when prompted,
and Mountain Lion takes care of the rest.
There are Smart folders all over your Mac: in iTunes,
Mail, and lots of other places. Smart folders are actually Spotlight
search results, but you can browse them just like regular
folders.
To create your own Smart folders, head to the Finder and choose
File
→
New Smart Folder or press
Option-⌘-N. In the search box of the new window that appears, type in
text describing what you want to find, and Mountain Lion will fill the
folder with items that meet your criteria. As you type, Mountain Lion
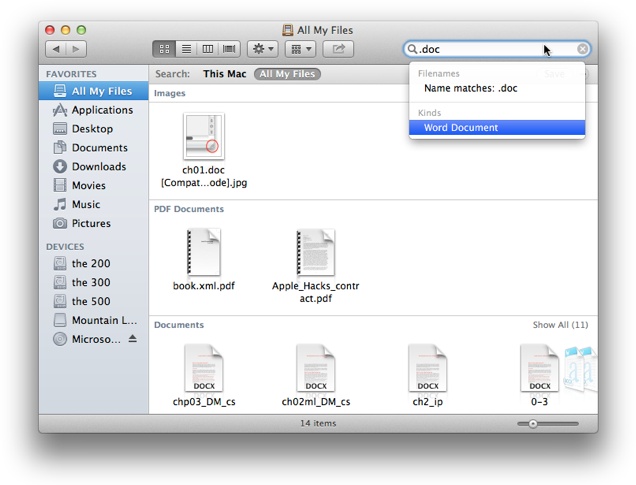
displays suggestions for refining your search. Say you want an easy way
to manage all your Word files. Start typing.docin the search box, and
Mountain Lion will make handy suggestions like the ones shown in
Figure 3-27
. Select “Word
Document” under Kinds and all your Word documents will appear in the
Smart folder.

Figure 3-27. OS X knows what you’re looking for!
If the results aren’t quite what you want, you can further
refine your search by clicking the gear icon in the window’s toolbar and
selecting Show Search Criteria. Doing so will let you refine your search
by adding more conditions for a match. (Love the search you created?
Click Save and the search will be available to you anytime you need
it.)
There are more great things about Smart folders. The results of
your search don’t change where anything is actually stored on your Mac,
but you can act as if all the files reside in the Smart folder. That
means that, even though the files in it could be scattered across a
hundred folders on your Mac, you can move, copy, and delete them just as
if they all resided in the Smart folder. (If you delete a file from a
Smart folder, you’ll also delete that file from your Mac.)
Don’t worry about your Smart folders slowing down your Mac or not
displaying changes immediately. Smart folders are constantly updated, so
when you add a new file that fits the Smart folder’s criteria, the file
shows up in the Smart folder right away.