OS X Mountain Lion Pocket Guide (3 page)
Read OS X Mountain Lion Pocket Guide Online
Authors: Chris Seibold
Tags: #COMPUTERS / Operating Systems / Macintosh

If you look for iChat in Mountain Lion, you won’t find it;
like the dodo, iChat is dead. But just because iChat is gone doesn’t
mean you have to stop chatting. The new Messages app retains all the
functionality of iChat and adds much more. In Messages, you can send
unlimited messages to anyone who uses an Apple device. And even better,
because everything’s instantly synced with iCloud, you can now go
straight from chatting using your
Mac to chatting using your iPhone without a break in the
conversation.
You can send texts from Messages, chat using your Jabber (or other
popular chat program) account, start a FaceTime conversation with your
buddy stationed at the South Pole, and so forth. It’s like Apple has
rolled all your communication needs into one convenient app.
Even better, like iMessage (the iOS app that inspired Messages),
when you’re contacting other Apple-gadget aficionados, you won’t run up
their cellphone bills: texts you send with Messages don’t count against
their cell providers’ text-message limits. (Those message limits still
apply for
non
-Apple cellphones and other devices,
however.)
According to Apple, the most popular portable gaming
device in the world is the iPod Touch. If you spend a lot of time gaming
on your iOS-based device, it stands to reason that you might want to
keep the games going when you’re using your Mac.
You’ve grown to love checking the leaderboards and playing
online friends with your iPad. With the Game Center, you can now play
those same friends when you’re using your Mac. As an added bonus, since
Game Center is included in Notifications, when you’re playing against
your cheating sister, say, you’ll be notified as soon as she makes yet
another cheater move so you can immediately take corrective action. See
Game Center
for more info.
Imagine you’ve got a video or Keynote presentation on your
Mac that you want to share with the world—or at least a group of people
too large to comfortably watch it on your Mac. With AirPlay Mirroring,
you can stream what’s on your screen to an Apple TV. Have a web page you
want to show the entire class? Turn on AirPlay Mirroring, and all your
students can see that page on the big screen. Miss your favorite show
last night? If it’s available online, you can broadcast it from your Mac
to your big-screen TV.
Using AirPlay Mirroring is easy: just open the Displays preference
pane (see
Displays
) and select Apple TV from the
drop-down menu (or the menu extra that’s enabled by default). The
hardest thing about AirPlay Mirroring is parting with $99 for the
required Apple TV.
You’ve been able to talk to your Mac and have it perform
actions for a decade. Now, Apple has raised the bar by giving your Mac
the ability to take dictation system-wide. That means that anything you
need to type you can instead
speak
to your attentively listening
Mac, and the machine will type if for you.
Dictation uses two things that might surprise you: your
location and your contacts. Your location is understandable (regional
accents and all), but contacts can seem positively creepy. Just what
is Apple after? Turns out Apple doesn’t care who your contacts are;
it’s interested in getting the names right when you use the dictation
software.
Apple’s version of dictation works a little differently than most
people expect. After you press the Fn (function) key twice, a little
microphone appears and you’re ready to start dictating. But the words
don’t appear on the screen as you speak. Instead, once you’re done
dictating, you click the Done button and the stuff you just said is sent
back to Apple’s servers and deciphered, then the passage pops up on your
Mac.
How well does it work? Here’s the “transcript” of the first
paragraph in this section:
“you talk to your form actions for a decade now apples raise the
bar in your Mac usually to take dictation system one that means
anything you need to type you can Cenesti to your listening machine
will type for”
Expect dictation to get better as time goes by.
That’s 10 nifty new features in Mountain Lion, but this list isn’t
comprehensive. There are a bunch of smaller improvements throughout OS X
in the various apps and system preferences; these changes are covered
throughout this book. To learn about changes to a specific app, for
example, flip to the section about that particular app.
The easiest way to start enjoying OS X Mountain Lion is to buy a new
Mac—the operating system is preinstalled, and you get a brand-new computer
to boot! If you’re one of the lucky ones getting a new Mac, you likely want
to learn how to get all your important data from your old machine to the new
one; see
Moving Data and Applications
for
details.
However, you don’t
have
to buy a new Mac to run
Mountain Lion, and since transferring your data is a little time consuming,
you might not want to. If your Mac meets Mountain Lion’s requirements
(explained next), you can simply upgrade your old Mac to Apple’s latest and
greatest. This chapter gives you the lowdown.
With every revision of OS X, Apple leaves some Macs behind,
and Mountain Lion is no exception. To install Mountain Lion, your Mac has
to possess a 64-bit Intel Core 2 Duo processor or better, be able to boot
into the OS X 64-bit kernel, and have an advanced
GPU (graphical processing unit). But those kinds of
requirements are hard to commit to memory—ask 100 Mac users what GPU
chipset their machine employs, and the vast majority of them will give you
a puzzled look (the people who
do
know the answer are
hard-core types and should be left alone).
So how do you find out whether your Mac is compatible with Mountain
Lion? The simplest way is to try to buy the software from the App Store.
If your Mac isn’t compatible, the App Store will tell you that the
software won’t run on that machine.
If you want to download the software once and install on multiple
machines, here’s a list of Macs that can run OS X Mountain Lion:
MacBook Pro 13-inch from mid-2009 or newer
MacBook Pro 15-inch from late 2007 or newer
MacBook Pro 17-inch from late 2007 or newer
MacBook Air from late 2008 or newer
Mac Mini from early 2009 or newer
iMac from mid-2007 or newer
Mac Pro from early 2008 or newer
Xserve from early 2009 or newer
You also need 2 GB of
RAM (which some otherwise compatible MacBooks and Mac Minis
might not have) and 5 GB of disk space. These are, of course,
minimum
requirements; you’ll be happier and your Mac
will run more smoothly if your computer has more RAM and disk space than
these requirements.
In addition to the hardware requirements, your Mac must be running
OS X 10.6.7 (Snow Leopard) or later. Why not, say, 10.6.3? Well, it’s
likely that you’ll be getting Mountain Lion from the Mac App Store, which
didn’t exist until 10.6.7 was released. If you’re running Snow Leopard,
just head to →
→
Software Update to
make sure you have the current version. If you’re running Leopard, you’ll
need to find a copy of Snow Leopard and install
that
before you worry about anything else.
Before deciding whether you actually want Mountain Lion, you
should do a little detective work. Like OS X Lion, Mountain Lion doesn’t
support PowerPC apps, so if you depend on one of those for day-to-day
work, you’ll likely want to avoid Mountain Lion or upgrade to new apps
before you install Mountain Lion. But how do you know which apps will and
won’t work?
Luckily, there’s a quick way to get at this information.
Head to →
→
About This Mac, and
then click More Info to display a two-column window. The left column
contains a long list of entries that reveal specific information when you
select them. Scroll down to the Software section, click Applications, and,
in the right column, you’ll see a list of all the apps you have installed.
The list is sortable, so if you click Kind (as shown in
Figure 2-1
), the list will
organize the applications into five categories: Intel, Universal, PowerPC,
Classic, and (if your Mac just doesn’t know what kind it is) blank. If the
application you need says “PowerPC” or “Classic” next to it, then it won’t
run in Mountain Lion, so check to see if there’s a new version available
before you update your operating system. If you don’t need any of those
clunky PowerPC apps or if you’re able to upgrade to newer versions of
them, you’re ready for Mountain Lion.
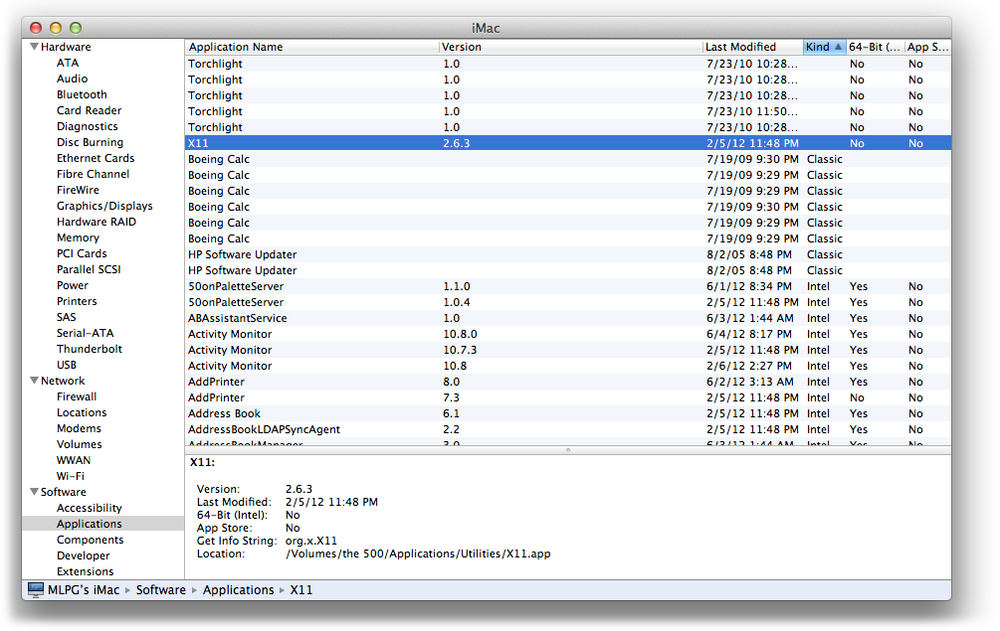
Figure 2-1. Know what will run before you upgrade
If you’ve installed Lion, installing Mountain Lion will be
familiar, as the process is almost
exactly the same. If you’re unfamiliar with the process, this section
tells you what to expect.-
This is the first edition of OS X that’s App Store
exclusive. With Lion, you had an option to pay for a thumb drive with
the installer on it, but you can get Mountain Lion only from the App
Store. So what if you have a slow Internet connection or bandwidth
limits? Then you can visit your friendly neighborhood Apple Store and
download Mountain Lion while you browse all the cool Apple
hardware.
Regardless of whether you download the installer in the comfort of
your own home or use someone else’s bandwidth, the process of installing
Mountain Lion is dead simple. First, make sure you’re running the latest
version of Lion or Snow Leopard (if not, head to →
→
Software Update).
Then, open the App Store (click its icon in your Dock), purchase Mountain
Lion, and then wait for it to download.
Be warned: the Mountain Lion installer is 4.35 GB. With a 5 MBps
Internet connection (about the average speed in the U.S.), that will
take roughly two hours to download. So if you have a pokey Internet
connection or a bandwidth cap, you probably won’t want to download a
copy for each computer you have. In that case, you’ll find the Mountain
Lion installer in your Applications folder. Once you make a copy, you
can transfer it to any other authorized Mac you want Mountain Lion on
and run it without the hassle of a new download. (You’ll still have to
be connected to the Internet when you install Mountain Lion, but you
won’t have to download 4.35 GB of data again.)
Once
the download is complete, the Mountain Lion installer should launch
automatically. (If it doesn’t, you’ll likely find an alias for it in your
Dock and the original application in your Applications folder.) All you
have to do to get things moving is click the Continue button (
Figure 2-2
).
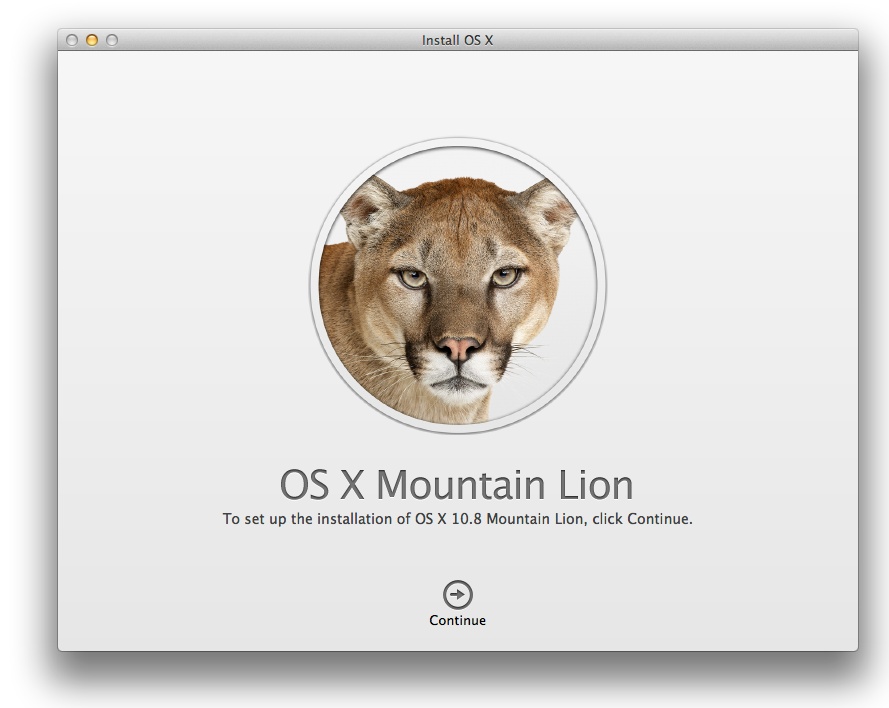
Figure 2-2. You have one option: Continue.
Once you take the plunge, you’ll be presented with a page
requiring you to agree to the software license. To install Mountain Lion,
you’ll have to click Agree twice: once in the Install OS X window and once
on a drop-down menu that asks if you
really
meant
that first click. After that, you’ll see a message telling you where
Mountain Lion will be installed. If you have multiple disks and don’t like
the choice the installer made, then click Show All Disks and you’ll be
able to pick the destination (
Figure 2-3
).
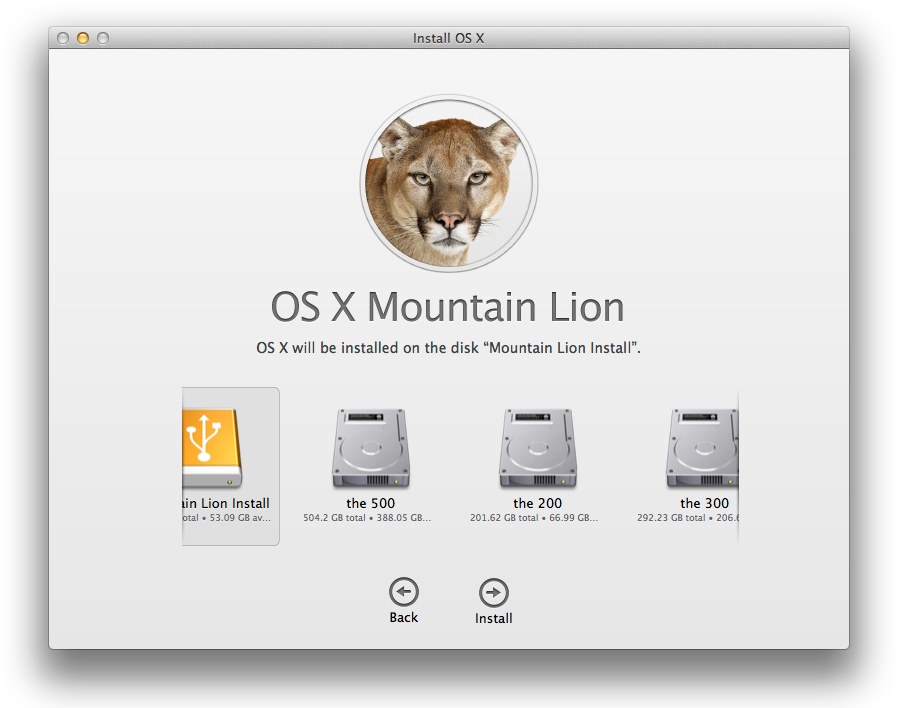
Figure 2-3. You get to choose the destination
Once you choose, click Install and then enter your administrator
password to continue. Mountain Lion will show you a status bar indicating
the progress of the install. A few minutes later, you’ll be notified that
you can either restart your Mac to proceed with the install or wait 30
seconds and let Mountain Lion restart for you. Instead of a regular
restart, your machine will shut down, reboot, and then proceed with the
installation process, which could take a while depending on how fast your
Mac is.
Mountain Lion can be installed on any drive (internal or
external) that’s formatted with Apple’s Mac OS Extended (
Journaled) file system. You can run Disk Utility from the
installer’s Utilities menu to format or inspect the drives on your
system.
After Mountain Lion is done installing, your Mac will
restart
again
using the new operating system, and
you’ll be ready to use your new OS. You might see a message that says
your email needs to be upgraded to work with the new version of Mail.
Other than that, you can get back to using your Mac just like you did
before you installed Mountain Lion (with some cool new features, of
course).
If you installed Mountain Lion on a blank drive or a
partition, your Mac will need some more information to get you up and
running. You’ll have to select your country’s keyboard layout and time
zone (Mountain Lion can do this for you; you’ll see a checkbox labeled
“Set time zone automatically using current location”). Then you’ll be
offered the opportunity to transfer data from another Mac (the next
section explains the process). If you choose not to, click Continue. If
you
do
want to migrate your data, see
Moving Data and Applications
to learn
how. Next, Mountain Lion will try to connect to the Internet. It’ll
automatically choose a network option, but if you’re not happy with its
choice, click the Different Network Setup button in the lower left of
the window and choose your preferred network. Once you’re hooked up to
the network, you’ll be asked for your Apple ID. You can skip this step,
but if you have an iCloud account, using that as your Apple
ID (by typing your ID and password into the provided box)
will let your Mac use the associated services without your having to do
any more configuring.
You might be reluctant to sign up for yet
another
online account. You probably don’t need
another email account, and you might wonder about the utility of
iCloud since you don’t see a place for it in your computing life. Now
is a good time to rethink that latter position. When Apple first
released MobileMe (the precursor to iCloud) the service handled Mail,
Contacts, and Safari bookmarks. In Mountain Lion, iCloud handles all
the stuff MobileMe handled
and
syncs photos and documents, and
lets you access your Mac remotely. In other words, iCloud is becoming
so central to the OS X experience that continued resistance is
futile.
After you enter (or create) your Apple ID, you’ll be
offered the opportunity to register your copy of Mountain Lion. The
information you type into the registration form will be used not just to
garner you a spot in Apple’s database, but also to generate an address
card for you in Address Book and to set up your email address for use
with Mail.
Mountain Lion will then ask you for some info on how and
where you intend to use your Mac. Once the data collection is out of the
way, you’ll be prompted to set up a user account. Mountain Lion will
generate a full name and account name for you; if you don’t want to use
its suggestions, you can type in your own names. You’ll also have to
enter a password and, if you wish, a hint in case you forget the
password.
With your account created, Mountain Lion will give you the
chance to snap a picture for the account with a webcam, choose a stock
image, or grab one from your picture library. Once that’s done, Mountain
Lion will configure your Mac using your iCloud information (if you use
the service). If you’re not an iCloud subscriber, don’t worry—your Mac
is ready to go. The things that iCloud configures automatically (like
Mail) just won’t be set up for you.
Not everyone will install Mountain Lion from the Mac App
Store; some folks will have a new Mac with Mountain Lion preinstalled.
If you’re one of these lucky ones, you aren’t interested in how to
install Mountain Lion. But if you’re upgrading from an older Mac or from
a Windows-based PC (getting data from a Windows PC onto your Mac is a
new, very nifty feature of Mountain Lion), you’ll certainly be
interested in getting that mountain of data from your old machine onto
your new computer. Apple has an app for that: Migration Assistant, which
can transfer files, settings, and preferences from your old computer to
your new one. After running Migration Assistant, your new Mac will seem
a lot like your old Mac. If you’re transferring data from a PC, your new
Mac won’t seem like your old PC, but it
will
have
the PC’s data on it.
You might not want to migrate your data from an old
computer right away: playing with a factory-fresh system is fun, and
migrating data isn’t a once-in-a-lifetime opportunity—you can do it
whenever is convenient. So toy with your new Mac for a while, and
then
migrate your data using Migration
Assistant.
When you run Migration Assistant, it can transfer the following
things to your new machine if you’re moving data from a Mac:
- Users
All your user accounts will be moved to your new
Mac. Accounts retain the same privileges (or restrictions) that
they had before. If you try to move over a user that already
exists on your Mac, you’ll have the option to either change the
account’s name or replace the existing user (as long as you aren’t
logged in as that user; if you want to import settings into your
account, first use System Preferences
→
Accounts to create a new user, log in as
that user, and then run Migration Assistant again). See
User Accounts
for more information.- Applications
All the applications in the Applications folder are
transferred, so you won’t have to reinstall them, and most should
retain all their settings (including any registration or
activation needed to run them).- Settings
Have a bunch of saved networks and passwords in your Network
Preferences? They all come along for the ride. So, if you’re used
to automatically jumping on the local WiFi hotspot, you’ll get on
without any extra effort. If your screensaver requires a password
to get back to the desktop, it still will. There are three
suboptions under Settings: Time Zone, Machine (computer settings
other than network or time zone), and Network; you get to pick and
choose the ones you want to move to your new machine.- Other files and folders
If your Mac has files strewn everywhere, even if they aren’t
where OS X expects them to be (the Documents directory), they’ll
be transferred.
If you stashed any files in the System folder, they
won’t
get transferred. But you shouldn’t ever
stash anything in the System folder, as it can get modified at any
time (by security updates and the like).
Migration Assistant
doesn’t
move the following items:
- The System folder
You’re installing a new system, so you don’t need the old
System folder to come along.- Apple applications and utilities
Migration Assistant assumes that every Apple application
(like FaceTime and iCal) on your Mountain Lion machine is newer or
the same version as the corresponding item on the Mac you’re
transferring data from, so those applications won’t get moved.
Instead, Migration Assistant will keep the preferences the same
and let you use the newer version. This is a problem only if you
hate the latest version of iMovie (for example). If you want to
use the older version instead, you’ll have to manually move it
over.
If you’re transferring data from a PC, Migration Assistant will
transfer the following:
IMAP and POP accounts from Outlook and Outlook Express
Contacts from Outlook, Outlook Express, and Contact home
directory (a folder in Windows for your contacts)Calendars from Outlook
Your iTunes library
Home Directory content (Music, Pictures, Desktop, Documents,
and Downloads)Localization settings, custom desktop pictures, and user
settings
How you begin the process depends on what type of machine
you’re migrating from. If you’re moving info from a PC, you’ll need to
point a browser to
http://support.apple.com/kb/DL1415
. From there, you can
download a program to install on your PC that makes the process
painless.
If you’re using a Mac, Migration Assistant was installed when you
installed Mountain Lion. As you’d expect, you need to be logged in as an
administrative user (or be able to supply the username and password of
an administrative user) to run Migration Assistant. Also, all other
applications have to be closed. So save all your work and quit
everything before you launch Migration Assistant. Then go to
Applications
→
Utilities
→
Migration Assistant to get started.
If you haven’t migrated data since the MacBook Air came
out, the process has changed a little bit. In the days before the Air,
Migration Assistant used FireWire Target Disk Mode (see the
Note
): you’d start the computer you wanted to
transfer data from in this mode, plug it into the destination Mac, and
then Migration Assistant took care of the rest. The good news is that
this method still works if you have two computers with FireWire; the
better news is that even if you don’t have two Macs with FireWire, you
can still use Migration Assistant. In fact, Migration Assistant offers
two ways to get your old data on your new Mac (shown in
Figure 2-4
):
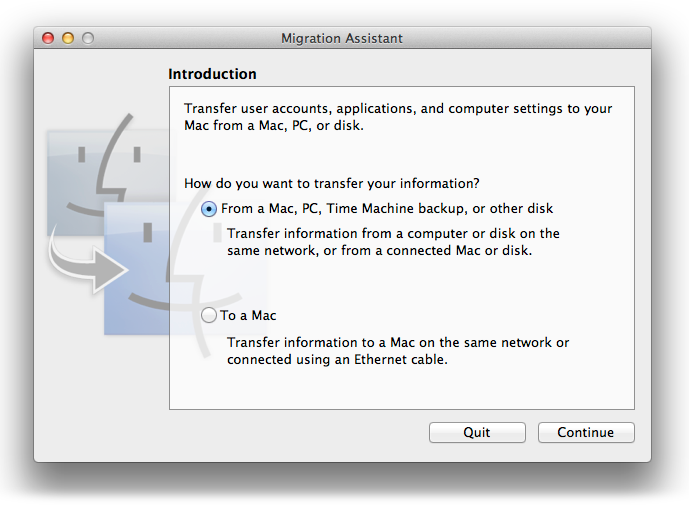
Figure 2-4. Starting the migration process
- From another Mac, PC, Time Machine backup, or other
disk Choosing this option allows you to transfer data from a Mac
or PC that’s either wired to or on the same network (wired or
wireless) as your new Mountain Lion-powered Mac.- To a Mac
This option is the counterpart of the “From another Mac or
PC” option—you select this option on your source machine and the
other one on your destination machine.
If you choose the first option, you’ll get two
more
options to choose between:
- From a Mac or PC
This is the option you’ll use if you want to transfer data,
well, from another Mac or PC. When you select this option and then
click the Continue button, the next screen will warn you that all
your applications must be closed. Save anything you’ve been
working on and click Continue, and your Mac will start looking for
other computers to transfer data from. Unless you’ve selected the
“To another Mac” option (discussed above) on the computer you want
to transfer data from, it won’t find any. No problem: Migration
Assistant will keep looking while you fire up Migration Assistant
on the other machine and select “To another Mac” on that computer.
Once both computers are ready to go, you’ll see something like
Figure 2-5
.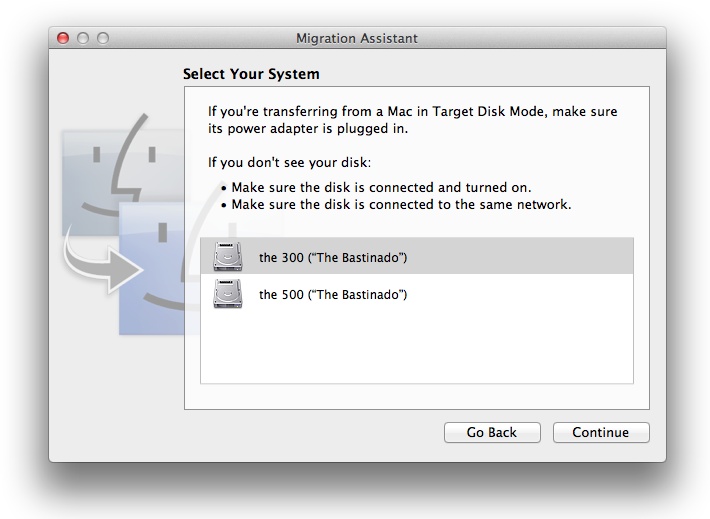
Figure 2-5. Transferring data from a disk
Click Continue and you’ll see a passcode. You don’t have to
write it down or remember it; you just need to make sure it’s the
same as the one displayed on the machine you are transferring data
from. (The passcode won’t show up on the data-donating machine
until the exchange has been initiated by the Mac you’re moving the
data
to
.) Verify that the numbers match, and
then click Continue. Next, you get a chance to decide what you
want to migrate (see
Fine-Tuning Data Migration
). Click Continue, and your
data will be transferred.- From a Time Machine backup or other disk
If you choose this option, your new Mac will scan all
attached drives and then present you with a list of drives you can
migrate data from. Click the one you wish to use, and then click
Continue. By default, Mountain Lion will transfer all your
relevant info, but you can change that behavior (see
Fine-Tuning Data Migration
).
If both Macs have FireWire, choose “From a Time Machine backup
or other disk” and then restart the Mac you want to get data
from
in FireWire Target Disk Mode. You do this by
holding down the T key while the computer boots until you see a
FireWire symbol dancing on the screen.